When Windows 95 appeared almost 30 years ago, it made a big thing about the Start button and the menu that went behind it. The Start button on the screen – and on the keyboards of newer PCs – was the way to quickly get to everything.
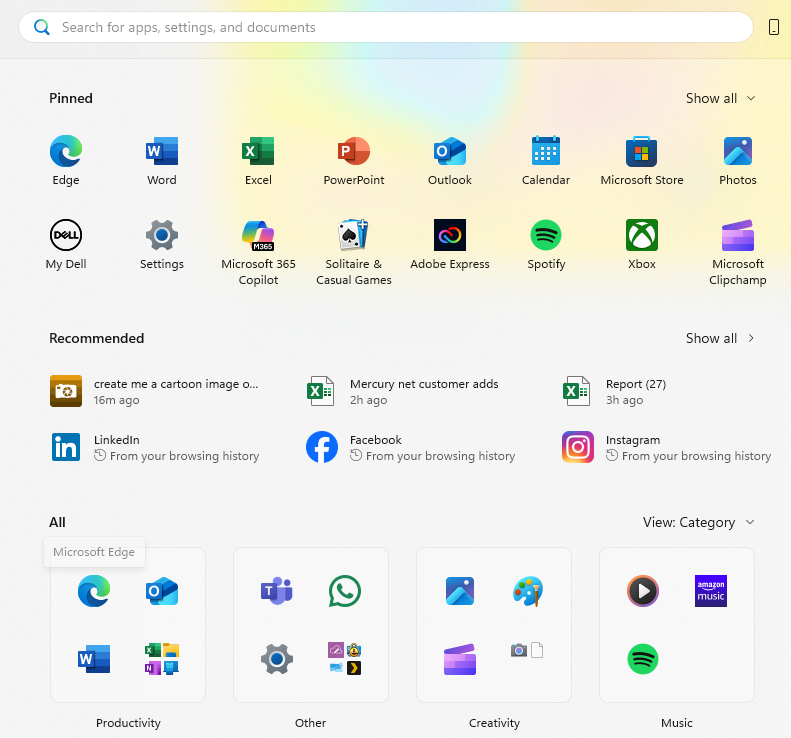
Fast forward to today and the Start menu is visually more arresting and comprised of different categories of icons. At the top are Pinned applications (which may or may not be things you’ve pinned there; Microsoft or other app providers might have decided you want them front and centre). Then there are apps or documents “Recommended” due to your usage habits.
Microsoft is still tweaking with what to put on the Start menu: there’s a new update coming which includes categories of apps, too.
The problem with any arrangement of icons is that when a user goes to access something, they need to figure out where the icon is; frequently used apps might get pinned to the Taskbar for easy startup via muscle memory, so the actual Start menu is infrequently accessed for day-to-day apps. Also, many people live in the browser so they might never need an app to be invoked through an icon.
Start to Run
A more consistent way for launching an app might be to press the Start button then begin typing the app’s name. If you don’t have Excel pinned to your Taskbar, for example, it could be quicker to just press Start and typing excel <enter> to launch, than pressing Start and fishing about with your mouse to find wherever the icon is.
The same UI promises to help find documents you’ve used too, so if you know what you want to open with Excel, you could try that instead (eg timesheet…).
Hardcore Runners
For true keyboard warriors, there’s no better shortcut than WindowsKey+R, which launches the simple Run dialog. Generally speaking, you need to know the name of the program’s executable if you want to fire it up from here – eg. Entering “word” won’t get you anywhere, since Microsoft Word is actually winword.exe.
It does keep a useful Most Recently Used list of commands and some Autocomplete logic, though, and entering the name of a folder will open that in Explorer.
There are lots of built-in variables that can jump to places in Windows:
%userprofile% is your own home directory
%onedrive% jumps to wherever your main OneDrive folder is.
%windir% takes you to Windows own director, and can be combined with others like %windir%\system32
To see the full list, drop to a command line and enter set. Everything in the list could potentially be used if you strap a % in front and after it.
Ultra Running
If the Win+R command is too namby-pamby for you and you prefer not to take your hands off the keyboard, there’s another super tool that’s part of the PowerToys package – PowerToys Run. Arguably not really a “Run” or even a “search” function, it provides both with a slew of additional commands and features that can jump straight to different parts of Windows.
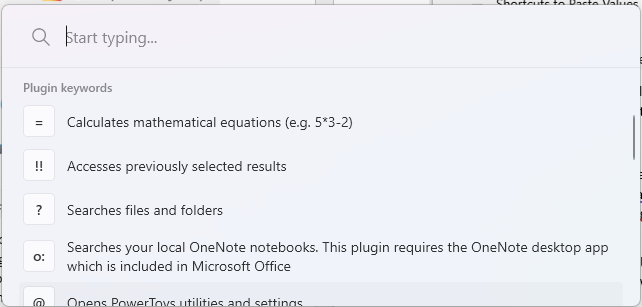
Press the shortcut key sequence to launch it (as long as PowerToys is running in the background), and you’ll get a floating window right in the middle of the screen. There are quite a few “operators” which direct it to search, from using the keyboard to loop through the current windows, to searching OneNote.
Fortunately, PowerToys Run can have its invocation re-assigned to, say, WindowsKey+SPACE.
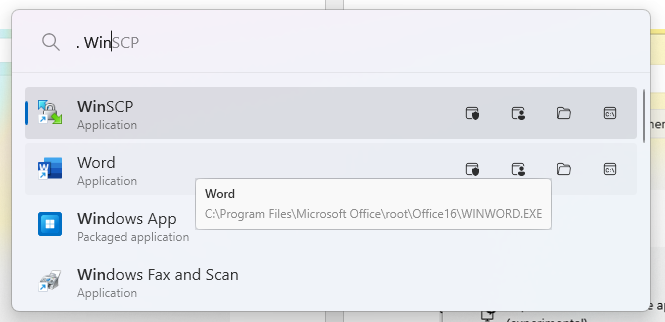
Start a command with “.” and type the name of an app, and you’ll get a suggested list – not just from the app’s name but from its executable, so you could quickly see what to enter into WindowsKey+R in future, for the sake of saving a few seconds.
Every email or productivity application which deals with contact info has some attempt at being able to sync, export or import contacts from elsewhere. “Attempt” being the operative word as you’re often left with a flat text file (or CSV) which might need some form of manipulation before it can be imported. Using Export & Import could be the simplest way of copying contacts from one account to another, or even cleaning up duplicates by exporting / fixing / deleting from the source / re-importing.
… while Outlook (classic) has a UI which hasn’t changed much in the last 20 years:
Export from company address book
What if you want to batch-export a load of contacts for colleagues from your company’s address book? Let’s say you’re a group going away on a conference and you want everyone’s number so you can keep in touch? If you’re using Exchange Server on-premises or Microsoft 365 for email, then there’s a “default Global Address List” which has everyone in it. It might also have phone numbers, job title, department and other info, besides just a name and an email address.
Using New Outlook or Outlook Web app, you can only really operate on a single entry at a time, so it could be a drawn-out exercise to pick everyone you want and copy them to your own contacts.
It’s pretty easy using classic Outlook to add multiple contacts from the GAL. Open the Address Book (another piece of UI which is largely unchanged since the original Exchange client released over 30 years ago); SHIFT+CTRL+B is the fastest way to fire it up.
Hold the CTRL key down while you click on multiple names, then right-click on one of the selected ones and choose Add to Contacts. So far, so good. But what if you wanted to add dozens of contacts from Aaron to Zebedee, and you had thousands of entries in the GAL? It could be a bit of a faff to scroll, multi-select then Add to Contacts. If only there was another way.
Exporting the whole Offline Address Book
Speaking of faff, here is one technique which will export everything to a CSV file and then let you filter, sort and ultimately export just the stuff you want. You might be able to do other things like take a snapshot at quarterly intervals, then use Excel to compare the CSVs and see who has joined, left or moved department, changed job titles and so on. Quite Interesting, no?
The source of this goldmine is the Offline Address Book which Outlook (classic) keeps on every PC that’s connected to an Exchange/M365 mailbox, so the user can still see the address list when they’re offline. Now this technique isn’t necessarily for the faint hearted, but at least you only need to do the bulk of it once and then run a simple script whenever you want to extract the data from the latest OAB. It’s not exactly rocket science.
The OAB is held in a bunch of files on your PC’s disk; the format is uncompressed so if you’re foolish enough to open in, say, Notepad, you’ll recognize some text but there’s a lot of other stuff in there. Fortunately, some enterprising techies have pulled together a script that quickly rips through an OAB and delivers a neat CSV of users, and another of groups or mailing lists.
Step One – Install Python
OK, this would send most people running for the hills, but on a Windows PC it’s reasonably straightforward (and for the purposes of the rest of this example, we’re assuming you’re running Windows – if you’re a Mac or Linux user then you’ll need to figure it out on your own). As said, this is a one-off activity, to install both the Python scripting language, and the oab script that we’re going to run later.
Once the install has finished, we need to use a package manager called pip (no, not him) to find and install the oab script.
Start a command prompt by pressing Start and entering cmd,then in the command window, simply enter:
pip install oab
You’ll see a bunch of semi-scary looking warnings; none are really important other than one which is likely saying:
WARNING: the script <name> is installed in ‘<long directory name>’ which is not on PATH.
It will be easier to run these scripts if you add that folder to PATH. Carefully select all the text of the long directory name between the ‘ ’ marks, and right-clickon it. This will copy that text to the clipboard.
Now enter, in the command prompt:
Set PATH=%PATH%;<right-click to paste the text copied>
eg.
This will mean in future, you can run the “oab” script from anywhere. Test that it works by just entering oab in the command window, and you should get a list of all the available options to run that command.
Step Two – Find your Offline Address Book files
Once you have Python and the script installed, you’ll only need to run steps two and three if you want to subsequently go back and re-extract data from the latest Offline Address Book.
The Offline Address Book (OAB) is built on the Exchange Server or M365 service, usually every day. Outlook (classic) can download on demand, or it tends to pick the latest files up when it feels like it. You probably want to force it, by going into Send/Receive and choosing the option Download Address Book. Keep an eye on the status text in the bottom right of Outlook to see if it’s still downloading stuff, and when it looks like it has finished then proceed.
Now, the trick is to find not only the most recent OAB files, but the ones which correspond to the account you’re interested in; if you have Outlook set up (as in the case above) to connect to several M365 accounts, you may have to try a few times to find the right one – but if you’re in a megacorporation with 500,000 entries and the others are your M365 family subscription etc, then just look for the biggest file. Of all the different files that comprise the OAB, the one we want is udetails.oab.
The OAB files are stored in a deeply buried location which can quickly be found by pressing the Start button or Windows Key, and entering:
You’ll end up with one or more folders with a GUID for a name; open each one in turn and look for a file called udetails.oab in the most recent folder(s).
Copy that file – assuming it has a recent date/time and looks sufficiently large (a 1,000 user company is going to be in the 1MB-2MB size, probably; Microsoft or Amazon will be more like 1GB) – to somewhere that’s easily accessible; why not try c:\users\<yourprofile>. You can get to that location quickly by pressing Start again and entering
%userprofile%
To prevent getting in the way of all the other stuff that’s in your user profile, you might want to create a folder (let’s call it oab) and drop the udetails.oab file in there for later perusal.
Step Three – Extraction
Now we have the latest OAB data file, it’s a simple matter of pointing the script at it.
Start by dropping to a command prompt (press Start and enter cmd) then changing directory to wherever you put the file; if you dropped it into %userprofile% then the command prompt will probably start there. If you put it in a subfolder, or somewhere else, then you’ll need to use cd to change directory (and possibly dir to check it’s there):
Now, from the command prompt, enter the following command to invoke the script to do the work (it is case sensitive so take care):
oab -C -o oab udetails.oab
If your OAB file is 100MBs in size, this might take a few minutes, but if more modest it’ll be a snap:
Now open the oab.users.csv file in Excel, select the whole thing, select Format as Table from the toolbar, tell it that your data has headers, and you should be easily able to filter out the rows you want to keep, delete the rest, then import them back into Outlook as personal contacts. Or do whatever else you have in mind.
As described earlier, to repeat the process in future, just update the OAB, grab the latest udetails.oab file again and re-run the script as per steps 2 and 3. Whatever you do with the resulting files, just make sure you do it responsibly.
Following last week’s vaguely Viz-themed missive on Tabs, we’ll expand a bit on the organization of browser tabs.
Edging ahead
Microsoft decided to sunset the ageing Internet Explorer browser with a new one for Windows 10, built on more modern core technologies and codenamed “Project Spartan” (when naming things after Halo characters was all the rage). This new “Edge” browser had some very nice functionality ideas, and the hope was that it would usher in a new era of performance, stability and security, at least compared to IE. In truth, it was slow, resource intensive and a bit flaky. Not all websites worked with it either, since developers would test their sites with browser versions which people actually used already.
One of those spangly new features that was part of the pre-Chromium Edge was the ability to “set aside” tabs; a step up from adding that site to Favo(u)rites, where you’d see a thumbnail of the tab when viewing the ones you’d decided to come back to later. This still sits, 7 years later, with a variety of other pretty neat features (like annotations) which have yet to make it across to the new Chromium version, or at least not to the same fidelity.
The nearest Edge/Chromium has to this tab set-aside feature is Collections.
You may see the icon of a Plus sign on your browser toolbar; if not, delve into Settings or possibly even look under More tools to either access it or pin it to the toolbar by right-clicking on the menu option.
Collections let you group sites/tabs together by topic, add notes to individual tiles or the whole collection, and they sync across multiple PCs using your Microsoft Account or work/school account (aka Entra ID). They even sync to the mobile versions of Edge for iOS and Android, if you’re committed enough to be using that too.
As well as providing a nice way of grouping sites and giving you pinned notes to serve as a personal aide-mémoire, Collections lets you quickly open the tabs in one action, so if you like to keep together several property searches, financial reports, product research pages etc, then it’s easy. You can share the tabs (including your notes) by copying them all to the clipboard as text and links, ready for sending on.
Working together
So far, we have Tab Groups that can be named and more-or-less persisted; there’s Collections which does much the same thing but with a bit more organisation. Collections is specific to Edge, whereas Tab Groups kind-of comes with the Chromium package so is common with other browsers too.
Now, the latest Edge-specific way of grouping tabs is Workspaces.
The idea here is to group tabs that you’re using or working with, and share them with other people – again, using Microsoft Account or work/school ID, so they can collaborate too. Like Collections, Workspaces will sync across different PCs using the same login, but they are not yet supported on mobile versions of Edge.
In practice, when you click a Workspace to open it up, a new browser window will appear with all the tabs open. Any changes you make – adding new tabs, moving to a different part of the site, closing a tab altogether – will be saved and reflected to everyone else also using the Workspace.
You do need to be mindful when using Workspaces that everything is shared, so don’t go opening tabs in that window which you don’t want other people to see. Also, when finished, close the whole Workspace window rather than closing each tab, otherwise you’ll remove the tabs for everyone else too. It’s worth having a play to see how useful this might be in sharing stuff between your family or your co-workers.
This week we’re talking about Tabs, as in browser tabs, rather than any other kind.
Most people are familiar with the idea of having multiple tabs open in their browser – how many could be a sign of a tidy mind or otherwise(tl;dr – most people have 1-3 windows open with 5-10 tabs in each, so typically anything up to 30 open at once) – and any modern browser has added a load of functionality to make it easier to manage lots of tabs.
Having many open tabs does have an impact on the performance of your computer, as there’s additional stuff for the browser to manage, though Edge has a “Sleeping Tabs” feature (Chrome’s version is “Inactive Tabs”), which puts them into a kind of stasis if not used for a while. Look in the Edge Task Manager if you want to see just how much memory and CPU each tab is taking up…
One handy tip for Edge and/or Chrome is that you can search open (and recently closed) tabs – press CTRL+SHIFT+A and you can jump to or reopen a tab easily.
Arrangements
One of the simplest and most effective things you can do to deal with many tabs is to display them vertically, especially if you a nice big, wide screen. The vertical tabs pane can be pinned so you can see the page title (and can be resized by dragging the edge right or left), or you can let it collapse back and just see the icons for each site. Hover over any of them and the whole list will reappear.
Enable vertical tabs from the settings or by clicking on the Tab Actions menu on the top left of the Edge window (if you’re in horizontal tab mode). The same menu icon moves down a little, to the very top of the vertical tabs list when that view is enabled.
It might help to organise your tabs if you put them into groups, that can be quickly expanded and collapsed or moved around; select whichever ones you want by holding the CTRL key down while clicking on them, and then right-click to add them to a new group. Or drag and drop the tabs into an existing group.
Edge has a neat “Organis|ze tabs” feature which will suggest how to group open tabs together – it’s accessed from the Tab actions menu.
Run the organise tabs option and it will suggest groupings for you based on the titles of each open tab. Click on the pencil icon to the right of each to change its colour and name, and after applying the grouping you can move things around as you like.
Grouping tabs makes it easier to close them all at once, or to move them between browser windows in one block.
Microsoft has had a few goes at building functionality which lets you persist groups of tabs better, arranged into Collections or Workspaces: that’s fodder for another tip.
When you’re in a meeting or even a phone call, do you write everything down? Whether you listen attentively and then record a summary of events later (mentally or in other form), or you furiously annotate what is happening in real time, it’s a matter of preference which one works.
Some say the act of writing notes help cement things in your memory, like doing revision at school where you’d write a summary of what you were supposed to learn. Or is note taking a mental distraction where you concentrate on the notes more than the nuance of what is happening in the meeting? Or maybe just live in the presence, wing it, and try to remember what occurred later.
Linear people like writing a list of bullets, grabbing key points, comments or decisions as things flow. Other, more visual types might prefer a mind map(or are they just doodling?) The Cornell method prescribes a way of taking notes during the meeting, then revisiting them to take cues and action items, with a summary for later recap. There are many online guides explaining different approaches – in truth, you’ll probably need to try them and see which works best for you.
Whichever one you land on, it’s worth making sure you actually read the notes back – or like some computer programming languages, you’ll end up with write-only notes: they might have made sense at the time, but even their author could look back later and have no idea what they mean.
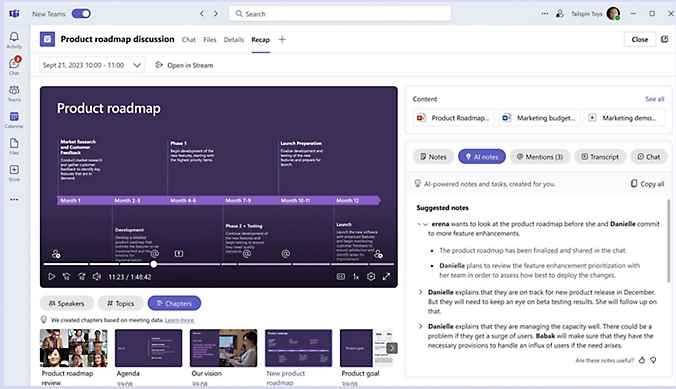
If you’re prepared to pay money then there are many options for having an automatic note taker in your meeting; Microsoft pitches both Teams Premium and M365 Copilot as ways of making recordings or transcriptions of Teams meetings, and looking for topics, actions etc.
The idea is that you can go back into a meeting after the event and see a summary of what happened, with the ability to jump back to a specific point in the recording or transcription (so you can check the note-taker got the gist correctly). You’ll get a list of identified actions and who they’re assigned to.
There are pros and cons to Teams’ approach, though – the recording process is non-intrusive and the analytics takes place in the background, and all the data about the meeting is stored in the M365 tenant of the host.
It’s the organiser of the meeting, however, who normally gets to decide if it’s recorded or transcribed, and only (licensed) users within their organisation will get to see the summary. So, if you’re joining a customer meeting which they arranged, you get no auto-notetaking even if you have a Copilot license on your own tenant. If they share the transcript or recording with you, then you could feed it into Copilot (see Kat Beedim from CPS’s excellent process, repurposed in #47: Using Copilot for (consistent) meeting notes) but that won’t have the same fidelity as a full recording.
Un-Fathomable
Another approach besides having Teams or Zoom make the summary, is to use a 3rd party agent which will do it for you. The market leader is probably Fathom, though there are plenty of other upstart alternatives.
Fathom works by being external to whatever the meeting platform is; you invite Fathom’s “notetaker” to your meeting and it shows up as an additional attendee. This means you may be able to join “your” Fathom to an external Zoom, Teams etc meeting, if the organiser allows attendees to bring additional invitees.
In a similar vein to Teams Premium, it lets you revisit your meeting with audio/video summary linked to extracted notes. You can also share meetings with colleagues who were not present, so they can review actions from events they missed.
One downside to Fathom’s approach is that it needs to be in the meeting to be able to work; that might be obvious, but it lacks the ability to consume a recorded meeting and generate notes after the event. If you forget to invite Fathom or start it recording, tough.
Also, the very appearance of “so-and-so’s Fathom notetaker” in a meeting which you’re organising can be a bit passive/aggressive; normally you’d be expected to ask if anyone minds you recording a meeting, but having someone bring their eavesdropping sidekick in unannounced can be a bit weird.
The media
Reverting to the old-school activity of people sitting in a meeting, listening, contributing and writing their own notes… what’s the best way to do that?
Pad and pen? OneNote on a laptop? ReMarkable tablet? Ah, that is another can of worms to be opened on another occasion.
There’s a long history of people building cool add-ons and tools for Windows. From “Tiny Elvis” which amazed Win3.1 users, to a whole suite of tech-nerd extensions called Winternals, offering stuff that could peer under the hood of the then-new Windows NT system. Some were officially produced – the Microsoft Plus! pack for Win95, or numerous Resource Kit tools spring to mind.
A new PowerToys package appeared more recently for Windows 10 and 11 – it’s a free collection of numerous utilities which extend Windows in some way. Some have featured in previous ToWs – #647 and #15 among them (the former being Old Testament before the Great Reset, the latter being in the new world).
PowerToys is updated regularly on GitHub (see details on https://aka.ms/powertoysresleasenotes) and gets bug fixes for some of the tools, or periodically, whole new additions. After 5 years, it’s still “Preview” and has reached v0.90.1. Perhaps that version number is asymptotic, in that it will never actually be 1.0.
Look on the system tray for the colourful PowerToys icon and left-click on it to get the Quick access menu (currently non-customizable, which is a bit odd – like, how often do you need to edit your Hosts file? ).
Double-click on the PowerToys system tray icon and you’ll get a more expansive dialog, allowing you to enable or disable individual utilities and get a reminder of what the keystroke is to invoke it.
Don’t fall asleep
One of those occasionally handy tools that, when enabled, has its own system tray icon, is Awake.
It shows up as a coffee cup in the System tray and can be used to over-ride any compulsion your PC has to go to sleep or even blank the screen. Handy if you’re downloading something from a slow network and you need to keep the PC active, or you want to keep the machine available for remote access etc.
Another use case is when using PIP/split-screen modes on large monitors, things can get a bit unpredictable if the primary input disappears through power saving schemes. Setting a longer timeout for the “Keep awake” will mean the screen doesn’t blank so quickly, until you revert to normal and let the machine’s power plan take over.
If you’ve ever watched Azure CTO and all round technical fellow Mark Russinovich present at a major conference, you’ve almost certainly seen him using ZoomIt. In a nutshell, you can zoom into a static grab of the screen, using the mouse or trackpad to smoothly zoom in and out. It lets you annotate highlights using the mouse – Mark would do this to underline some part of a demo he was giving, showing where something has changed or where a command should be entered.
As well as zooming on a static view, it can also zoom into a live part of the screen too (which might be handy for doing precision mousing), plus some other neat presenter-friendly tricks like having a full-screen countdown timer.
When storage was less plentiful, computer users paid more attention to the location and size of their files. You’d delete stuff you didn’t need to free up space, and if you only had dozens or maybe a few hundred documents or emails, you’d probably remember how to find them.
With storage so capacious and cheap, it’s easy to adopt the “piler” strategy that you don’t need to organise or file things away because you’ll be able to find them later, either through just remembering where you put them or by having some other kind of index or tool.
Time / Money
There used to be a website which posed the question that if Bill Gates (then the richest person in the world) was walking down the street and saw a $$ bill, would it need to be worth for him to stop and pick it up? Let’s ask Copilot to update that for today:
Now, if you estimate your own earnings and divide by 31,536,000, it’s probably going to be worthwhile stopping for a $1 note or £1 coin. But if you think about all the time it might take to manage your emails and old documents, vs just leaving them in place and paying for a bit more storage…
Finding documents on PC
Assuming you have documents and other files on your PC, perhaps synced down from a folder that lives in OneDrive, Google Drive, Dropbox etc, they should be indexed and easy to find. Maybe you’ve deliberately decided to keep files in a local folder that will be lost if your disk dies. Unless specifically excluded, Windows will index the contents of all your files, and lets you search from the Start menu or from within Windows Explorer.
Press the Windows key or icon to open Start and type in whatever you’re looking for. Helpfully, it offers files/documents or the option of searching the web for the same thing. Unhelpfully, some would opine, the web search uses Edge browser and the Bing search engine regardless of what the default browser/search engine is. This can be worked around but it’s a clumsy way to try to drive people to use Edge and Bing.
The Windows Search service (and Indexing Service that it replaced) runs in the background and been around in one form or another since Windows 2000. It spots when a file has changed and looks at its properties and contents, so it can be quickly located. Look at the ellipsis “…” on the search results on Start menu for a quick way to tweak the settings.
Some of the clickbaity“Do These 5 Things Right Now To Make Windows Faster!” type articles online would advocate for switching it off altogether, but the gains will be marginal. You’d be better following some of the other nonsense you’d find on the MSN/Bing/Edge homepage.
Former Windows engineer Dave Plummer shares his thoughts on the efficacy of Windows Search; it’s a relatively hard problem to solve without wasting a lot of resource, even if Macs do a better job (sometimes). If you know the content is on OneDrive / SharePoint / Dropbox etc, it might be quicker just going to the appropriate host and looking for the document there.
If you know the name of the file – or some part thereof – but you can’t recall where it is, then it’s worth looking at freeware, Everything. A super-slimmed down and lightning-fast interface will index filenames across the entire machine; if can also search contents if you like, but since they won’t be indexed first, it’s laboriously slow.
Here’s what comes back when the same query is run on the same set of 1,000s of photos stored in both OneDrive and Google… (using the Split view discussed in ToW #51):
Maybe relying on search to find stuff is a fool’s errand, and the Earth shall belong to the Filers after all.
Browsing on mobile devices is the main way people use the web. As mentioned in ToW #62, the last decade has seen a complete shift from PC & Mac being used for nearly 70% of web traffic to the dominant platforms being Android and iOS.
One nuance the stats don’t take into account, though, is that most of the 30% who’re still on Windows & OS X will also be browsing on whatever phone they have. It’s not uncommon to see people sitting in front of a desktop or laptop, while using their phone for other things – be that reading stuff in a mobile web browser or using a dedicated app.
For those reasons, we’re going to use Android and Windows as the use case for this week’s tip, but the same things can also be done on Mac + iOS. Probably.
Mobile apps -> desktop
If you’re sitting on the sofa flicking through stuff, there will be times where it’s easier to look at the content on a bigger screen. Sure, you might be able mirror the device on the big TV, but who ever does that?
Let’s say you’re browsing an eBay listing and want to send it to your laptop so you can see the pictures better. One option is to try using Google’s Quick Share to send something straight from a phone app to the PC, once you’ve set up the software and signed in. Mac users need to jump through some additional non-official hoops.
Quick Share is the new name for “Nearby Share” – start by clicking the sharing icon on the top of the eBay app (or from whatever app you’re looking to share something).
How the app behaves will differ from one to another; in the case of the eBay app, it will offer to send a link to this listing to some other app on the device, including the ability to share it elsewhere.
The list of apps (and contacts) will vary depending on usage. If you have Microsoft’s Phone Link already set up between your phone and PC, you can just fire it to your PC using the Send to PC command, and it will open a new browser page right away. If using Quick Share, you’ll get a prompt to open it.
Mobile browser -> desktop
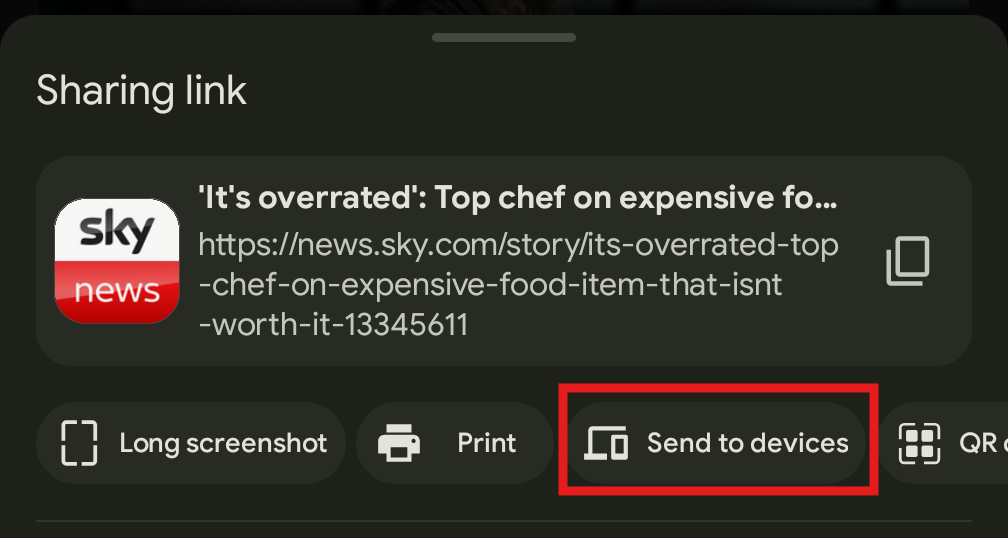
Another more general and consistent use case is when you’re on the phone using a web browser rather than an app. Clicking the Share icon in Chrome will let you copy the link to the phone’s clipboard or send it to a variety of other contacts or apps (just as in the previous eBay app example), or “Send to devices”: in this case, any other device where you’re also logged in to Chrome with the same Google ID. You could also screen grab the page or generate a QR code, so if you want to share the link with someone nearby, you can do that more easily than faffing about with Bluetooth.
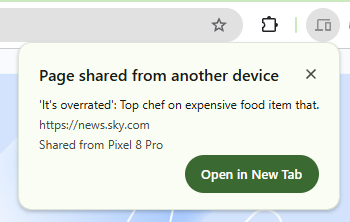
After tapping this option and choosing the relevant PC, you’ll see a notification show up in Chrome.
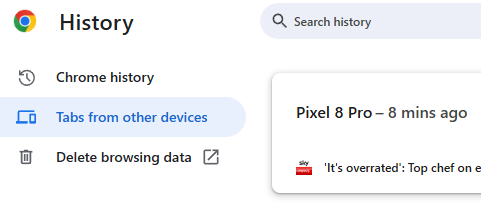
You’ll also see “Your devices” if you expand Chrome’s History either in the menu or by pressing CTRL+H…
From Edge to Edge
Some small proportion of Microsoft fans might be running the mobile Edge browser on their Android or even iOS phones. It’s a surprisingly good mobile browsing experience with built-in ad blocker, password saving integration with Microsoft Authenticator and an inevitable smatter of Copilotry.
Edge Mobile was built on the Chromium browser engine and released a year before the main desktop Edge was ported to Chromium too. As a result, many features in Google Chrome are also carried over (since it, unsurprisingly, is also based on Chromium), except that you’d be running Edge on your mobile device and signing into Edge on your PC or Mac using a Microsoft Account.
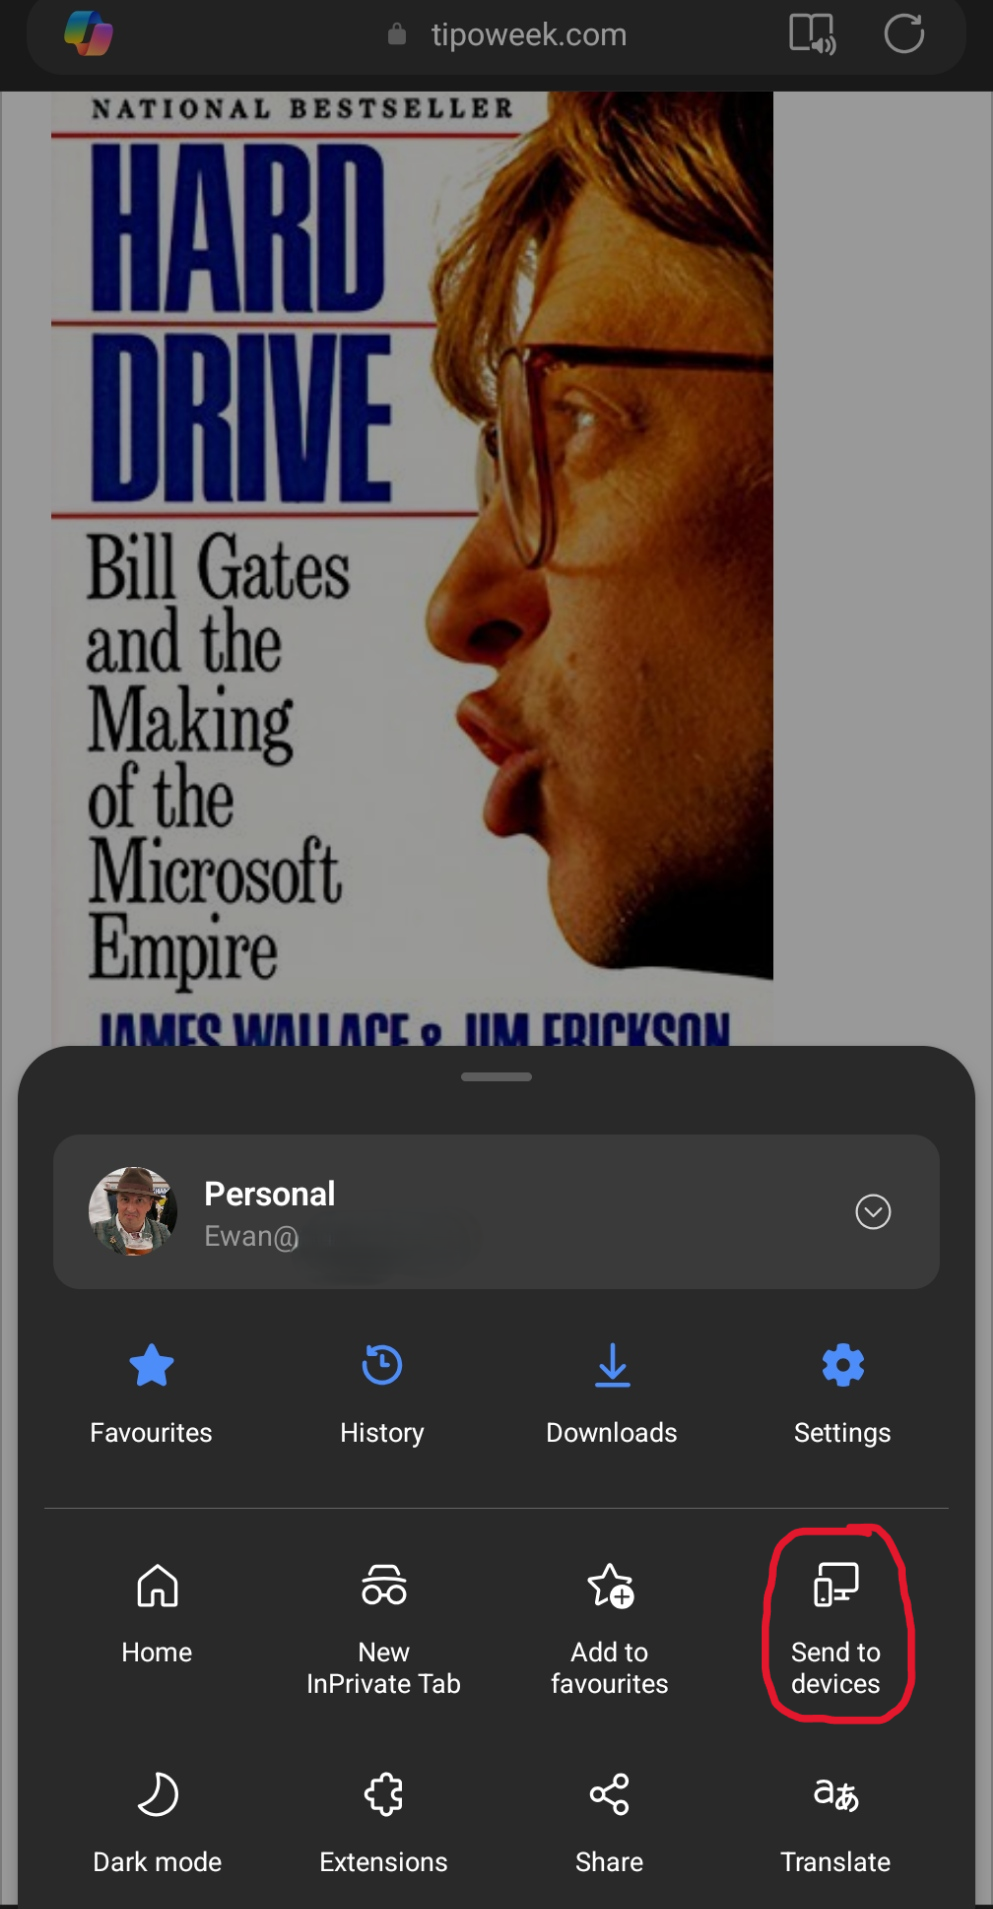
Similar to how Chrome does it, Edge will also let you send links to your PC or Mac – the quickest way is to go to the “hamburger” 3-line menu in the bottom right, and choose “Send to devices” to get a list of potential target computers. The menu that appears on the mobile browser may be several pages wide; swipe left and right to see the others and press and hold anywhere on the menu to edit it, allowing you to reorder the icons or hide/show them.
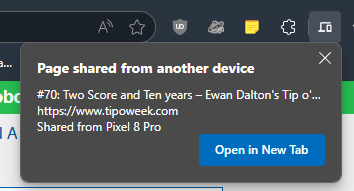
Just as Chrome behaves, having sent the link to one or multiple PCs, a notification will appear in desktop Edge inviting you to open it…
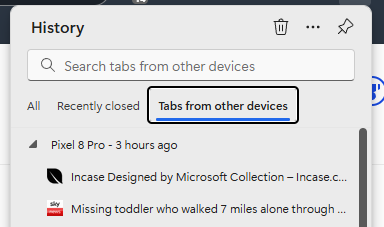
… and if you have the browser on PC and phone both set up to sync with your Microsoft Account, you’ll also see previous pages browsed on the phone by looking in the History page (CTRL+H) in Edge on the PC, which makes it easy to go back to pages you had previously viewed on the phone without needing to deliberately send them across.
This new deal means Microsoft can embed LinkedIn with Skype, its email system and other enterprise products so that, in the words of one Silicon Valley expert, it will be able ‘to recreate the connective tissue for enterprises.’
It seems the Skype integration never really did pan out. Outlook and LinkedIn never got especially close, and Salesforce’s nightmare of Microsoft poring over all that data and not letting anyone else get access to it never really materialised. Even Microsoft tools don’t really have very good access to the data.
One of us (but not really)
At the time, the LinkedIn acquisition was Microsoft’s largest and seen as quite risky, with the backdrop of a failed$45Bbid for Yahoo! and not-exactly-successful integrations of multi-billion buyouts of Nokia and others.
There was some consternation on how LinkedIn could possibly be worth all that money – one of the most popular internal Microsoft Yammer communities has even been reborn in LinkedIn, for current and former ‘softies alike …
(though Groups in LI seem to be less functional than Facebook Groups, so the place to go is FB’s Microsoft Old-timers, which has about 30x as many members).
Maybe what has been LinkedIn’s biggest reason for success in the Microsoft family is that it’s never really been fully assimilated. Sure, management sits at the top table(and co-founder Reid Hoffman is on the board) but LinkedIn has been kept (or kept itself?) at arm’s length; Microsoft friends and partners are not LinkedIn friends and partners. LinkedIn employees have linkedin.com primary email addresses, not microsoft.com ones (even if they may also have a lesser-user microsoft.com address…) There’s a certain defiance of separateness even after almost a decade, a bit like Dynamics used to be or as GitHub also is.
To paraphrase Yoda: Search not: Find, though that is sometimes easier said than done. Along with holding itself apart organisationally and technically from the rest of Microsoft, LinkedIn has a somewhat stubbornly different look and feel to everything else that comes from Redmond.
Searching on LinkedIn starts with entering whatever you’re looking for in the search bar on the home page.
There are few operators you can use – AND/OR and putting stuff in quotes can help to guide things, but you will need to use the Posts / Companies etc filters to zone in to the right content, and you can only do that after the first search has been run. Note that AND, OR and NOT must be in capitals and they specifically call out that + / – isn’t supported.
So, if you want to find something – a previous post in a newsletter you’d read, for example – there isn’t an easy way to do it without first searching everything, then telling LinkedIn that you don’t want “people” but something else. Even going to the newsletter home page doesn’t give you the ability to search its contents, which seems like an own goal.
If you’re looking for a Post you may get a button offering “From my network”, and clicking on that will invoke a filter to select your top connections, people you follow or your own posts.
But you might not get that option. If you don’t, then you need to select Posts and then use the Date, Content type or, in this example, “From Member” filter. If you’re looking for your own content, you need to type your own name and have it resolve, before clicking on show results.
More help is available on Search on LinkedIn, and you might notice that some filters stick sometimes (but not always) so if you’ve already set the Posts and From:me filters up, then others searches will keep them until you clear the filters, or they somehow just clear themselves.
When you do get results, depending on what you search for, you’ll be presented a list of things that look like they match, but there’s no highlighting of the search terms to see where that match is, so you’ll need to open them up individually to see if they match.
For the more adventurous, you could hack the URL to add search terms and set the filters – eg
When internet search engines took off in the mid 90s – remember Alta Vista? – and Google exploded into the public consciousness in the early 2000s, it became increasingly apparent that getting good search results were helped by being able to ask your question correctly.
Savvy searchers might use a combination of quotes and other “operators” to specify an exact phrase, or guide the search engine to include only certain terms or results from a particular website (such as site:tipoweek.com onenote). Google and Bing both tend to use the same operators (so, as Scott Hanselman would say, you could “Google with Bing”).
Prompting Today
When using some of the many AI tools such as ChatGPT, Copilot, Gemini etc, you can get very relevant results by being quite specific in what you ask it to do. As an example, one of the best ToW banner images was created using Microsoft Designer with the prompt, “a serene image of a young boy sitting at an old laptop (with Windows 10) but lurking in the dark background is the grim reaper”
Being much more verbose and directional than you’d ever try in a regular search engine can give some quite remarkable results. The order of what you ask might vary the emphasis given to certain parts of the response, and the general advice is to be positive – i.e. ask for things you want, rather than telling it what you don’t want.
It seems that AI can suffer from a variant of Dostoevsky’s “White Bear Problem”; ie. Asking it not to do something increases the likelihood of doing it. Not long after Microsoft went big on Copilot and Designer, here’s one example when Copilot was asked to draw an image on a particular topic…
The idea was to convey a background threat with those hooded figures, not the feeling that the poor girl was in imminent peril. The figures lurking in the background might be a mite less sinister if they weren’t armed, so clarification was called for…
Maybe DALL-E 3 at that time was just fixated with firearms, or asking it not to do something was a step too far. We’ve gone from “some guns” to “pointing guns at her”. Hmmm.
Trying the same prompt in Designer seemingly gets a little less gun-heavy now, but still has the odd one creeping in. Trying to be more explicit doesn’t appear to work… adding to the end of the prompt, “The sinister hooded figures are not carrying guns of any kind”.
For other Copilot ideas, check out Chris Stuart Ridout talking about Prompt Buddy, a Teams app which lets users share good prompts with others in the company.