|
If people habitually get your name wrong, you could adopt an easier-to-say handle or just put up with people mangling your name and don’t worry about it. Or you can try to teach people how you pronounce your own name. In the days of Microsoft Exchange Unified Messaging, you could choose to record your name, as you might have done in those old-fashioned conference call systems that announce your arrival into a call. Exchange UM let you call in to set your voicemail greeting, manage your calendar and so on. That made a great demo back in the day, but presumably didn’t get used enough as it has now gone away.
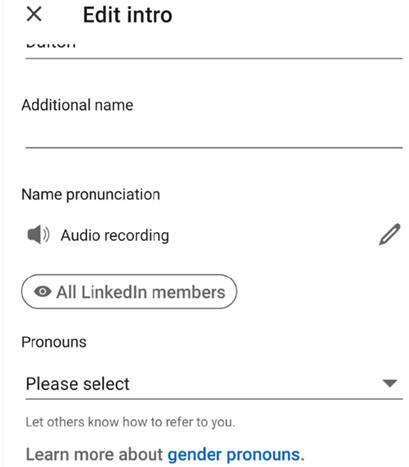
To make the recording, you’ll need to use the LinkedIn mobile app, not the regular browser view.
Look in your profile settings and you’ll see options like recording your name or listing your preferred pronouns, as well as the usual headline, title etc. After recording your name, others will see the speaker icon on your profile, and clicking it will play your voice.
Just tap on your own profile picture in the app, and you’ll see an option to edit it and also add a video. Separately, on the topic of how to say various words, YouTube has a variety of pronunciation tutorials. |
Month: June 2022
635 – Outlook Wunderbar and Full Screen
|
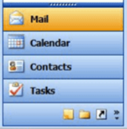
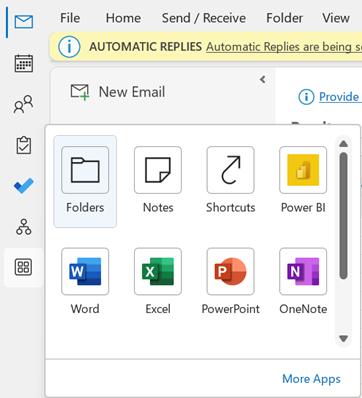
Other apps can be pinned to the new bar, too – including things like the Org Explorer, which presents a much more graphical way of looking at the org chart than the old Address Book in Outlook.
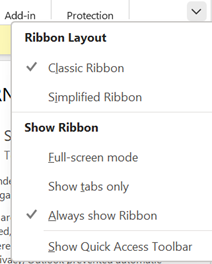
You could try Simplified Ribbon to reduce the size and hide some of the more esoteric functions. Show tabs only reverts to a simple menu bar, and when you click on one of the options, the ribbon for that tab is displayed. You can toggle easily between Tabs Only and the full ribbon by pressing CTRL+F1. There are loads of other shortcuts for Outlook though some are a little obscure.
If you need to search your mailbox while in full-screen, press ALT to temporarily display the ribbon, and look for the highlighted keys that can jump to specific tab or function.
|
634 – M’aidez, m’aidez
![clip_image002[4] Quick Assist logo](/wp-content/uploads/2022/06/clip_image0024_thumb.gif) The internationally recognized distress signal “May-day!”, as used by pilots heading for trouble among other scenarios, was chosen as an anglicisation of the French “m’aidez”, or “help me”, due to difficulties of understanding other terms over poor quality radio.
The internationally recognized distress signal “May-day!”, as used by pilots heading for trouble among other scenarios, was chosen as an anglicisation of the French “m’aidez”, or “help me”, due to difficulties of understanding other terms over poor quality radio.
With much less serious consequences, those of us with a technical bent might often be asked to help family or friends who have problems with their computer, and may turn to remotely taking over their machine – from desktop sharing in Teams or Skype, to using software that should be simpler for the technologically challenged to initiate so you can help them out.
TeamViewer is one such bit of software that’s relatively easy to install and configure, so it’s unfortunately a fave of the scammers who prey on vulnerable people by phoning them up and warning that Microsoft has detected a problem with their computer, and they need to get help to fix it.
Microsoft will never proactively reach out to you to provide unsolicited PC or technical support.
![clip_image004[4] Quick Assist update](/wp-content/uploads/2022/06/clip_image0044_thumb.gif) If you do want to get or give help from a Windows PC, a venerable in-box inclusion called Quick Assist could be worth a look – it has recently been updated and is delivered via the Microsoft Store, which now has support for any Windows app and not just UWP and PWA. More on that announcement from Build, here.
If you do want to get or give help from a Windows PC, a venerable in-box inclusion called Quick Assist could be worth a look – it has recently been updated and is delivered via the Microsoft Store, which now has support for any Windows app and not just UWP and PWA. More on that announcement from Build, here.
![clip_image006[4] Sharing security code](/wp-content/uploads/2022/06/clip_image0064_thumb.gif) The gist with Quick Assist is that you over the phone, you could talk your
The gist with Quick Assist is that you over the phone, you could talk your victim friend through the process to start it up (Start -> type assist ENTER), then you do the same. The first screen gives an option to enter a code provided, or if you are the one doing the remote assisting, click the button to Assist another person, and you’ll be given a time-limited alphanumeric code to provide the other party.
They type this is to the dialog on their end, and a secure connection is established, whereupon they can choose to share their screen in view-only mode, or they can offer to give you control.
After a couple of prompts to validate that this is really what they want to do, you would see the recipient’s desktop in a window and have a variety of control icons around it, like a short cut to run Task Manager on their machine, shut it down or send messages back and forth between both of you. Unfortunately, the chat history is not preserved but it’s a good enough way to give short instructions.
633 – Muting in Teams
|
We’ve all been in Teams meetings when someone has left themselves unmuted and presumably doesn’t realise – they start talking to someone else in their house / dog barks / they start eating a bag of crisps / sighing noisily etc. Social etiquette will often have the speaker ask, “Oh, does someone have a question?” or the slightly more direct instruction to mute yourself unless you want to talk.
Bear in mind that it only applies to “Attendees” (ie all “Presenters” can choose to make their mic / camera available any time) and by right-clicking on an attendee’s icon in the Participants list, an As we increasingly go back to hybrid meetings where remote participants will join a meeting room full of meatbags, it’s important once more to manage the microphone / speaker dance when several people in the same space join the same meeting. One best practice is to have people in the room log in to the online the meeting too, and potentially use the raise hand feature in Teams before they are asked by the organiser to talk, that way putting them on an equal footing with remote participants. But this will be bad news if those physical attendees don’t fix their laptop audio properly.
Pay attention to the “yeah, yeah” video and audio dialog that most people will rush through when joining a Teams meeting; there’s a “Don’t use audio” feature which means you’ll join and have no worry about your own laptop causing problems in the meeting room. If you have a Teams Room system, you might want to join with no video too or you’ll end up with a gallery of attendees who are facing away from their camera, as they look at other people in the physical meeting room. |


![clip_image002[6] clip_image002[6]](/wp-content/uploads/2022/06/clip_image0026_thumb.gif)


