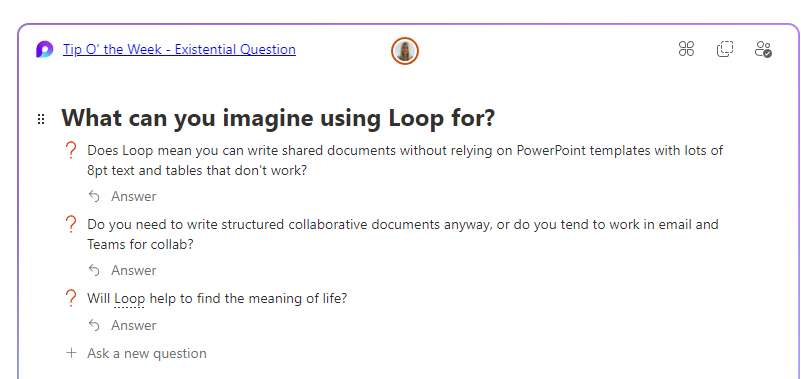
Sometimes, new application paradigms disrupt the old ways of doing things – like real time messaging could sometimes replace email, or shared online document authoring takes over from working in offline silos. Just as software development methodologies and tools come in and out of fashion amongst the cool kidz, so too does the idea of doing everything online in a browser vs using those fusty old desktop apps that you might have installed. One new application that spring to prominence in recent years is Notion; it showcased a canvas-based approach to colloborative workspaces with components that could be shared and reused in an entirely browser or mobile app based environment. Notion went from a small startup 10 years ago to a multi-billion valuation, despite initially fending off VC cash. The user base is supposedly skewed to teenage-to-mid-30s, though old timers like Paul Thurrott and the team behind the Windows Weekly podcast notably use Notion to manage the prep notes for each episode. He was initially less than complementary when Microsoft unveiled a similar-looking new service, born out of components of the “Fluid Framework” which been unveiled at Build in 2019 as a new way of doing co-authoring on compound documents. Loop is the name given to this new Microsoft 365 collab tool, announced in preview in 2021 and expanded somwhat shortly thereafter. It’s still a preview – some software companies have products in preview lasting multilple years, even if they don’t ultimately cark it. Loop can be accessed at loop.microsoft.com either by using a “work or school” account as part of M365, or a Microsoft Account to sign-in to a personal version. Loop mobile apps now have support for personal accounts too. Admins in Microsoft 365 environments need to enable Loop for use – if you visit loop.microsoft.com as an end user and it’s not available, you’ll be told as much and asked to find your IT admin to get them to switch it on. Loop components can belong to a workspace which itself has numerous pages – when you create a new page, you’ll see a selection of templates to get you started: … and there’s a larger gallery which has more ideas, basically just pre-built pages with a smattering of ready-configured Loop components. Inevitably, commentators compare Loop and Notion though one major difference is that rather than doing everyting in the online workspace, Loop components can also be shared and embedded within Office documents, emails or in Teams, which is arguably more flexible. If you copy a Loop component to the clipboard and paste it into an email, you’ll see it embedded – though if using a table in your mail (such as is used in some weekly missives to try to control their layout), you’ll be disappointed as it appears you can’t embed Loop components inside a table. Create a new Loop component inside a mail or Teams session, and it won’t be part of an existing Workspace – it’s basically just an attachment but still offers multi-user capabilities. If you insert the component from the menu then it auto-creates the name assiged to that component and there’s nowhere that you can rename it within the email etc. Head over to OneDrive and look under My Files / Attachments, and you’ll see the created component – just click the ellipsis to the right and choose Rename from there, and it will show up with that name, wherever you embedded it. Example: |
Category: Outlook
678 – New Old Things again
In ToW 632 – New Old Things, the topic of the old version of OneNote getting some spiffy new features was raised. This week carries on the same theme in a different direction – some altogether new versions of old applications, which might be worth taking a look at, even if they’re not quite fully featured yet.
In the beginning there was Skype. Well, actually, before that there was MSN Messenger and its variants. Business environments then got Live Communications Server, Office Communications Server, eventually Lync, and finally the confusingly branded Skype for Business.
Teams came along from the left field around 6 years ago and from a real-time collaboration product point of view, swept all before it (at least in Microsoft), eventually replacing Skype for Business, as the pandemic turbocharged its adoption and appeal. Skype is still with us, with reasonably recent releases and even integration of the new Bing and GPT driven AI.
The thing is, the original Teams client grew up pretty quickly and though it has had lots of improvements, it’s never been especially resource-light, or quick. The Teams team (herein lies one challenge with its name) took the decision to start over and build a new Teams client, shiny and slick and running like greased lightning.
If you feel like giving it a try, you may see a Try new Teams slider on the top left of the main Teams client window; clicking that will restart Teams by closing the old app and starting the new. There are some features not quite there yet, but the list is being updated frequently as functionality improves. If you switch to the new Teams preview and don’t like it, you can quickly switch back – but you’re either/or running one or the other.
Outlook has a longer heritage – it came out first with Office 97 so has its roots in early/mid-90s code, and even if the core of the app has been re-engineered and the UX has had numerous polishes over the years, there are still occasional peeks at a Windows 95 era application lurking beneath.
There has been a push for some time to make the Outlook Web client a more viable alternative for many users, including showing Outlook Web in an Edge sidebar even when clicking a link from the PC desktop client. Functionality differs between the full-fat desktop, the web client and the various mobile apps.
There’s a “new Outlook” on the way, now too – previously codenamed “project Monarch” it’s supposedly been in the works for years, yet looks a lot like the web client that happens to run in a window – it’s available in preview now. It may end up replacing the variety of desktop, web and mobile apps, though that could take a while. In near terms, the new Outlook will likely supplant the default Mail & Calendar apps in Windows 11.
You may see a Try the new Outlook slider on the top right of the main Outlook window; flicking that will restart Outlook in its new guise, however unlike the new Teams, it is possible to run both new and old, side-by-side.
One way would be to make the switch, then on the new “Outlook PRE” icon that appears on the taskbar, choose to Pin it. Then flick back and you’ll now have both old and new Outlooks available together. You could configure the New one to remove your main M365 email account, and just have your Outlook.com / Hotmail or now even a Gmail account, while leaving all your work emails in the old Outlook UX.
If you want to keep old and new Outlook with different account setups – business in the old, private in the new, for example – go straight to the Store and install the New Outlook app, then configure it as you like when it starts.
676 – Calendar spring cleaning
As spring continues to emerge from its wintry slumber in the northern hemisphere, it could be worth spending a little time tidying up your Outlook calendar as well as spring cleaning your nest. The following applies to Outlook on the PC, though similar colour-coding concepts exist for Outlook Web App and on other platforms.
You could start by looking for “Ghost meetings” – those are ones where you’re the organizer, but none of the invited attendees have accepted your invitation. A good example is a 1:1 meeting when the other party is on holiday – they might have declined a meeting but you left it in your calendar.
To quickly view Ghost (or maybe Zombie?) meetings in your calendar:
- Download this ZIP file and open the downloads folder where it is saved.
- Right-click the ZIP and choose Extract All then right-click the resulting file and Unblock it, so Excel will let you run the macro within (don’t worry, it’s perfectly safe).
- Now open the file in Excel. If asked, tell it you want to edit the file and allow macros to run, then hit the Scan Calendar button. You’ll now get a list of meetings to go and delete, or possibly to nag the invitees to respond.
Another trick is to colour-code your appointments, either by setting categories on them individually or by using rules. This way you could quickly differentiate an appointment (ie something you put in your calendar to block out time) from a meeting (ie an appointment which you invited others, or to which you have been invited).
Setting a colour category is a quick exercise once you have the categories defined – right-click on an entry in the calendar to pick a category, or you can set it from Categorize option on the Ribbon while creating or editing an appointment or meeting.
Rules are set by creating instructions that apply to the view you’re using; go to the View menu on the ribbon and choose the View Settings menu item.
This presents a somewhat old-fashioned looking dialog box which lets you change the view, including using Conditional Formatting, where you define rules that will mean the select colour applies.
In “My Meetings”, if your name is the organizer, then the meeting shows as green.
Explore the conditions dialog a little and you’ll see all kinds of things you can filter by. It includes a powerful advanced mode that will let you set a condition on any property of the meeting or appointment (so you could have different colours for meetings whose locations were in different buildings etc).
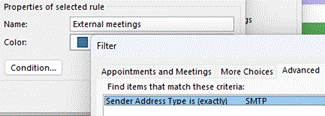
The “External meetings” condition above does require further hoops to be jumped through to get it set up, but it’s a one-and-done exercise. It involves adding a custom form to Outlook, which in turn exposes a new property called “Sender Address Type” – if the value is SMTP, that means the message – or calendar meeting request in this case – came from outside, so you’ve been invited to a meeting organized by a 3rd party. The same field could be used to colour code your inbox so as to prioritize emails differently too.
To see how you could use the Sender Address Type to alter how your inbox is displayed, and for the instructions on how to install the form so that field becomes visible to Outlook, crank up the time machine and head back to Tip o’ the Week #275 – Prioritising External Email – Ewan Dalton’s Tip o’ the Week (tipoweek.com). Great Scot!
675 – Does size matter?
When disk size was measured in Megabytes and network bandwidth even less, size of files really mattered. When non-floppy floppy disks were sized in 1.something MB, IOMega Zip drives promised 100x as much storage for only a few times the outlay.
The dramatic growth in capacity and drop in cost of storage has radically outpaced Moore’s law, where a gigabyte of disk storage might have cost $100 in 1997 and only $10 by the year 2000. Nowadays, if you bought your gigs on a spinny platter, they’d cost you less than $0.01 each. For most end users, solid state storage has largely replaced the traditional hard disk and even with 10x performance, the price is still only a few cents per GB.
That said, storing data in the cloud costs money over the long term, and has a potentially negative environmental impact – a Stanford report from a few years ago estimated that saving and storing 100GB in the cloud for a year costs the equivalent of 0.2 tonnes of CO2, or about the same as a one-way flight from Seattle to San Francisco. So reducing unnecessary cloud storage can be worthwhile.
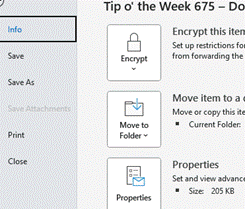
If you’re writing an email in Outlook, you can see the current size from the File | Info menu.
In Word, Excel and PowerPoint, you can see the document size and other useful info in the same place (varying details depending on which application).
A previous Tip dealt with the scourge of bloating PowerPoint files, where it’s not uncommon to have unnecessary large images lurking within the template you’re using, but there’s a simple trick that’s common across all Office apps – compressing picture size.
Especially if you’re embedding photos from a phone or even screen-grabs from a high-res display, individual files can be in the multi-megabyte* category. In many cases, you might resize your image so doesn’t take up such a huge part of your document, but the app will still be storing the full resolution of the image – including any bits you’ve cropped out – behind the scenes.
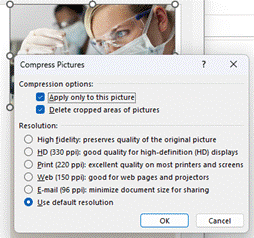
To compress pictures in your document – and let’s use PowerPoint as an example given that it’s the chief culprit – simply select an image and in the Picture Format menu which appears, choose the Compress Pictures option.
This will let you determine the level of detail to keep for this image – if it’s a simple presentation, then it probably doesn’t need a very high definition picture. You also select whether to keep or discard any cropped areas, and importantly, whether to apply to just this one or by clearing the top option, applying to all images in the file.
Try taking any large PowerPoint file, delete cropped areas and apply Web or Print resolution to all images, and you might see it drop to 10% of its previous size.
The Compress Pictures option is also available from the folder picker in the old File | Save As dialog, and there are other options to change the default resolution available from within the File | Options menu.
*Remember kiddos, there are 1000 MB in one GB; smart alecs might believe that a kilobyte would be 210 bytes – 1024 – but for 25 years international standards have defined that as a kibibyte or KiB, trying to assert with less ambiguity that a kilobyte is actually 1000 bytes, therefore a Gigabyte is 1,000 x 1,000 x 1,000 = 1,000,000,000 bytes, whereas a Gibibyte – srsly – is 1,0243, or 1,073,741,824 bytes). |
672 – Why your meetings are clashing
Look at your work calendar for the next two weeks or so; if you’re a part of a multi-national organization that routinely has meetings with people all over the world, your nicely ordered diary might be a maelstrom of overlapping and clashing appointments. Welcome to the start of the 6-monthly Daylight Saving Time Shuffle! Of course, you might have clashing for other reasons.
Meetings in Outlook – apparently, other PIMs are available – are created in the time zone of the organizer. If you’re in London and have set up a weekly 4pm meeting, most of the time that’s at 8am for the people in San Francisco, but for the next 2 weeks it’d be 9am and therefore possibly conflicting with whatever else they had planned for then.
The topic of time and its zones has been covered ad nauseam on ToW passim, but it’s worth a quick reminder of what is ahead (and other countries / regions still do vary – see a summary of the global daylight saving time dates and regions, here), especially since the US has a habit of doing things differently to the rest of the world:
- 12 March 2023 – Most of the US, Canada, Carribean enters DST (if observed)
- 24-26 March – most of the rest of the Northern Hemisphere enters DST (if observed)
- 2 April – Australia, New Zealand leaves DST
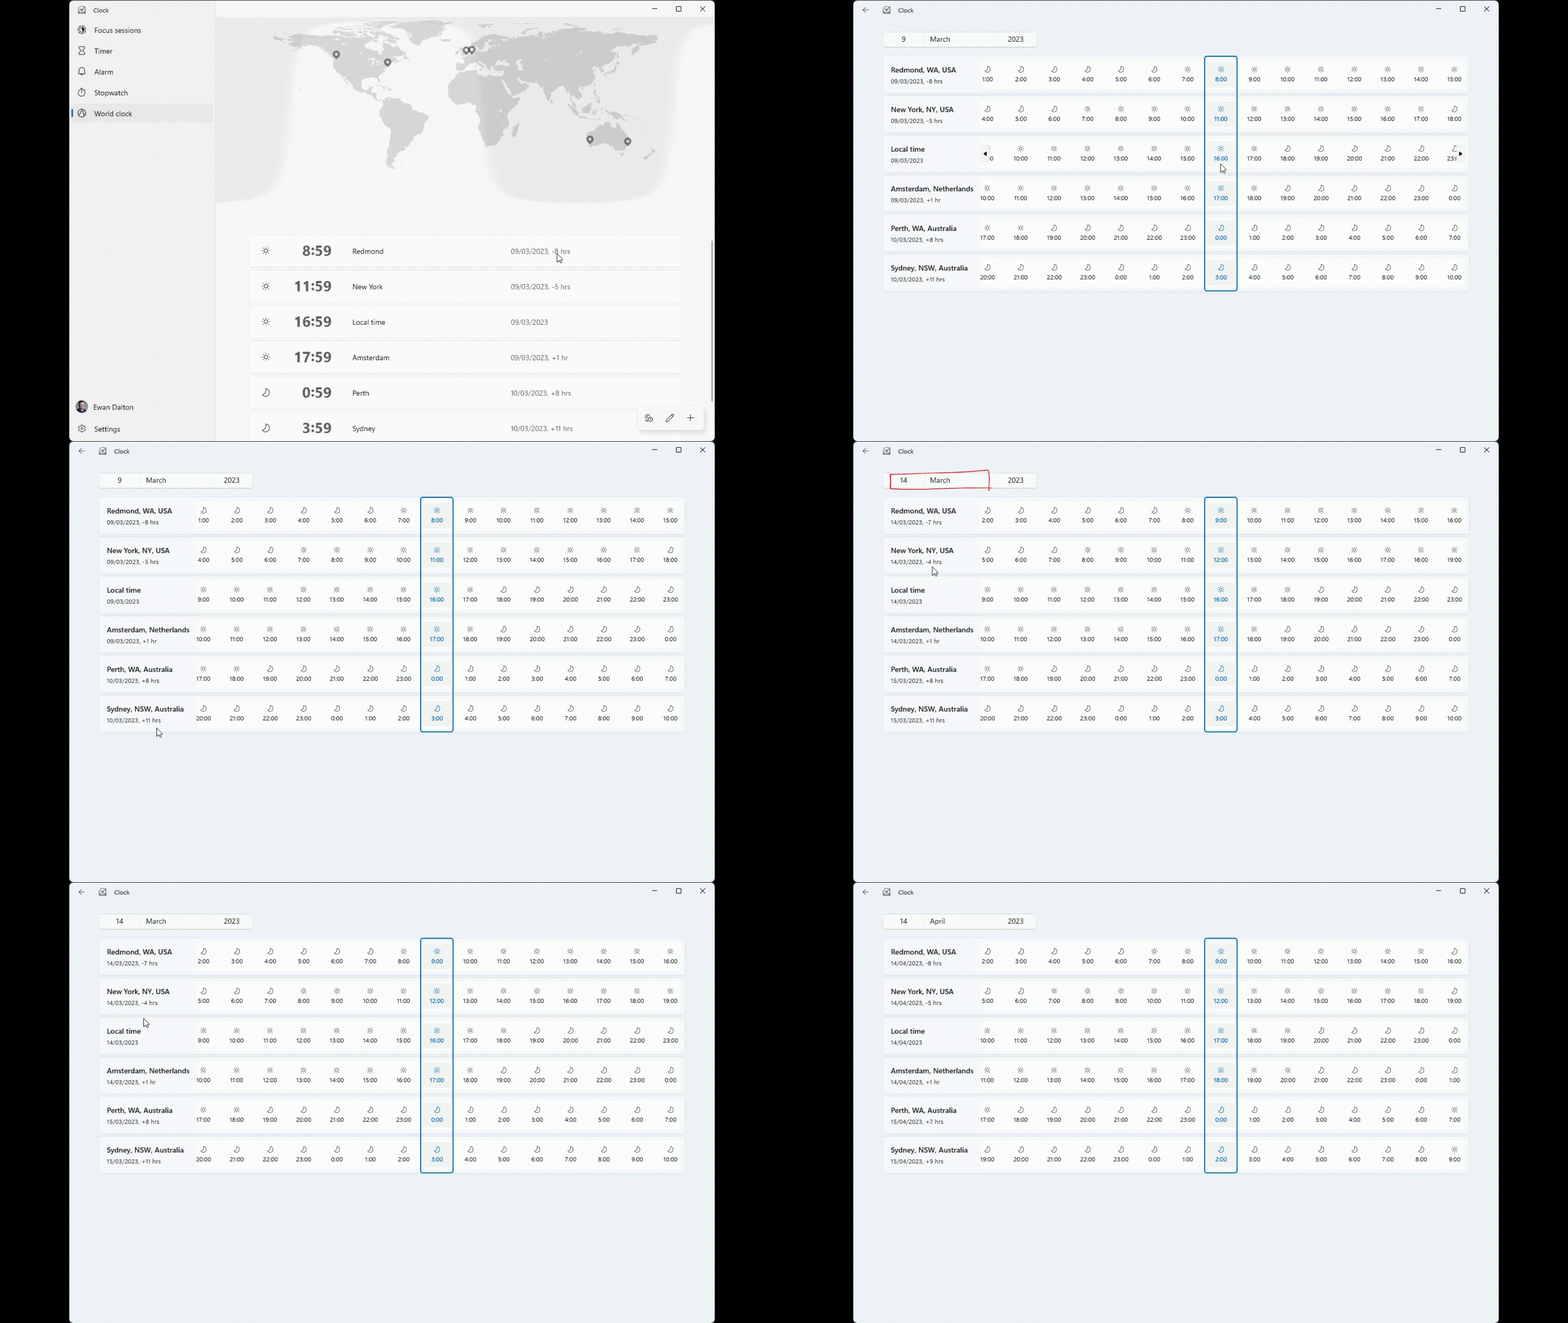
Practically, that means that today, a noon meeting in Seattle would be 8pm in London and 7am (tomorrow) in Sydney, but in a little over 3 weeks that would have moved to noon/7pm/6am and eventually settled back at noon SEA and 8pm LON, but now at a refreshing 5am SYD.
Fortunately, the Clock app on Windows 11 has a “Word Clock” feature that lets you pin cities to the map and you’ll see what the current time is (and what the time zone offset is currently). You can also get a tabular view of what the relative time will be at any given date.
669 – Hazelnut in every bite
What has a hazlenut in every bite? That’s right, a Topic from the British sweetie shop of yesteryear, and nothing at all to do with what’s near Tufty’s nest. Sadly discontinued last year, due to falling demand, there’s no accounting for taste.
Topics are still available today to users of Microsoft 365, as a way of curating certain scraps of knowledge that they can share with other users within the same organization. The very first version of Microsoft SharePoint (codenamed “Tahoe”) had a capability that aimed to do much the same thing – “Best Bets” were a way for an administrator to guide the search experience so that if someone ran a query for a term, rather than returning hundreds of old PowerPoint files that contain that word, it would take the searcher to a more official site.
Viva Topics – because everything is getting Vivafied just as in the days of Tahoe, every other product had Live and/or .NET in its name – is part of a growing family of “employee experience” offerings; it’s an addon to even the top flight Office Microsoft 365 subscription, but adds AI-powered discovery as well as the means to manually curate things.
After deploying Topics and assigning licenses to the appropriate users, topic pages can be automatically created based on the documents that exist already – the Search and underlying Graph services can identify subjects that look like are active, with people contributing to them through documents, conversations and so on. Codenames or location names, for example, could be quickly identified and suggested.
A Knowledge Manager could also be assigned to create or approve new pages; individual users could be empowered to do it themselves, though that might end up in something of a mess. Best practice would be to have some kind of form or email-based request, where a user would ask for a topic page to be created and they would then own the content within.
Discovery is pretty easy – depending on how it’s set up, if the title of a topic is mentioned on a SharePoint site, it can be automatically highlighted on a pop-up card with which will give a summary of the topic, and a link to more the main page which contains furtherinformation.
Topic pages themselves can be full of useful info; a search for documents or other pages that the SharePoint environment behind the scenes considers to be related, as well as specifically curated sources of information, contact cards for the people who are managing the project or involved with the customer, links to docs or other websites etc.
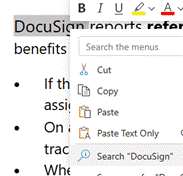
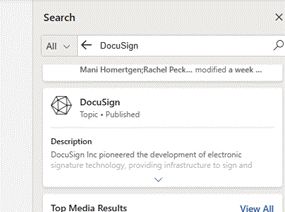
Within Office apps like Word or Outlook, if the user highlights a word or phrase and chooses to Search for it, a sidebar in Office will run a search online and across internal sites for that word – this is avialable to everyone, with or without Topics deployed.
If Topics has been configured and the searched for term is a topic (or is one of the topic’s synonyms, or is otherwise related), then the user will see it fairly prominently in the search results.
661 – Finding mail and slimming down
Learning how to find stuff in email is crucial, since many of us get so much that we let it accumulate until eventually it becomes a problem. Sifting through the many cc’ed work mails, or finding the order confirmation email in your personal mailbox amongst all the other stuff, we’re more reliant on search than ever.
This is a topic that has been covered numerous times in previous ToWs – 573 – Searching in Outlook and 504 – Searching Outlook for example – but is worthy of a revisit since we may have a chance to pursue the fallacy that is Inbox Zero over the next few weeks. And maybe it’s a time to find and delete the special offer emails and once-in-a-lifetime invitations that may be clogging up our personal mailboxes too.
Work mail
Dealing with desktop Outlook on the PC, there are plenty of tools available to help you find specific messages, in fact there’s a whole toolbar full of them.
As you look to search mail that meets your chosen criteria – it’s from someone in particular, maybe with a keyword in the subject, or that you know has an attached PowerPoint file, you’ll see that clicking the filters and options inserts the actual commands that will drive the search, into the Search bar positioned at the window’s top.
Remembering a few of these means it’s quick and easy to search for mail from a person (you don’t need the quotes, really, and you could use just a part of their name) by typing straight into the box. ALT+Q (for query?) sends your focus straight onto the search bar, so if you’re a keyboard warrior, you could ALT+TAB to Outlook, ALT+Q and enter a search command, before your mouse-toting colleagues have even clicked a toolbar. While we’re at it, remember that CTRL+number jumps to the location on the (now vertical) icon bar on the left, so CTRL+1 will normally be mailbox, CTRL+2 is calendar, CTRL+3 contacts, and so on.
Commands could also be used to filter on properties of a message that are not so easily visible through the UI – eg from:ewan messagesize:>10mb or from:nico sent:”last week”. See here for more examples of the kind of thing you can type. Look under Recent Searches to re-run ones you’ve typed before.
Reducing Mail Bloat
Is your mailbox size is starting to look under strain (look under the File menu to see how big your ‘box is and what the limit is)? With an active work mailbox in M365, it shouldn’t be much of a risk unless you genuinely never delete anything, but a quick way of identifying the big rocks and getting rid of them may be needed occasionally.
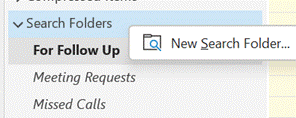
You could run a one-off search for all big mail as per the instructions above, or for extra control try creating a Search Folder. Expand the folder tree on Outlook’s left side, and scroll towards the bottom, to locate the Search Folders hierarchy, right-click on the top of the tree and choose New …
This will bring up a wizard which creates a query across your entire mailbox or other data file, but which looks like a folder; it’s visible only in Outlook desktop (ie not in web or on mobile) but can be a great way to locate stuff that might be filed away in the darker recesses of your mailbox.
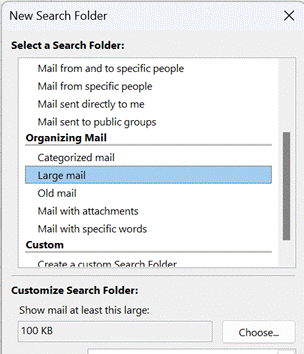
You can choose from some set templates or do your own custom thing entirely. The age of this feature is somewhat given away by the default value for “Large mail”… click the Choose button and enter something meaningful (like 10000 for ~10MB).
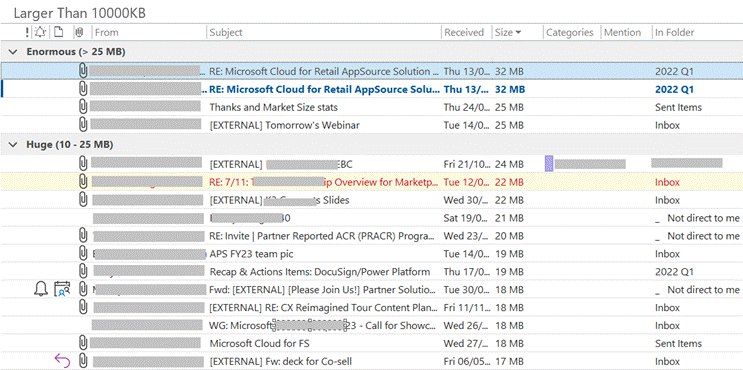
This should give you a few easily deleted big mails to at least get any short-term capacity problems dealt with.
Right-click on the Search folder and choose Customize… to give it a better name, or to tweak the criteria.
Home email
If you have a Hotmail / Outlook.com etc mailbox, there may be a more pressing size issue, as over a period of years you might have been signed up to a newsletter every time you buy something online, and without realizing it, those could account for gigabytes of data bloat on your mailbox. If every notification from Amazon or eBay is 400K, they soon mount up to a meaningful size.
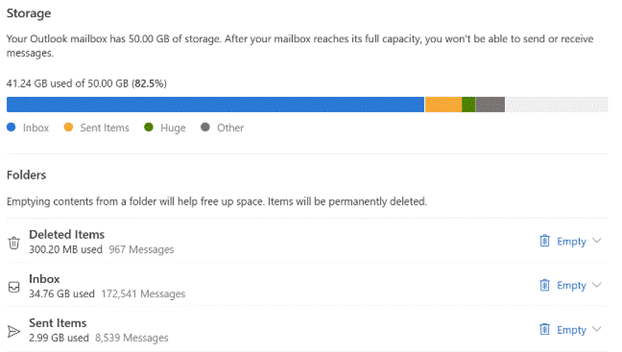
If you have a free Outlook.com account, you should have a 15GB mailbox quota and if you have the account associated to a Microsoft 365 home or work subscription, you’ll get 50GB.
To check, go into Settings and search for Storage.
The UI for Outlook.com is simple and effective, but one thing it doesn’t do a great job of is handling message sizes.
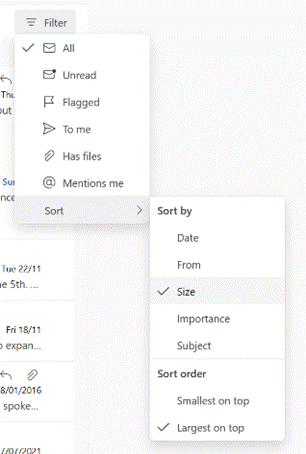
Sort by size and you’ll see a group heading showing which emails are the largest (displayed by default with the biggest on top), but nowhere can you find out what the actual message size is.
If you want to do a mass clean-out of your Outlook.com account, then you could try sorting by From, however the UI won’t let you click on the group heading to select all emails from that sender and make it easy to delete them.
The Windows Mail app on Win11 doesn’t offer Size either, not even to sort by.
Sometimes, the old ways are the best – you get much more functionality if you add your Outlook.com account to full-fat desktop Outlook, allowing you to change the view, see and sort by message sizes etc. Oh, and yes, you can even set up a Search Folder too. Now, tidy away!
This is the last “regular” Tip o’ the Week until January.
If you’re still here next Friday, look out for next week’s special edition – it’ll be a belter.
660 – Contacts in D365 CRM
Sales people tend to not like CRM systems very much. They are usually foisted on the poor folk who need to figure out how to get what they need out of them, while navigating a cumbersome and unhelpful set of behaviours and expectations. And that’s just the sales people – the CRM implementations can be poor too. If you have to use CRM, and you’re lucky enough to be using Dynamics 365 Sales (if not, you can get a free month’s trial), then there are some handy contact management tools worthy of a few minutes’ attention. First of all, the Outlook integration for the latest D365 CRM service means if you have an email from a customer or partner, you can track it and quickly add contacts on the email to the CRM system by invoking the Dynamics add-in. Click the Dynamics 365 icon in Outlook and you’ll see a sidebar show up on the right. The “Set Regarding” option lets you add the email to a customer record in CRM. Below that, if the contact doesn’t exist already, you’ll see the option to add it by clicking on the recipient’s name and hit the + button on the lower right. Depending on the rules of your particular system, you’ll probably need to provide a job role and maybe some other fields, and you might not be able to associate that contact with an account yet – perhaps you’ll need to save it to Dynamics first, then make the association with the account to which the contact belongs. If the Account field is locked when you first add the contact, then once your contact has been saved in the sidebar, click the hamburger menu icon on the top left and look under Recent to open that contact again, then you should be able to choose the account name from that view, rather than fishing about in the main CRM UI for all the other added contacts. From within the same sidebar UI, you can fire up a more fully-featured view by opening it in a separate Dynamics window. From there you can more easily do stuff like matching the contact to one in LinkedIn, if you have Sales Navigator access; it’s a handy way of associating the two, though annoyingly it doesn’t automatically pick up the LinkedIn photo and associate it with the CRM contact. To set a picture for your contact, click on the circular initials at the top left of the name and that lets you choose a photo – ideally, you’ll have already saved the mugshot to your machine first, though if the image is online – a company website, for example – you might be able to grab the direct URL to the photo and paste it into the Upload Image dialog. Getting images from LinkedIn can be a little more laborious especially if you’re doing this in batches. Here’s a fairly simple technique to make it easier.
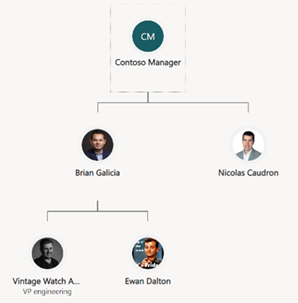
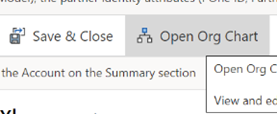
OK, so you have an image for each of your contacts – so what? Well, all the contacts you’ve just added should be visible in the Org Chart function which appears on the main toolbar of the Account. With a bit of dragging and dropping, you can quickly lay out the reporting structure for your known customer contacts. Handles will appear on contacts as you move them around, to help manage the way the chart is displayed and keep it simple. Save the chart layout when you’re happy, and you can show your boss how diligent you’re being at managing your customer relationship. Now, who wouldn’t want that? |
655 – Like my email
Every time you buy anything, stay anywhere or eat something, you’re peppered with requests to review and recommend whatever it was. If review / like fatigue has not yet set in, there’s now the ability to signal a reaction with emails in Outlook and M365.
The likey-likey feature is only present for emails in your own organization – ie. you can’t like that email that informs you’ve won the state lottery, or that your Apple ID has been compromised (though it is reported that sometimes the reactions do work across tenants). You can, however, send an appropriate emote to any email that originated from someone in your organization (even if there are other externals on it).
In desktop Outlook, look for the smiley icon in the response area at the top right of a message in the preview pane or when you open it outright; Outlook Web App has a similar UI which might contain other extensions’ icons next to the smiley too.
There isn’t a could have been a meeting or a please take me off this email button, but whenever you click on the like, love, laugh etc icon, the reaction is visible to the originator of the mail. (Happy Silver Anniversary, btw, Bedlam DL3 – hope you get on the EBC wall)
To see what people have to say of the guff you send, look at the Notifications icon in the top right of Outlook / OWA, and as well as any mentions you may have from people who can’t type your name without putting an @ in front of it, you’ll see a summary of who has reacted to each message, and how.
Alternatively, look in your Sent Items and if you select a message you can see what reactions it has had; there isn’t an easy way to show reactions in the table view so you could see which messages are the most popular without having to preview or open them up. It probably can be done – though likely a palaver for limited utility.
Here’s a challenge – if you’re a ‘Softie and you got this in email, react to the message and see if we can break the internet.
Thank you for all that you do!
653 – Bookings with me, you, everybody
Ideally, within an organization where people are expected to work together, they will use tools that have been around since the 1980s and actually share their calendar with their colleagues.
Outlook users can usually see blocks of when someone looks free or busy, when looking in the Scheduling Assistant tab on a meeting, though it won’t show external attendees and unless the attendees have chosen to share their calendar details, you won’t see anything other than tentative, free, busy or out of the office. Hopefully, some eejit won’t have blocked everyone else’s calendars by informing their colleagues of an impending day off.
When dealing with people in other time zones, there is a clue to whether they are likely to be able to join a meeting (quite apart from whether they have their calendar blocked or not) – the Work time setting is meant to show others what days and hours their expected work time is supposed to be.
Looking at the scheduling assistant grid, the light-grey area is supposed to be not-work time, and if there are any lighter-coloured blocks, that means they’re free and open for booking. Individually, you might also see their time zone displayed in their Profile Card when clicking on the user’s name in Outlook, Teams etc. Again, this is available for people in the same organization, so when dealing with external parties another approach will be required.
A variety of 3rd party services exist to help people find time when others are free – a bit like a restaurant or hotel booking service, tools like Calendly or HubSpot (others are available) offer to expose your free time slots to selected external people, so they can find a slot that you are available and reserve it for a meeting with them. Office users could also use FindTime, which effectively sends a poll of suggested times to a group of people and gets them to vote on which one suits them best.
There’s also a Bookings application which is part of Microsoft 365; accessible via the app launcher icon (the grid of squares on the top left if you login on office.com using an account with an active M365 subscription). Bookings is designed to manage scheduling across a group of people – like in a hairdresser’s salon, where multiple members of staff could be available on different shift patterns, but a simple web UI is presented to an end customer so they can find a time when their favourite snipper is available.
Regular ToW contributor Ian Moulster spotted a new addition to Microsoft 365 which appeared in July, and though it may have common underpinnings, it’s a different offering to Bookings – called Bookings with me.
You might spot the Bookings with me notification in the top right of Outlook Web App, or try setting it up at outlook.office.com/bookwithme.
If available in your subscription, you can then set up a booking page with a menu of meeting types you want to accept – eg 20 minute 1:1 Teams calls in “public” (ie available to anyone who has your booking page URL – you might even add it to your email signature), or more specific meetings that are “private”, which you can choose to make available individually to sets of people. There are numerous of controls over how much time before and after the meeting, what days/times it can happen etc. Availability is synced with your Outlook calendar.
When you share the booking page or private URL with people, they just find themselves a time that’s free, and either sign in with a M365 work or school account or give another email address. If the latter, they will get an email with a verification code to enter into the booking form (M365 users are presumed already clean), and after confirming the code, they’ll get a meeting request sent from your calendar, with location and/or Teams details.