|
If the country or state you’re in observes summer time, then you’re either about to enter (if in the northern half of the marble) or leave it (if southern). To keep us on our toes, this movement back or forth often happens around the world on different dates. To keep us on our toes, some countries have less-than-hour gaps between time zones, and in the past, others have decided to change time zone permanently.
– eg if it’s 2:30am in Iran, then lining Tehran up with the red hand would put both London and Paris at midnight, since they’re both at GMT+1. eh? In October 1968, the UK decided to move to British Standard Time – GMT+1 – all year round. This particular wristwatch was produced between 1968 and the end of 1971, when the practice was reversed – so for a while, it was correct that London would be in the same time zone as Paris and Rome. Except the watch wouldn’t know when Paris and Rome went into summer time, thus putting them an hour further ahead… oh well, never mind. In a global working environment, especially one where everything is done online rather than having people in the same location, the friction of time zones changing has never been more obvious. Usually, you’ll only move through time zones relative to everyone else when you travel – flying across large distances, or maybe just driving across a bridge or dam. But now, a digitally-oriented meeting can shift its time for some of its attendees, relative to the others – depending on where the originator is based.
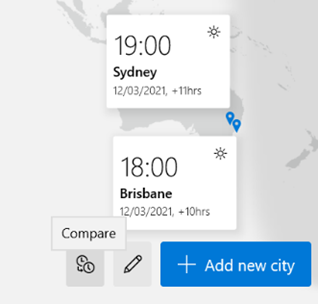
Those parts of the US which observe DST, are due to move an hour forward this coming Sunday (ie March 14th). In common with doing things differently to everywhere else, that brings the US (and Canada) one hour nearer most of Europe for the next two weeks, until the end of March. Much of the southern hemisphere comes out of DST the week after that, so by then Sydney will be two hours nearer London than currently. The impact of this can be seen in peoples’ calendars, when regular meetings somewhat inexplicably start to clash with each other – if a UK organiser set a recurring meeting for 4pm GMT, that would normally compel Seattleites to be there at 8am, but since they’ll be only 7 hours behind for a couple of weeks, that shifts to 9am in their calendar, potentially clashing with some existing 9am Pacific Daylight Time meeting. Conversely, a 9am PST / 5pm GMT meeting as created by the person in the US a few weeks ago, would now start at 4pm in the afternoon in London. Great news if that meeting is a Friday afternoon, as it brings beer o’clock one hour forward. Although Outlook does a pretty decent job of juggling the differences between time zones, there is no obvious way to show what time zone a meeting had been created in (eg show me all meetings that are going to be affected by this shift for the next 2 weeks). A simple trick if you want to check on a specific meeting, is to start a Reply to a meeting you’ve been invited to, whereupon you’ll see the time zone of its creator…
While It won’t help you identify the meetings that are causing the clashes, it might help restrain you from firing angry missives at the organiser of the meeting, if you know what’s causing it. |
Tag: Outlook
564 – Do Mention It
|
The same behaviour is commonly available in Teams as well, though it may be more limited as to who you can mention – in the chat for a meeting or in a Teams channel, you’ll typically only be able to @mention the people who are taking part or who are already members of the team. Like other uses of the @mention idiom, tagging someone will insert their full Display Name, as defined in the Microsoft 365 environment (or the address book if you like) – which can make mentioning people in a chat feel a little directorial or formal, especially if the format of their display name is something like FamilyName, GivenName (DEPARTMENT).
In most uses of the mention, you can edit the full name of the person, though it’s not quite consistent how to do it – in Teams, for example, merely pressing backspace (after the display name has been resolved) will remove the last word … so if you want to tag a colleague and their display name is Jane Doh, then a quick tap will reduce that to simply Jane. If they were Doh, Jane (IT) then it’s a little more complex to lose the formality – holding CTRL+SHIFT while pressing the left arrow will select a word at a time, so you could ditch the last part of the name then simply CTRL+Left arrow would skip the middle part, then CTRL+SHIFT+Left arrow/Delete will remove the first part again. Lesser platforms might allow a user to set a nickname that is used in place of their display name; that’s not (yet) an option in Teams etc, though in Outlook when you mention someone, you could insert a nickname in-between other names then remove the original ones, leaving only the short name you’ve added, but still hot-linked to their contact card etc. It’s a bit clumsy but might be preferable to calling them by their more formal name.
Just click the sort/filter option found to the top right of your Inbox or other folder, and choose Mentioned Mail to show only messages where you are mentioned. As with all such features, it works for some people and work cultures/environments better than others. For some external best practice guidance, see here or here. |
563 – Remove the Dupes
|
As storage got cheaper, the tendency to just keep old data gained prevalence, though some systems imposed limits due to the relative complexity and expense of managing their data, providing resiliency and backup services.
When Google launched Gmail in 2004 with a staggering mailbox limit of 1GB – 500 times that which was offered by Hotmail – the rules on what was expected for email quotas were re-written, with an expectation that you would never need to delete anything, and could use search to find content within. Leaving aside corporate policy on data retention, keeping piles of stuff indefinitely causes its own set of problems. How do you know which is the right version? Can you be sure that you have copies of everything you might need, in case the data is lost or damaged? If you have a backup, do you know that it’s a full copy of everything, and not a partial archive? Having multiple copies of the same content can be a headache too, if you’re not sure which is the true original and which might be later copies or partial backups. Applications might create their own duplicate content – perhaps through bugs, or through user activity. There was a time when syncing content to your phone or to another machine might risk duplication of everything – like having multiple copies of contacts in Outlook, for example. A variety of hacky resource kit utilities were created to help clean up mailboxes of duplicate contacts, appointments etc; you might want to check out a more modern variant if you’re worried that your mailbox is cluttered up.
Cleaning up the dupes can help make sense of what remains. You could spend money on proper photo archiving and management tools like Adobe Lightroom, or you could roll your own methodology using a mixture of free and low-cost tools – tech pundit Paul Thurrott recently wrote about his approach. There are many duplicate-removing tools out there – just be sure you’re getting them from a reliable place, free from adware and other nasties. Be wary of anything that purports to “clean” your PC (registry cleaners etc), watch out when accepting T&Cs and don’t allow the setup routine to install any other guff you don’t need. Make sure you have the right protection on your machine, too. One recommended tool is Duplicate Sweeper – free to try but a princely £15 to buy, but worth the peace of mind that comes with a tidy photo library or Documents folder. |
558 – Sharing your holidays
|
Really progressive people might even be sharing their calendar details with you, so you can see what they’re doing – useful, as all-day busy events obliterate everything else if details are not shown. If you’d like to tell other people you’re going on holiday, then you should create a 2nd appointment and invite your colleagues to it; but there are 3 important steps to take when you do this so you don’t muck up their calendar and annoy them to boot. When creating your second “FYI” holiday appointment:
While we’re setting the appointment up, it’s OK to not use Recurrence too – some people think that the way to make a multi-day appointment is to set a one-day meeting that recurs every day for a week. Don’t do that. Just set the start and finish Now all you need to do is create a suitably informative and entertaining Out of Office message and you’re all set! |
555 – checking Accessibility
|
These technologies often spawn wider usage in unforeseen ways, and in many cases are developed not for goals of making a fortune or having global influence, but to help a particular individual:
Microsoft has a long history in pushing accessibility technology – Windows 95 was the first You can jump straight to many of the settings applets by running ms-settings:easeofaccess-keyboard or ms-settings:easeofaccess-speechrecognition and so on.
The Check Accessibility option on the Review tab in Office apps like Word and Outlook, should be run just as you’d check the spelling of a document when you think it’s finished. The tool will give you a series of recommendations with guidance as to why it may be better to change aspects of the document. Not every one will be viable – you may want to have images in a particular place on the page, for example, rather than just in-line with text – but many are quick to correct.
One call to action would be update your own sig to add Alt Text, or to mark the images as decorative so screen reader software ignores them. For more tips on how to write documents which are more accessible, see guidance from Microsoft or from the University of Washington. Some resources for developers or web page designers from the UK Gov, with plenty of links to other sources – Testing for accessibility – Service Manual – GOV.UK (www.gov.uk). |
554 – Outlook signatures shortcut
|
Still, having your LinkedIn photo (and a link to your profile) along with salient information makes a lot of sense, especially when emailing someone for the first time. You can edit your signature in Outlook directly, by going to File | Options | Mail | Signatures, though you may find it better to do the creative stuff in Word, then copy/paste the results into the Outlook dialog. If you feel like freshening up the signature you use, there’s a nice template document with 20 sample signature designs to give you inspiration, here, and some instructions on how to make best use of it, here. The signature that you create is stored by Outlook as a collection of files in a folder on your PC – if you want to look and see, press the Windows key to bring up the Start menu, paste %appdata%\microsoft\Signatures and hit enter. There was a previous Tip (ToW #267) on how to set up synchronisation between multiple PCs using OneDrive, if that kind of thing is of interest.
When sending mail in a new window, you get the full ribbon menu of options, which includes the ability to insert your signature in the message – handy if you have it set to not include by default (eg in replies, where you might not normally want a full signature).
The search box will show you a bunch of content from search results as well as relevant actions from the many menu options in Outlook – it can jump to pretty much every feature, if you can’t remember where to find it The Signature action is the same as the menu option which lets you choose from one of a number of possible signature blocks to insert – in this example, there is only one, called .sig.
Now, when you’re replying to an email in the main Outlook window, the insertion of your signature block is only a couple of clicks away. |
550 – That’s not my name
|
If you have the kind of name that people habitually get wrong, there are things you can do to mitigate, like adopting a shorter and easier-to-pronounce and/or spell version. This tactic is often seen where people from cultures with long and complex names choose a “western” handle as well, just to make their own lives a bit easier. Or you could just put up with people getting your name wrong and don’t worry about it. An alternative trick is to provide people with your own pronunciation – that way, even if they forget, they can go back and check how you say your name. In the days of Microsoft Exchange Unified Messaging, you could choose to record your own name, as well as calling in to set your voicemail greeting, manage your calendar and so on. Exchange UM made a great demo back in the day, but presumably didn’t get used enough as it has now gone away.
Tap on your own photo in the top left of the LinkedIn app, then choose View Profile – and the rest is fairly self-explanatory. You record your name, and after you’ve confirmed that you’re happy with the playback, save it and from now on, anyone who looks you up will see the speaker icon next to your profile name. Alternatively, YouTube has a variety of pronunciation tutorials. |
543 – Dynamics CRM and Outlook
|
Mark Benioff, another ex-Oracle exec, set up Salesforce.com in 1999 to not only establish SaaS as a viable way to deliver “line of business” systems (as part of the first Application Service Provider boom, which was largely wiped out by Dot Bomb), but to ultimately eclipse his former employer in terms of market value. Time also moves on – now that Salesforce is the big dog in the CRM world, there are lots of competitors snapping at its heels… Pega, Zoho and many more. Not least, Microsoft – the Dynamics CRM business (now part of Dynamics 365 Customer Engagement) is growing fast, and even courted the “Father of CRM” to choose D365 for his new enterprise. If you use Microsoft’s Dynamics 365 CRM as part of your job, and use Outlook on your PC for mail, calendaring and contacts, there’s a handy way of connecting the two. Dynamics Connector for Outlook There have been several versions of a way to link Outlook and Dynamics together; the latest, Dynamics 365 App for Outlook, will fully supplant earlier versions in October 2020. See the admin guide for more on what the connector does and how it works. The installation can be a little clunky first time, though – you’ll need to install the connector software from here, which starts by downloading and extracting the setup files to a folder on your PC. Make sure you’re getting the right version for your copy of Office – to check, in Outlook, go to File | Office Account | About Outlook and look to see if you have 32 or 64 bit version installed.
Once you have the base version installed (a process which takes a good few minutes: you also have the option to enable offline usage, which means setting up a local database to hold the content), don’t bother starting it yet – go straight ahead and run the update to the current version (strangely, a larger download than the original install). Once that’s downloaded and installed, you’ll need to restart Outlook if it’s running.
You’ll see a new Dynamics 365 tab on the main menu, offering a variety of CRM-specific activities.
… meaning there’s no excuse to not have your important contacts listed in CRM. You can even match the contacts’ LinkedIn profiles, and create an org chart of all the listed contacts. |
539 – Outlook calendaring fun
|
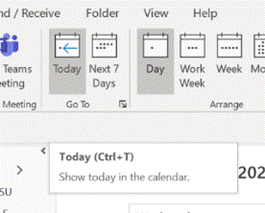
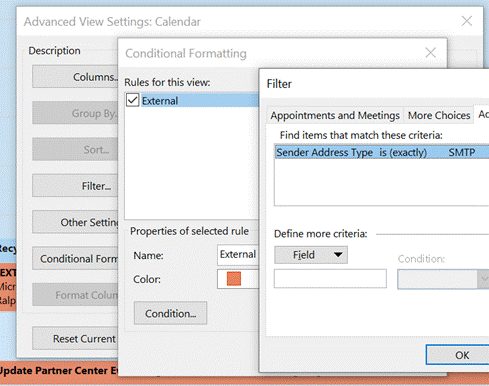
Here are a few simple tricks to remember when working with your calendar:
|
528 – Shorten your meetings (again)
|
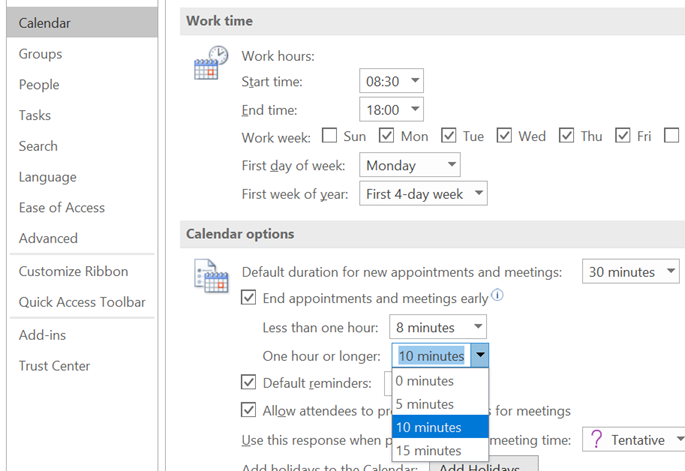
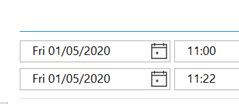
Eagle-eyed reader John Westworth pointed out that a simpler way of doing much the same thing exists within Outlook already, if you’re on the Microsoft365 subscription. The feature arrived back in March 2019, in version 1902 (Build 11328.20146). Note: to find the version of the Office suite, go into Word – not Outlook itself – and under File | Account you’ll see what version you’re currently using. This year-old but hitherto little-known feature is called “End Meetings Early”: it lets you choose a value to over-ride the default meeting duration, so if you create what is ostensibly a 30-minute meeting, I’ll actually end some number of minutes early. In Outlook, go to File | Options and look under the Calendar section on the left, to set your favoured options. If you create your appointment or meeting – remembering that a meeting is just a special type of appointment, to which other people are invited – either With most of the world still WFH, it’s a handy way of making sure you don’t get in back-to-back meetings during the day, with no chance to get away from your screen. Assuming, of course, that everyone obeys the finish time rather than just over-running to the next half or full hour boundary… If you use the Teams client to create meetings, it doesn’t currently have the functionality to shorten them, so for now, it’s best to stick to Outlook for setting the meeting up. |


