|
If people habitually get your name wrong, you could adopt an easier-to-say handle or just put up with people mangling your name and don’t worry about it. Or you can try to teach people how you pronounce your own name. In the days of Microsoft Exchange Unified Messaging, you could choose to record your name, as you might have done in those old-fashioned conference call systems that announce your arrival into a call. Exchange UM let you call in to set your voicemail greeting, manage your calendar and so on. That made a great demo back in the day, but presumably didn’t get used enough as it has now gone away.
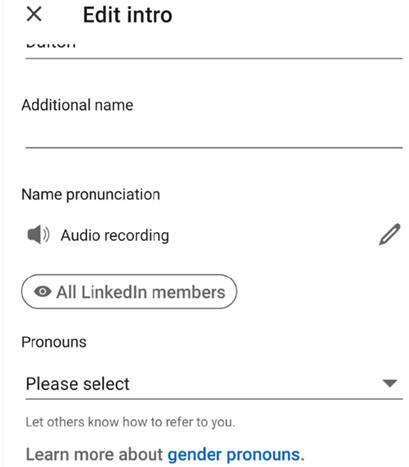
To make the recording, you’ll need to use the LinkedIn mobile app, not the regular browser view.
Look in your profile settings and you’ll see options like recording your name or listing your preferred pronouns, as well as the usual headline, title etc. After recording your name, others will see the speaker icon on your profile, and clicking it will play your voice.
Just tap on your own profile picture in the app, and you’ll see an option to edit it and also add a video. Separately, on the topic of how to say various words, YouTube has a variety of pronunciation tutorials. |
Tag: Names
575 – Who’s meeting?
 Organising a meeting in Outlook means sending out requests to participate – effectively you’re creating an appointment or event in your own calendar, then converting into a meeting by inviting other people to join you. If you’re putting something in your diary and want other people to know about it, but without expecting them to join you (eg you’re going on vacation and presumably don’t want your teammates to tag along), simple tricks can reduce the annoyance you might foist onto your co-workers… Organising a meeting in Outlook means sending out requests to participate – effectively you’re creating an appointment or event in your own calendar, then converting into a meeting by inviting other people to join you. If you’re putting something in your diary and want other people to know about it, but without expecting them to join you (eg you’re going on vacation and presumably don’t want your teammates to tag along), simple tricks can reduce the annoyance you might foist onto your co-workers…
Who has responded? Have most people declined?
If you are organising or attending a large business meeting with lots of attendees, it’s useful to be able to slice and dice the attendees more effectively – have most people declined and should I move the date, for example – click on the big Copy Status option at the top of the list.
If you right-click the table and select Table > Totals Row then if you filter the headings – like the responses, for example, you’ll be able to quickly see how many Accepted, Declined and so on. What could be interesting, too, is showing attendees names alongside their role, department, which office they’re from, their actual email address etc… Well, thanks to the magic of macros, use this Address Book Resolver spreadsheet, and just paste the responses from the Copy Status… step into cell A1, then hit the Resolve button. Some attendees might be external users (so won’t be known to your address book), and some of the names in the first column might not be unique enough to resolve, and will be highlighted (alongside external users) by a red Unknown in the Job Title column.
To use this sheet for resolving any list of bulk display names or alias names, just paste them into column A (and hide Columns B and C if you’re not using the output from a meeting invite tracking list). To prepare the spreadsheet for use, download the Address Book Resolver file as above (here it is again). Open the ZIP file and open the enclosed XLSM file or save it somewhere on your machine, then open it. Make sure you Enable Editing, then Enable Content so you can run the Macro that does the lookups. This is an evolution of the Alias resolver sheet posted back in ToW 417. |


