594 – One day, meetings != Teams

clip_image001Over the last 18 months, the number of Teams users has shot up – over 250M according to latest published stats, or almost 20x what they were 2 years ago. We all know why.

When you create an appointment in Outlook and decide to turn it into a Teams meeting by clicking the icon on the clip_image003Meeting tab, a bunch of custom fields are added to the meeting item in your calendar to define how it should be handled by the Outlook application, clip_image005allowing such functionality as right-clicking on an item in your calendar and joining the meeting from there.

Then there’s the text that gets added to the end of any existing appointment text, which gives dial-in info and provides a link for users who like to click on URLs or who are running a calendaring client which doesn’t support Teams natively. Some degree of customization can be done to this auto-text, but it’s an admin task rather than an end-user one.

clip_image007LinkedIn’s #1 fan, Brian Galicia, got in touch to draw attention to an option in Outlook which lets you make every meeting a Teams meeting (since the days of meeting people face to face now feel like a distant memory). Fortunately, it only adds the appendages to a calendar appointment when you start to invite people to it, so if you put stuff in your calendar to remind you to do things In Real Life, it won’t get in the way.

The option is accessed from the main Outlook window, under File | Options | Calendar, and is just above the groovy feature which lets you choose to shorten the default meeting time, so as to allow you and the attendees to get out of your chair once or twice in a working day.
From the ToW history files: When you create a thing in your calendar that’s just for you, that’s an Appointment. When you start to invite other people to your thing, then it becomes a Meeting. The Outlook UI changes when you’re dealing with Meetings vs Appointments (e.g., see tracking information on who accepted your meeting invitation, etc).

When the Teams integration to Outlook was first rolled out, the workflow to create a meeting was typically to put the time in your diary, invite your desired attendees, then click the Teams Meeting button to add all the extra stuff that anoints the meeting to become a Teams one.

That was a one-way process, though – if you clicked in error or decided to forego the online element, you either had to hack out the properties and text (since merely removing the “join” links in the text didn’t get rid of the Join Meeting UI in Outlook, as that was lit up by the contents of the various custom fields in the item) or, more likely, ditch the meeting and create a new one.

clip_image009Happily, Outlook now lets you do the removal from within its UI. You’ll find that under Settings on the Meeting tab, where you can also control some other functions, like whether external attendees need to be held in the lobby or whether you let them straight in.

The bypass feature is meeting-specific, so if you are scheduling 1:1s with customers or partners, you might want to let the striaght through, but if hosting a larger meeting then having a lobby could let you get your internal team straight before bringing in your guests.

593 – It’s a Date

clip_image002Following last week’s missive on Notepad, including the obscure tip on how to create a log file, the topic of inserting and handling dates in other applications is worth a (re-)visit. Each individual app may choose to offer different methods and formats, but for common Office applications there are a handful of memorable tricks and shortcuts.

clip_image004In Word, there are plenty of ways to insert and manage dates – perhaps the most useful way to remind the reader when the document was last updated (manually showing when a document was last reviewed or published). On the Insert tab, you’ll find Date & Time on the right-hand side, letting you add appropriate info in the format of your choice. You can also tick a box to update the field automatically, though that simply means every time the document is opened, it will show today’s date… which feels a bit pointless.

clip_image006More useful could be to tell the reader when the document was created or last saved, by referencing the actual properties of the document clip_image008(though be careful; auto-save might mean someone opened an old document, realised it was irrelevant, but had inadvertently saved it back).

On the Insert tab / Quick Parts, look under Field, then pick the doc property and format you’d like to show.

It is worth pointing out that showing a date as 10/1/21 (or similar) is ambiguous given that a few hundred million people will expect it be month-day-year while many of the remaining 7 billion will assume the day comes first, with a couple of billion presuming the format should normally start with the year, such as yyyy-mm-dd (which is arguably the most sensible of all; and it sorts properly, too).

A more daily usable short format like dd-mmm-yy (ie 13-Aug-21) should perhaps be the norm, especially when the date is appearing as text in a document. Pressing SHIFT+ALT+D in Word will insert the current Date as a field (so you can edit the format to remove ambiguity) and SHIFT+ALT+T inserts the current time too. In PowerPoint, both of these combos bring up the “Date & Time” dialogue to add the chosen content and format as plain text.

clip_image010When formatting dates, incidentally, the convention is that two letters refer to the short number (eg dd = 13), whereas 3 d’s or m’s will use the short form of spelling the day or month, with 4 meaning the whole thing (ie Friday, August). Try formatting a cell in Excel as Custom, and you can preview what the format would be, by typing in a variety of letters.

While in Excel, it’s worth learning the short cut key to insert the date and time – CTRL+; and SHIFT+CTRL+; respectively (no doubt there’s a reason why Excel has a different shortcut to other Office apps – some legacy of Lotus 1-2-3 perhaps?).

OneNote fans will want to remember that SHIFT+ALT+D / T combo as it inserts the date/time into the notebook; really handy when taking notes of a phone call or similar. SHIFT+ALT+F puts both day and time, something that Word doesn’t offer. In both Desktop OneNote and users of the Windows Store version, it’s just plain text that gets added, so you’re on your own when it comes to formatting.

clip_image012

OneNote pages will typically have a date & time showing under their title – on the Desktop version, it’s possible to change that so as to mark a page as having been recently updated. No such luck on the lame duck Store version.

At least when stalwarts insist on writing – or worse, saying – a short-form date as something like “ten one”, there’s more than half of each month where one number in the date could only mean “day” – starting with the thirteenth (as in, 8/13 can never by the 8th of a month, but 8/12 could be a few days before Christmas to Europeans, or the date when tweedy Americans start looking for grouse in the Yorkshire moors and Scottish Highlands).

592 – Take Note

clip_image002The simple text editor Notepad has been around since the dawn of Windows – it’s one of the few apps that was in the box with Windows 1.0 and is still there 36 years later, in Windows 10 and 11. Many people will encounter Notepad because they open a txt or log file, but some still fire up Notepad to quickly scratch something down, like a number being read out to you over the phone, when they say “do you have a pen and paper handy?”. Normally, It should take you under to two seconds to get Notepad running from anywhere – Press WindowsKey+R notepad ENTER.

Another handy use of Notepad is to quickly strip text of formatting; you might find that copying and pasting text from multiple documents often drags unwanted font choice, size, colours etc. In many apps clip_image004you have the option of pasting something as Text Only, but if not, then putting the decorated text into Notepad first, then selecting and copying it again from there will mean it pastes quickly and cleanly into the destination document. Sometimes, it’s actually quicker to use Notepad as a middleman too (especially if you favour the CTRL-C / CTRL-V method of clipboard interaction).

Some people – for whatever self-flagellatory reasons – actually use Notepad for taking notes during meetings or calls, and then maybe format their raw text into something more structured afterwards. ZDNet’s Microsoft commentator Mary Jo Foley is devout Notepad user. The fact that it’s simple and quick appeals to many, it seems.

clip_image006Notepad was turned into a Store app in mid 2019 and has gained a few tweaks to functionality, though nothing that normal people might notice. It’s getting a new icon in Windows 11, and who knows what other advanced functionality might follow.

Despite its relative simplicity, there are some obscure features – like the ability to add content to the header and/or footer of a page that’s being printed, even if there’s nowhere to save that clip_image008setting (since a TXT file is just that, until you start getting into the intricacies of different text file formats and what that might mean to applications which may consume the text file you’re editing).

Following last week’s F4 tip for Office apps like Excel, ToW reader Flaviu Comanescu-Balla goes one better in highlighting that pressing F5 in Notepad will insert the current date and time, clip_image010so if you are keeping phone notes or something, you can quickly annotate them.

In fact, Flaviu also spotted an even more obscure feature, where if you put .LOG as the first line in a Text file saved from Notepad, every time you open that file, the current date and time is appended at the end, so you can jot something down, save it again and keep a log of activities.

591 – An Excel Smörgåsbord

clip_image002Think of this week’s tip as not one single dish, but rather a series of related snacks; a groaning table of cold hors d’oeuvres or sizzling spicy tapas, with one common theme – they’re all about Excel.

May the F4 be with you

One of the neatest features in Office yet largely hidden; the F4 key repeats the last command without needing to faff about selecting the option from the menu. So what, you might say? Well, what if you’re formatting cells and want to repeat the same format over and over again – you could change one, then use the Format Painter option to apply that to select other cells, or possibly just apply the format you want, then select each additional cell in turn and press F4.

One slight downside is that it only repeats the very last action, so changing a number format and then making it bold wouldn’t be easily repeatable since those are two actions. Still, there are so many uses for this “Magic Key no one knows about”.

CTRL+y does the same thing in case you’ve got one of those annoying keyboards where the function keys do other things, you never know without looking if you’ll be pressing F4 or changing the system volume.

Layouts and Tabs

Now, Windows has lots of tricks for arranging application windows side by side, especially if you have multiple monitors; there’s a particularly shiny new way of doing it in Windows 11 with Snap Layouts. In the context of Excel, that’s OK if you’re using two spreadsheets side by side and you might want to reference or copy data between them, but Excel has its own window-handling functions that could be more useful.

clip_image004The key scenario here is that you can open the same document in more than one window (by clicking New Window, on the View tab) and then show different parts of it side/side – separate tabs, perhaps, or different areas on the same sheet.

The Synchronous scrolling feature means clip_image006you can also keep the cursor at the same point in both sheets, making it easier to compare. If you have functions on one tab that depends on data from another, you could change the data in one window and see its impact in real time in the other.

Click on the Arrange All menu option to automatically distribute the open Excel windows, optionally confining the process to just the windows from the active workbook.

Transpose data with paste

It’s a fairly common exercise to take a load of data that’s in one format and want to represent it differently; there is a useful Transpose feature that takes data from columns and paste it back as a row, or vice versa. One useful scenario could be when you want to take the names of everyone who got an email or meeting request and put them in a tabular format.

clip_image008Start by copying and pasting the names/addresses from Outlook’s To: field into a new cell: you’ll see that is’ one long string of text that needs to be broken down, but in this case, each address is delimited with a semicolon (“;”).

clip_image010Having selected the cell, go to the Data tab in Excel and choose Text to Columns then choose clip_image012Delimited and select the semicolon. Once the wizard is complete, you’ll end up with each address in its own column. Now select the multiple cells and copy to clipboard.

clip_image014Next, put the cursor on a lower row or maybe a new sheet altogether; right-click on the destination cell and under Paste Options, look for the Transpose icon (with the two arrows); hovering over the different icons in this menu will preview what you’re going to do. Click on the icon to commit.

Now you have a list of addresses on their own row, and without the “;”s, but they do have a leading space ahead of all but the first one. It might be quick to correct each line in turn, and there’s always the TRIM function which could be used to tidy stuff up through formulae.

clip_image016Alternatively, go back to the start of the process, select both Semicolon and space, and choose to combine the two, so the text in the columns is neater.

When you’re happy, remove the original line that had the text in columns, leaving just the separate email addresses on their own rows.

Now, snacks just make you hungry, don’t they?

590 – OneNote Tagging

clip_image002Even fans of  OneNote – either the full-fat Windows x86 version or the versions targeted at other platforms, mobiles and the Microsoft Store, both of which have been covered extensively in ToW passim – will likely use only a fraction of its total functionality. Did you know, for example, that pressing SHIFT+CTRL+> or SHIFT+CTRL+< increases or decreases the font size of the selected text? Or holding CTRL while pressing DEL or BACKSPACE in a block of text deletes the word either side of the cursor, and not just a single character? (Actually, these are true of other Office apps as well, though not Excel, presumably because using Excel for text formatting is considered deviant and weird).

clip_image004There are many useful features hidden in plain sight, like the tagging functionality which sits on the Home tab. In OneNote for Windows, if you have the ribbon expanded, you’ll see a series of icons to mark selected text with a Tag, and for the top 9 you can tag the text by pressing CTRL+n, where n is the number in the list.

clip_image006The idea with tags is that you can quickly reference back to the specific text that you’ve highlighted and tagged, via a hyperlink. As well as the variety of in-the-box tags, it’s easy to add custom ones: click on the down arrow at the bottom of the list and choose Customize Tags… then you can supply your own description and choose the icon and colours.

clip_image008The new tag is added at the very top of the list, so is immediately accessible by pressing CTRL+1 if you like; otherwise, it’s simple enough to shift the order around.

clip_image010Finding previously-tagged text uses the seriously powerful but sometimes obtuse search function in the sidebar; if you use OneNote to take notes from Outlook meetings, by default you might see hundreds of links that appear to be tagged.

Try using the Search filters at the bottom to restrict the results set, so you only show tags within a given notebook location or across all your notebooks, but for a specific time.

clip_image012The “OneNote for Windows 10”, Mac and mobile versions of OneNote handle tags slightly differently; while more-or-less compatible the degree of functionality does vary between the clients. Generally speaking, you can find tags across them all, though you may be restricted in editing or creating them. The OneNote mobile app supports a “To Do” tag, for example. The web clients don’t offer custom tags at all, and don’t allow tag-specific search (other than just text indexing).

In the OneNote for Windows 10 store app, you can search for Tags but custom ones created in the desktop app don’t appear in the Tags list when editing a page. Only a handful of tags are initially offered in the store version, and if you add a custom one it’s still possible to press CTRL+n to use it, but you need to count where your tag is in the list as it doesn’t show you the shortcut.

Custom tags added in the store version don’t appear in the tags list of any other client though do sync across other devices, to some degree.

Given the slight rough edges between the versions if you routinely open the same notebook in mobile, web and store/desktop apps, then Tags may not prove so useful – but if you tend to stick to a single UI – especially if it’s the older desktop one – then it’s worth exploring how custom tags could help you organize your stuff.

589 – When I’m naming Windows

clip_image002Great News! Another family of products has been announced during Inspire – previously a mega event held in Las Vegas, now a carefully-choreographed series of pre-recorded sessions being shown as-live with real people providing Q&A support. Many companies have moved their productivity and communications services to the cloud (Office 365 largely being supplanted by Microsoft 365 as more security and management stuff was added), and shifted some or all of their server estate to someone else’s datacenter too. Increasingly, if people were physically sitting in an office anymore, the only on-premises compute would be the PC they’re using (plus some networking gear, and a printer or two).

Windows 365 delivers a “Cloud PC” – literally a machine running Windows, which is remotely accessed by an end user and stays just like they left it when they disconnect, but is managed and secured centrally. As you may expect, there will be various SKUs depending on how capable you want it to be; Paul Thurrott opines that there will be many options, as “Microsoft is addicted to tiers”.

General Availability is due on 2nd August; it’s sits on top of the existing Windows / Azure Virtual Desktop, offering a per-user/per month pricing model (rather than a per-hour of use price) and providing a simpler management layer. Eventually, you’ll have the option of running Windows 11 but for now it’s Windows 10; there’s also the ability to run just an application and stream that to a remote device.

clip_image004Initially, at least, Windows 365 will be offered only to businesses already using Microsoft 365; the model being that you choose how many machines you want, and what size they’ll be (datacenter location, how much memory/CPU/storage etc), and the actual machine will be running in the Microsoft datacenter, allowing you to remotely access it from anywhere and on any device.

According to Mary Jo Foley, it will be reassuringly expensive so use cases will be carefully chosen rather than thinking everyone will sit at home running W365, accessing it over some ancient PC. For more details on machine sizing and the mechanics of provisioning and managing Windows 365, see here.

Interesting examples given during the announcement were the remote government of Nunavut, or having hundreds of interns joining Microsoft for the summer; normally they’d come to the office and be given a PC but since they’re all at home, the cost and time burden of configuring the PCs and shipping them out would have been high. Instead, they’re given a virtual desktop via Windows 365 – created en masse in a few minutes – and they connect to that from whatever kind of device they already have at home. When their tenure is up, their access is removed and there’s no data left behind on their iPad/Mac/Chromebook or home PC. Maybe 2022 could finally be the Year of the Linux Desktop?

For the rest of us; Windows 10 is still moving forward and the latest release due later this year has entered its latest stage of testing – Windows 10 21H2. And Windows 11 got another update to 22000.71, offering a variety of tweaks and polish. Even though Windows 10 is a modern OS with lots of great functionality, if you have already switched to Windows 11, using a machine with Win10 feels like going back in a time machine.

588 – Inside(r) Windows 11

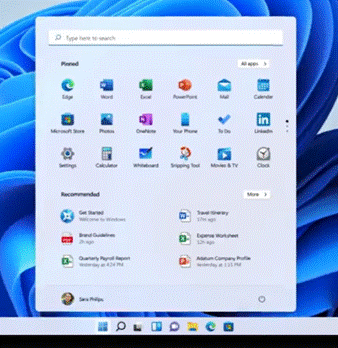
clip_image002If you were hiding under a rock, you may have missed the unveiling of the next release of Windows. Early adopters on the Windows Insiders program (which can be joined in from the Windows Update settings page on Win10) can already upgrade to Windows 11; currently that means being in the Dev channel (the most aggressive in terms of pushing our updates), so if you’re willing to run the risk of suffering a bit of discomfort, then you can get access to the preview bits now – or maybe wait until a bit later in the year and a more complete and stable build will make it to the Beta channel. If you have a Thurrott.com account, see what Paul thinks about whether you should try it out or not.

clip_image004Windows 11 promises not only a design refresh, but an under-the-covers shift from a security and reliability perspective, which means the compatibility list is pretty restrictive – it’s being targeted at newest hardware that supports updated security and performance management features. While many fairly recent machines will pass the test, DIY home PCs and older laptops are not likely to cut the mustard. The Windows 11 update and support cadence has been unveiled recently too. Maybe the ideal solution will be to buy a new PC when Windows 11 arrives…

Microsoft people who set up their Insider enrolment as being associated with a @microsoft.com email address will see additional options around which Branch or Ring to use – if that’s you, then unless you’re technically self-sufficient and very comfortable with the level of pain you may feel, be careful. External users get to join Dev / Beta / Release preview Channel.

clip_image006

Improved and updated functionality includes not just the fancy new Taskbar and Start menu – there are lots of areas where deeper integration with app functions and the OS itself will help to make it a slicker experience overall.

The virtual desktop experience has been improved somewhat – you can set up multiple desktop environments, then easily switch and drag/drop apps between them, but there are improvements over the same feature in Windows 10 – you can set different backdrops/themes for each and they persist between machine reboots.

Press WindowsKey+TAB to see the desktops and manage the apps – that’s the same key that used to control the Win 10 Timeline feature which has now been removed.

clip_image008When it comes to moving windows around, there’s a greatly enhanced Snap experience, so you can arrange windows by either dragging them to the appropriate corner of the screen or by pressing WindowsKey+Z to bring up a dialog that will snap your current window to the selected location. Newly added is a 3-line view if you have a portrait-aspect display.

Some features that have been disclosed – like running Android Apps on Windows – will be delivered in later previews, and doubtless some that are present now will change before final release. There’s already been an update which adds more tweaks and fixes some bugs.

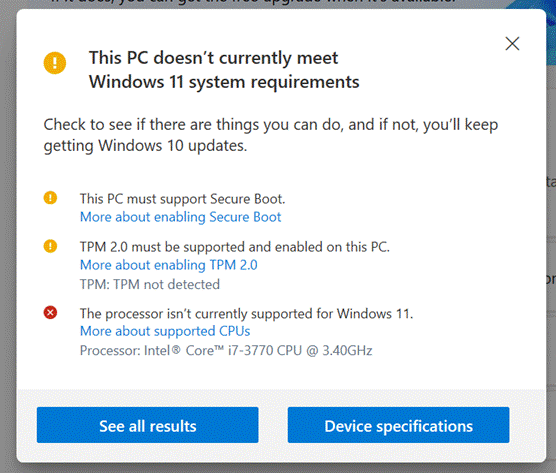
A “Windows Health Check” app was released briefly which would report if your PC was suitable for Windows 11, but was short on information as to why a particular PC might not be upgradeable, so the team has pulled the app for now and instead points to the info on Windows 11 Specifications. At least while it’s in Dev channel, it is possible to get Win11 on machines which don’t meet the bar, though there is a warning that your experience may not be all there and some things won’t work. YMMV.

587 – New Line please

clip_image002Lots of terms in computing have their roots in an earlier time, where the association has long since disappeared. The mouse was so called because of its “tail” connecting it to the machine; when was the last time you used a wired mouse? Then there’s the apocryphal story of a young person, on first encountering a 3.5” floppy disk (er, not so floppy any more) thinking that someone had 3D printed the save icon.

As well as the QWERTY keyboard layout, a few things were carried over to the modern computer from the typewriter – the backspace and tab keys and the carriage return key. Purely mechanical typewriters had an end-of-clip_image004line lever, which caused the paper to feed one line and the whole mechanism of the roller to shoot back to start a new line. Electric typewriters had the innovation of not requiring the dings and the manual whirrs, by pressing the RETURN key to automate the carriage – the symbol still displayed on most computer keyboards today is indicative of the physical action.

Early computer systems aped the same approach of the line feed (ie the paper being shuffled up one line) and the carriage return (going back to the left side), as being separate activities and they were given specific control codes – so CR, LF and CR+LF are still things. For some time, consternation still applied as Windows considered that CR + LF needed to be noted to really start a new line, whereas the Unix fraternity simply thought that LF was all you needed. It is possible to hack the registry so Notepad acts Unixsy should you need it to.

In most applications, if you want to start a new line, you’d just press Return or Enter (in effect, the same thing, though not always the case). Pedants would say that ENTER doesn’t mean you necessarily need a new line, you’re just committing some data you’ve typed, redolent of the old terminal where you might be submitting a form rather than typing in free text.

Applications perform sometimes completely different actions when you press a modifier key like CTRL or ALT, and ENTER. In Word, CTRL+ENTER starts a new page, ALT+ENTER repeats the last typing action. In Outlook, CTRL+ENTER sends the current email and ALT+ENTER – like the same keystroke normally does when looking at a file in Windows Explorer – shows the properties of the current message.

In Excel, CTRL+ENTER has some other meanings, notably it completes the entry of data into a cell, without moving the selection to the next cell along or to the line below (depending on config). SHIFT+CTRL+ENTER can be used to create a powerful but quite complex array formula. ALT+ENTER also has a useful trick for formatting text in-cell, alongside some tips to control cell text formatting.

clip_image006Firstly, wrap text where it makes sense – so clip_image008to stop it spilling into the next column and getting over-written by whatever text is or may be added in there.

clip_image010Sometimes, however, the layout doesn’t quite sit right unless you resize the column, and that might not be ideal. If typing in new text into a cell, you can force a new-line within the box by pressing ALT+ENTER. For existing text in a cell, one solution to put a new line in is to double-click in the cell, which will insert a flashing text cursor and you edit text directly in the cell rather than the formula bar text box at the top of the sheet. Move the cursor using the arrow keys clip_image012and/or by clicking the mouse elsewhere in the text; press ALT+ENTER  to force a new line in the box.
Much neater.

Another way of editing text in an existing cell; select it and the text will be displayed in the formula bar, but only the first line, unless you have the formula bar expanded out, by clicking the down-arrow on the right.

clip_image014If you show it as a multi-line view, it may be easier to click within that box to edit the text, move the cursor around and hit the ALT+ENTER shortcut to force a new line.

586 – Pick Up Thy WordPress

clip_image002This tip has been a very long time coming. Back in ToW 479, the subject of running WordPress on Azure was mooted, and it prompted an internal-to-MS conversation about the guidelines for publishing stuff externally.

The extended back story is that there were hundreds of employee blogs which had been published under the technet.microsoft.com and msdn.microsoft.com sites, both of which URLs could trace their birth back to the 1990s, and a project was underway to clean them up and rationalize somewhat.

Initially, guidance to MS bloggers was (basically) “unless you’re an official blog, you have <nn months> to move your stuff elsewhere before it gets deleted.” Certainly, there was to be no new content after the cut-off date.

That guidance relented somewhat and content from relatively active blogs was migrated to the Microsoft Docs archive though taking a trip through the final posts from the ToW host blog, The Electric Wand, shows that lots of graphical content was not carried across – more of a lift & dump than a lift & shift.

Blogging is a bit old-hat these days but lots of people do still maintain a blog to share stuff they think is interesting; see Scott Hanselman as one example.

Anyway, the solution for Tip o’ the Week was to move to an external website – www.tipoweek.com – which is hosted in Azure and, like about a third of all websites, running under the content management system, WordPress.

clip_image004Setting up a WordPress site is pretty straightforward, really – though you do have a variety of options on what kind of site you want to build. If you need a complex site with lots of control over it, then you might clip_image006want to run it in a Virtual Machine or a container. For most of us, though, a simple App Service will suffice. From the home page of your Azure subscription, just Create a resource and search services and marketplace for WordPress, then select the WordPress App Service from the multitude of options you might get.

For more tips on how best to get up and running with WP in Azure, see here.

clip_image008One retiring Microsoftie (not the shy type, but leaving the company, today in fact), emailed last week to point out that the tipoweek.com website was being flagged in Edge as Not secure. Oh Noes!

This has, in fact, been a niggling issue for a while, since Chrome (and Edge, given its diet of Chromium) instituted a policy of flagging any website that doesn’t use the secure HTTPS protocol & SSL by default.

Secure Sockets Layer, if you’re not overly familiar with it, relies on a way of encrypting data travelling between two points, using a previously-generated pair of mathematically-linked digital keys. If you have one key, you can use it to encrypt data which can only be decrypted by the other key in the pair (ie you can’t even use the same key that encrypted the data to decrypt it again). Typically, one of these keys is publicly accessible and the other is kept private.

clip_image010One way of sharing a public key is to embed it in a site’s SSL certificate, which is in turn validated by a mutually-trusted third party (called a certificate authority). If you visit the website for an institution like a shop or a bank, then your browser will download the site’s certificate, validate that it’s still current and trusted, then use that public key to encrypt data sent to the site. Since that data can only be decrypted using the corresponding private key, we can validate that the site is not being impersonated.

The whole public/private key encryption process has something of a computational overhead associated with it, but once we have established a secure connection, we could use a faster encryption technique for data sharing by using a single key that can both encrypt and decrypt the same data.

In other words, if I go to a website that presents me a certificate specifically issued for that URL’s domain, I can be sure that the site handing out the cert is who they purport to be. This could be validated by me generating a random set of numbers, encrypting it with the public key and sending that to the site; it would decrypt the gobbledygook with the private key that only it has, and we now both have the same set of data that has been securely shared between us. That would form the symmetric key that we can use for the rest of the connection.

For more detail on these kinds of topics, check out the Cryptography 101 podcast on Hanselminutes.

clip_image012In Edge, if you want to look at a secure site’s certificate, click on the padlock icon (or the handbag icon as some people once saw it – that meant it was safe to shop) – and click the “Connection is secure” banner, then click the little certificate icon in the upper right.

clip_image014

The trouble is, if you’re hosting a hobby or a community web site, paying for an SSL certificate might seem a bit of overkill; web hosting companies will try to bundle them into domain protection and other security features which might be no big deal for a commercial enterprise but a little stiff for a parish newsletter.

Fortunately, there are alternatives, though they do need a bit of spade work to get up and running. Hanselman (yes, him again) discussed using an extension and an organisation called Let’s Encrypt, whose goal it is to make the web 100% secure. They have issued over 225 million SSL certs, and will generate 3-month-validity certificates free of charge, as an alternative to paying anything from $60-200 a year to a commercial issuer. With a bit of practice, it doesn’t take long to create and manage the certs and if you only need to do it 4 times a year, then it could be time well spent and money well saved.

clip_image016An alternative method was written up by fellow Microsoftie Andreas Pohl, using a slightly more manual method to create the certificate then import into Azure; if you’re looking for an excuse to get Windows Subsystem for Linux up and running, then this could be it.

Once you have the certificate exported to a file, it’s a matter of a few clicks to import it into the Azure App Service that is running WordPress, set up the bindings appropriately, and you can then flick the switch to make the site only service up content over HTTPS.

clip_image018And thus display the handbag of security to anyone who visits.

585 – Heading to Viva

clip_image002Back in the mid/late 20th century, the mainstream car market in developed countries was quite localized, where certain brands were seen as the default. Italians drove Fiats and Lancias; even until fairly recently, pretty much all you’d see in French towns were Citroëns and Renaults. The biggest blue-collar rivalry for Brits, Aussies and many Americans was undoubtedly… are you a Ford family, or a GM family?

In the UK’s 1970s, Ford had the Fiesta (small), Escort (mid), Cortina (large), Capri (sporty) and Granada (executive). GM operated in mainland Europe as Opel (Kadett/Rekord/Monza/Senator etc) and in the UK, as Vauxhall (Chevette/Cavalier/Carlton etc). Brits of a certain age may fondly? remember the Escort-sized, everyman family car: the Vauxhall Viva. The announcement of the employee wellbeing platform, Microsoft Viva thus brought a misty-eyed moment of reflection for some…

clip_image004Since the unveiling in February 2021, Viva functionality has been gradually added to a variety of Office 365 experiences from Topics (based on what was called Project Cortex), Learning (highlighting online learning materials from a selection of company-curated sources, including stuff from LinkedIn Learning), Connections (a modern take on the company intranet) and the first module which was available, Insights, which is accessed via an app in Teams.

The Insights-defined “Virtual Commute” and calendar-blocking Focus Time has been mentioned previously in ToW #577, but it’s had a new shot in the arm as well as announcements about forthcoming improvements, such as the ability for Teams to quieten notifications when you’re in a focus period, and quiet time when Teams and Outlook will shush pinging you outside of working hours.

Now rolling out to Viva Insights is a set of mindfulness and meditation exercises curated from Headspace, who produce a load of online video as well as Netflix series and in-flight channels. See more about Headspace in Viva Insights, here.

clip_image005