669 – Hazelnut in every bite

imageWhat has a hazlenut in every bite? That’s right, a Topic from the British sweetie shop of yesteryear, and nothing at all to do with what’s near Tufty’s nest. Sadly discontinued last year, due to falling demand, there’s no accounting for taste.

Topics are still available today to users of Microsoft 365, as a way of curating certain scraps of knowledge that they can share with other users within the same organization. The very first version of Microsoft SharePoint (codenamed “Tahoe”) had a capability that aimed to do much the same thing – “Best Bets” were a way for an administrator to guide the search experience so that if someone ran a query for a term, rather than returning hundreds of old PowerPoint files that contain that word, it would take the searcher to a more official site.

clip_image002Viva Topics – because everything is getting Vivafied just as in the days of Tahoe, every other product had Live and/or .NET in its name – is part of a growing family of “employee experience” offerings; it’s an addon to even the top flight Office Microsoft 365 subscription, but adds AI-powered discovery as well as the means to manually curate things.

After deploying Topics and assigning licenses to the appropriate users, topic pages can be automatically created based on the documents that exist already – the Search and underlying Graph services can identify subjects that look like are active, with people contributing to them through documents, conversations and so on. Codenames or location names, for example, could be quickly identified and suggested.

A Knowledge Manager could also be assigned to create or approve new pages; individual users could be empowered to do it themselves, though that might end up in something of a mess. Best practice would be to have some kind of form or email-based request, where a user would ask for a topic page to be created and they would then own the content within.

clip_image004

Discovery is pretty easy – depending on how it’s set up, if the title of a topic is mentioned on a SharePoint site, it can be automatically highlighted on a pop-up card with which will give a summary of the topic, and a link to more the main page which contains furtherinformation.
clip_image006Topic pages themselves can be full of useful info; a search for documents or other pages that the SharePoint environment behind the scenes considers to be related, as well as specifically curated sources of information, contact cards for the people who are managing the project or involved with the customer, links to docs or other websites etc.

clip_image008

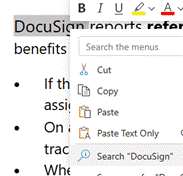
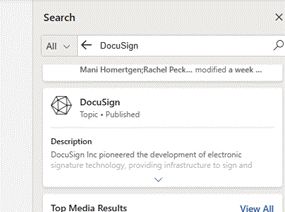
Within Office apps like Word or Outlook, if the user highlights a word or phrase and chooses to Search for it, a sidebar in Office will run a search online and across internal sites for that word – this is avialable to everyone, with or without Topics deployed.

If Topics has been configured and the searched for term is a topic (or is one of the topic’s synonyms, or is otherwise related), then the user will see it fairly prominently in the search results.

Now who’s for some chocolatey nuts?

649 – Exploring SharePoint libraries

clip_image002SharePoint is now old enough that it could walk into a bar and buy itself a beer. It has changed a lot over the versions; starting out as a server product that would produce “portals” (or “digital dashboards”) it grew quickly to being rather more document-centric. SharePoint became the back-end for OneDrive for Business storage, and both have evolved a long way.

Two years ago, SharePoint was said to be used by over 200 million users. The following year, the Gartner MQ had it way out in front on the “Ability to Execute” Y-axis and slightly behind only one other supplier on the “Completeness of Vision” X-axis. It won’t be long now for the next MQ report to appear.

Nowadays, SharePoint underpins quite a lot of Microsoft 365 functionality, such as apps like Lists which provide a groovier UI over the top of the base web services, and the document oriented collab in Teams.

clip_image004If you look at a file library in Teams, you’ll see a bunch of SharePoint-y options – you can Sync the content offline and it will be held offline, using OneDrive to sync it (and if you like, syncing only the files you’ve opened rather than the whole shebang).

clip_image006The Sync’ed libraries show up in the Windows Explorer app, and in any number of applications’ File | Open / Save dialog boxes, so you can access and interact with the files through the apps you use rather than browsing to SharePoint.

You’ll see a collection of folders that have been set up to Sync, shown with your organization name, alongside any personal OneDrive and OneDrive for Business synced libraries.

The Download option (next to Sync on the Toolbar in Teams), creates a single ZIP file your computer, with the entire contents of the folder you’re looking at, so use it carefully.

clip_image008One somewhat overlooked option further to the right of the toolbar (or may be on the ellipsis (“…”) menu): Add shortcut to OneDrive. This creates a shortcut link to the current SharePoint folder within your main OneDrive for Business storage, making it easy to find that SharePoint folder in the future, even though it’s not synced offline. The Add shortcut option is also visible on the ellipsis to the right of sub-folders when viewed in SharePoint or Teams.

Don’t add shortcuts to libraries – or sub-folders – which are already being Synced offline. That would be bad.

One downside to the OneDrive shortcut approach is that it just dumps the link into “My Files”, which is the root folder in OneDrive. The shortcut is named the same as the original source – so if you have lots of Teams folders with the same name (eg “Documents”), they will clash with each other as adding a new link would try to create a shortcut with the same name as one that exists already.

clip_image010

One solution would be to create a subfolder in OneDrive, called Sites (or similar), and after creating the shortcut to your latest Teams/SharePoint site, go to the root OneDrive folder and move your new shortcut – maybe renaming it too, so you can see what its parent site was (since the shortcut doesn’t make it clear what the source SharePoint site is) – you’d then have a Sites folder with lots of Shortcuts like Project Team – Documents etc.

Another side benefit of using shortcuts rather than Syncing offline, is that if you have multiple PCs – or feel like accessing OneDrive through a browser on a different machine altogether – you will always have access to the same collection of shortcuts, whereas the Sync offline capability is configured separately on each machine.

618 – Listing

clip_image002Lists form a big part of lots of peoples’ lives – whether it’s a to-do list for productivity afficionados, shopping lists for remembering the essentials or compiling top-five lists of favourite things, just, well, because.

A while back, Microsoft released a new app for Microsoft 365 users called Lists, which was essentially a front-end to SharePoint, itself a staple of the Office 365/Microsoft 365 offering since the beginning, and providing much more functionality than simply a place to stuff documents. The original SharePoint Portal Server 2001 (codenamed “Tahoe”) is nearly old enough to buy itself a beer in its homeland, and relatively advanced logic and custom data validation & handling has been a major part of its appeal for a lot of that time.

clip_image004Lists brings a lot of that functionality to the fore, while being extensible through Power Apps and integrated into Teams. There are mobile Lists apps available and in beta too.

Recently, the Lists experience was made available – in preview – for non-M365 users who could sign in with their Microsoft Account. A “lightweight” version of the app, it’s still pretty functional and pitched at individuals, families or small businesses who need to keep lists of things.

Taking a slightly different tack, the To Do application is a good way of making other sorts of lists – that could be Tasks or flagged emails as well as simple tick-lists to mark off what needs to be done. In something of an overlap with Lists, To Do can share its lists with other people – think of To Do as primarily for personal use that you might share, whereas Lists is for managing shared endeavours first and foremost.

clip_image008If you’re a user of both Amazon’s Alexa services and Microsoft To Do, you might want to integrate them together; using the Tasks In The Hand skill. Once enabled and correctly configured, you can use Alexa to manage that service’s built-in To-Do and Shopping lists, and these are then synchronized to the Microsoft To Do app.

clip_image010You can rename the lists which are subsequently created in To Do and which sync with Alexa, though you can’t yet manage additional ones. You could simply use the Alexa app to manage the lists rather than synching them with To Do, but setting up synch gives you more flexibility – To Do integrates with other software and services, like being able to show lists in the Microsoft Launcher app on an Android phone.

548 – A-List listings

clip_image002Updates flow to Microsoft 365 on a regular basis – there’s a published list of all the minor and major changes that are launched and on their way. As well as improving the current user experience and adding new features, occasionally whole new offerings are added – such as Microsoft Lists, which first made an appearance in July.

Lists gives an easy way of creating, sharing and managing lists of custom clip_image004information within a team – tracking issues, recording assets, anything in fact, that might have used a shared spreadsheet to do it in a low-tech way. Lists was announced to provide a modern-looking, consistent way of managing lists through a variety of front-ends – including mobile apps, to come later this year.

You should be able to see Lists from the menu on Office 365 web apps – start clip_image006at www.office.com and sign in with a business Office/Microsoft 365 login and the new icon will give you access to Lists – get started here.

Just like sharing forms or doing task management, there are often numerous ways to do the same thing – and in days of yore, that would have meant several competing and incompatible technologies, encouraged to fight it out with each other to try to ensure that the best one wins. Nowadays, with a more collegiate mindset, consistent ways of doing things show up in different user experiences – like To-Do and Outlook, StickyNotes and more. Expect deeper integration across other apps in due course

The new Lists experience is essentially just a great UI built on top of a mature back-end; SharePoint Lists, which have evolved over the last 10+ years, allowing the definition of custom columns and rules to validate data entry.

One new frontier is to integrate the new Lists UI into Teams; if you have ability to administer a Team, clip_image008you will see an “add a tab” function alongside the Posts / Files etc tabs that are typically presented.

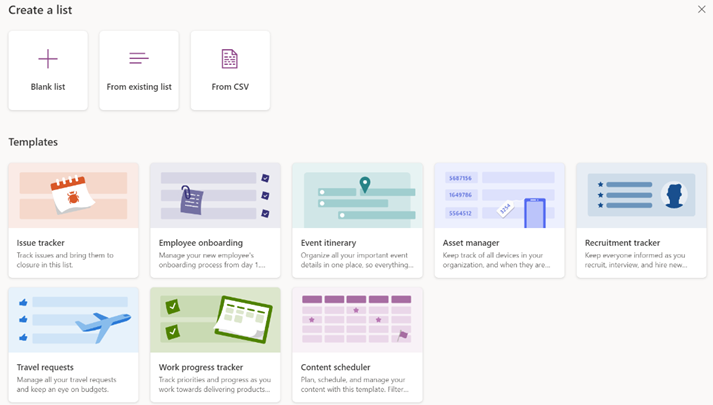
clip_image010Adding a List tab will then walk you through a process to either choose an existing List (by entering the URL of the SharePoint site that hosts it) or by creating one by importing a spreadsheet, starting from a number of templates or by defining it from scratch

Have a play with Lists and think about how your team could use them in place of spreadsheets.

Microsofties: There’s an internal story about how Lists came about, and looking forward to where it’s likely to go in the future.

Check out Paul Thurrott’s excellent introduction to Lists. And there’s even a Lists Look Book.

Tip o’ the Week 332 – Failing to plan is, eh…

clip_image002[1]If you’ve ever tried to source the real originator of some popular quote, you might come across the same old names that are supposedly responsible for it – Winston Churchill, Mark Twain, Benjamin Franklin, Jeremy Clarkson, etc. One such quote that has been widely attributed to any number of people (including self-styled 1970s time management guru, Alan Lakein) is, “Failing to plan is planning to fail”.

clip_image003[1]A new tool has been rolled out to Office365 users to help – Microsoft Planner. It’s a relatively simple-looking yet deceptively powerful group project / task management application that lets you assign and collaborate tasks amongst team members, all the time maintaining an easy to use and very visual overview of the projects.

clip_image004[1]Planner has been in preview for a few months but was released generally in early June and will automatically show up in the grid icon set on the top-left of browser-based Office365 applications.

To get the gist of what Planner does, check out the overview video, here. For tips on getting up and running, see the Getting Started guide.

There is a degree of functional overlap with other task-management systems like Wunderlist or even Outlook on its own, but Planner is designed very much to be a team-based thing and is particularly aimed at businesses or for educational use.

Comparisons are inevitably made with other tools, most notably Trello, and SharePoint’s own Tasks capability has had the Sword of Damocles hanging over it, if you believe the chat, so Planner is a welcome addition.

Tip o’ the Week #242 – File favourites and Explorer

clip_image002Office365 offers a great way of hosting documents in the cloud, using SharePoint Online and OneDrive for Business (which is really SharePoint under the hood) as its publicly facing storage offerings.

Office apps themselves are well versed in supporting SharePoint as a location to open and save stuff to, however other clip_image004apps – and websites – are not always so supportive.

If you’re lucky, applications will offer you a newer file dialog box >> which at least lets you navigate to shortcuts that can take you to your fave places – even good ol’ Notepad lets you pick from a Favo(u)rites list, and can access other groups of links to your PC or the network to which you’re connected.clip_image006

You could choose to disable the “OneDrive” tree from this file chooser (see the instructions, here). It’s a pity that OneDrive for Business – where you should be storing all your work-related files, vs OneDrive for your own personal stuff – can’t be exposed as an expanding tree. Oh well, there’s always Threshold

Well, if you want to make your favourite SharePoint sites show up in file dialog boxes, there are a few simple steps you can take…

  • clip_image010Navigate to your SharePoint library of choice in the browser, then click on the library tab, then on the Ribbon clip_image008which appears, click Open with Explorer… which will open said SharePoint library as if it was just another file share using Windows Explorer.

    Now, the road is rocky here if you are not using a domain-joined PC to access the library – for Windows to authenticate you automatically to open a library in Explorer, if you’re on a home PC, you may need to make sure you’ve appropriate saved the password (clicked Remember Me in authentication dialogs, even though they rarely do, etc).

    clip_image012It’s also worth adding the website to your intranet sites if you’re on a non-corporate machine – in the desktop Internet Explorer, first copy the site URL to the clipboard, then go into Tools | Internet Options (by pressing the ALT key to show the menu bar) and add the site to your Intranet zone by clicking the Sites button, then the Advanced button, to paste and include this site in your Intranet zone. You don’t need to do this is on a corporate, domain-joined PC.

  • clip_image014Now, once you have the requisite Explorer window showing you the contents of the SharePoint site (just click on the address bar if you’re in any doubt as to clip_image016whether it’s coming from SharePoint or not), then try right-clicking the Favorites menu in Explorer and adding the current location to Favorites. Now, it’ll show up in the list and can be renamed by right-clicking it, perhaps giving it a more uniquely identifiable name than “Shared Documents”, for example.
    Once you’ve created the shortcut in your Favorites, you could try jumping to your preferred text editor (or paint program, sound recorder etc) and try to open or save something – you should see your newly-created shortcut showing up.

There are numerous other ways of getting your favourite sites to appear in common-or-garden dialog boxes; from the library tab as above, you can choose to Sync SharePoint sites (and they’ll all show up under the SharePoint favourite), or if you copy the clip_image018URL/UNC to the clipboard, it can then be added to clip_image020Network Locations by right-clicking on This PC within Windows Explorer and choosing Add Network Location to make the link show up in that group of shortcuts.

Even the oldest binary apps and websites tend to support a file picker that will let you choose from This PC, and you should be able to navigate down to your new Network Location shortcut.

All of these tips are relatively self-explanatory for tech savvy folk like Microsofties – even if relying on old-fashioned style Explorer shortcuts might seem a little backward. If you’re helping to set up Office365 for a family member to use, however, this kind of short-cuttery could make the transition much smoother, and could be the difference between you getting asked numerous times how to save files, or being left blissfully alone.

Tip o’ the Week #225 – Surveys R Us

clip_image002

Have you noticed an increase in online surveys asking if you have a few minutes to complete them, when you visit web sites? Do you duck & dive when walking along the street and are confronted by a just-a-little-too-friendly student in high-vis and brandishing a clipboard?

clip_image003

Surveys are undoubtedly useful to the people collecting the information (as long as they screen out the loonies) though there’s always the possibility that the people who bother to fill in surveys might not always be the typical user – who has a spare 5 minutes in their day to tell some website what they think?

All that said, there are many tools that can be of use if you’re the surveyor and you want to ask people their opinion. In SharePoint Online (see here for a tutorial) it’s really easy to create surveys that contain structured and unstructured questions, even branching logic (eg. If you answer “No” to one question, jump to the next relevant one rather than asking you further questions about the thing you didn’t do).

Thanks to Phil Cross for pointing out that there has been a super-simple solution available for more than a year, courtesy of SkyOneDriveExcel Surveys. Ready for your Mum and Auntie to use, it’s a really simple way of asking a few questions and collating the responses you get – here’s an example survey.

It looks nice, but there are few fancy features like branching, however it’s really easy to set up a survey and it’s on OneDrive, so anyone can fill it in.

clip_image005

One thing to note, though – the originator doesn’t get any more information than what’s entered in the actual survey, so you might want to add questions about who the respondent is, what date it is etc. Answers are retrieved in a straightforward Excel table, and can use Excel functionality to filter and analyse – if you think you’re going to get enough replies that you’ll need to do that.

Still, Excel Surveys are easy to initiate, simple to complete and can be filled in by anyone who can access OneDrive.

Tip o’ the Week #111 – Sharing PowerPoint in Lync?

clip_image001If you’re regularly part of a Lync call which involves presenting slides, here’s some best practice that everyone should know about. In a nutshell – don’t share your whole desktopto show the PowerPoint slides; don’t even share PowerPoint  as a single program (something that Lync would allow you to do), but it’s really not the best way.

Why not?In general, the user experience is better if you show slides by uploading them into the meeting/call. Showing slides by sharing the whole desktop is inefficient on the network too; if the network isn’t so great (eg when attendees are on slower lines), it can be practially unusable. Also, unless you’re really smooth in the way you operate the PC, you’re in danger of showing more than just the slides – email alerts, incoming IMs from other people popping up etc. A slicker way of sharing slides is to use Lync’s built-in functionality designed to do just that.

If you have slides sitting on your PC, the quickest way of adding them into your meeting is to click on the Share clip_image002button within the conversation window, and select PowerPoint Presentation, which will then give you the option to choose a PowerPoint file to be shown – the Lync software will then upload the PPT to the server, and convert it to an HTML format that can be shown in a browseror in the Lync client. This process of uploading & conversion can take a little while if you have a large or complex PPT, so it’s best to start uploading as early as you can.

The nice thing about using this mechanism to share slides is that they are now in the meeting, and other attendees could take over as presenter quickly – you clip_image003could even leave the meeting and let them continue.

If you store your slides on a SharePoint site, there’s a trick to quickly uploading the slides to your meeting. One way would be to navigate to the document library in the browser, and then Open with Explorer – another would be to simply open the SharePoint site in Windows Explorer, by using the UNC – eg instead of going to http://sharepointemea/sites/love-it/tipoweek, go to the start menu and simply type \\sharepointemea\sites\love-it\tipoweek.That way, you could browse to the document just as if it’s on your hard disk.

If you go back up to the point earlier in this tip, to where you’d add a slide deck from your PC – you could type the \\sharepointemea\sites\etc link into the file dialog and then select the appropriate PPT, or else you could prepare in advance by opening the library using explorer, then re-use the tip from ToW#101on how to copy the full path of a file name to the clipboard, and just paste that into the dialog when it comes time to upload the PPT.

Once you’ve converted to using this approach, you may freely mock anyone who still does it the (admittedly, easier, with one click) old fashioned way of just sharing out their whole desktop to show a single slide deck. Live the dream – upload the slides to the meeting  using Lync!

There’s a really good explanation of some of the other benefits to using the PowerPoint sharing method on this blog.

Tip o’ the Week #101 – Finding files for dialogs

clip_image001How many times a month do you have a file (a picture, maybe, or a document) that you want to upload to some website, or attach to an email. and you know where the file is, but then have to navigate through a dialog box to locate it from within the application? I can sometimes think of 2 or 3 such scenarios in a given day.

There are lots of alternatives, of course – if you want to attach a document that’s on your desktop to an email, then you can just drag & drop it. But many dialog boxes don’t give you that flexibility – some apps will make you point to a file, by navigating to the file’s folder and selecting it from there.

clip_image002[4]This can be complicated if you have lots of documents in the folder, especially ones whose names don’t mean a lot – think about a folder with 100s of pictures, all called P0001234.jpg or similar. When you’re previewing the picture in Explorer, it might be easy to see which one you want to share, but if you’re uploading it through a dialog box that doesn’t give you a preview of the pics, then you’ll need to remember its location & name, so you can point to the file.

clip_image003[4]One approach would be to just click on the address bar within the Explorer window, and copy that to the Clipboard – CTRL-C – then you can typically paste that into the upload dialog box, and at least you will be pointed at the folder where the files exist. If you start typing the name of the file at the end of clip_image005[4]the path in the Address bar, then it may let you select the full name (using the up & down arrow keys to select) and copy that to the clipboard (CTRL-C again) too. All very well for the keyboard jockey but there is an easier way.

Copy as path

If you’ve selected a file in an Explorer window, hold down the SHIFT key and right-click, and you’ll see a new option shows up – Copy as path. This somewhat cryptic command copies the name of the file and it’s full path into the clipboard – so you can pick exactly the photo or document, and can easily paste that full path and file name into any dialog box.

Here’s an example of a SharePoint 2010 Upload Document dialog; just right-click in the “File name” box, paste the full name and hit Open.

clip_image006

On the face of it, this might not seem like a revolutionary function – but start using it and you’ll be amazed at how much time and aggravation it saves you. ZDNet’s Ed Bott said, “I use this shortcut constantly. It’s amazing how many times it comes in handy. It will save you many, many clicks.”

Tip o’ the Week #92 – Take and Share better meeting notes

clip_image002[4]Be the scribe

OneNote is a great audit tool.

When you’re in meetings with customers and partners why not offer to take the notes on your tablet, slate or laptop and then when the meeting is done simply save the notes as a PDF to create a simple, (almost) non editable version of the notes that you can share with colleagues, customers and partners.  This is especially useful if you hook up your device to a projector (using duplicate screen mode) and use your tablet as an electronic whiteboard. 

To export your results to PDF, choose “File”, “Save As” and then “PDF”. When the save dialog is displayed you can choose to save selected pages, the current section or even the whole notebook. If you don’t want the PDF step you can share your notes even more quickly by using the Share tab and selecting the “E-mail Page” button to send the page as a picture. The “audit” part comes in because both you and the customer has a permanent copy of the notes – this has extricated me from a number of potentially taught situations?

For collaborating with colleagues, an even better option is to use shared notebooks. Using SharePoint 2010 (e.g. your MySite) you can create shared notebooks which are synchronised between team members and always kept clip_image002up to date.

This is great for going to a customer meeting, taking notes and then automatically having them shared with your extended account teams. The only thing to be aware of is that shared notebooks (especially with ink) can take up a fair bit of disk space – but don’t worry, a call to 5000 or through ITWeb can get your quota increased easily.

To share a notebook that already exists go into “File”, “Share” and then choose the SharePoint server (“Network” option) server where you want to store it. When you’ve done this make sure that the location you stored the notebook has the correct permissions for your colleagues. To share a new notebook on SharePoint, go into “File”, “New” and select “Network” and choose the SharePoint. This is great for collaboration but even better for showing customers how we “live the dream”clip_image003.

Did you know you can create a meeting note directly from an Outlook Appointment, and that note will contain the date, time, location and names of all the attendees of the Outlook item?

Just go into the meeting in Outlook and you’ll see a nice big OneNote icon – click that and the rest is obvious.

Using and creating templates

clip_image004One way of gettng better organised might be to use a common template for meeting notes – if you click on the down-arrow next to the New Page command in the sidebar, you’ll see available templates and a link allowing you to set up new templates or find others online.

Some templates on microsoft.com.