|
Estimates of the energy cost to transmit and store data vary wildly, but if 1 GB cost 1 kWh power and the average CO2 output for generation was ~500g/kWh, then even shaving 10MB off a file can make a material difference if it’s going to be heavily used†. There are a few tricks you can follow to make your PPTs less massive – like compressing the images within, meaning that an embedded picture which was originally sized to print on a poster could be re-sized to fit on a screen.
A somewhat cavalier way of looking for large things you can torch, is to make a copy of your PPTX file and then rename it so you can look within. The OfficeXML file formats (prevalent in Office 2007 and onwards) use the same compression as ZIP files, so if you rename your file as such, you’ll be able to open it in Windows Explorer or other ZIP handling utilities, to see its innards. Opening the file shows you a folder structure, and if you navigate into ppt \ media then sort by Size, you’ll quickly see what’s making your file so big.
Go into View menu and look under Slide Master, which will open a whole new tab specific to the management of these template slides that form the bones of the presentation. You may well see lots of title slides or similar, which have embedded background images – if you know you don’t need those graphics or those layouts, just delete them.
This title slide in the Slide Master view had a graphical background which was 17Mb in size
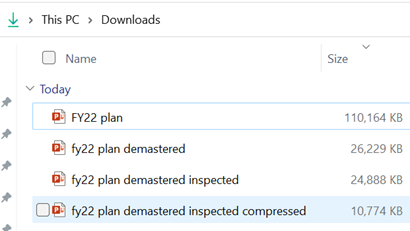
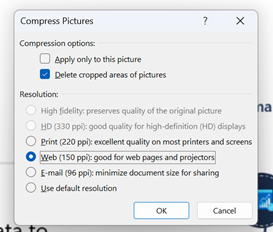
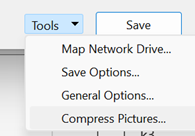
Selecting an image from one of the 70-odd slides in the deck, and choosing Compress Pictures from the Picture Format tab reduced it again to only 11MB, or 10% of the original file size – all for a few minutes’ effort.
†NB: the irony of sending a 2MB email to thousands of people, and sharing online and on LinkedIn, is not lost. |
Tag: Pictures
Tip o’ the Week 458 – Grabbing pictures from websites
|
Legitimate examples might include things like downloading a company logo from its website so you can include it in a PowerPoint slide; try going to just about any major company site and you’ll probably find it’s not straightforward to save the image file. Ditto all sorts of clever pages that might stop you simply saving the picture to your PC.
If you want to grab the actual URL for an image on a web page, the The Inspect Element funciton in browsers is designed to help web page debugging; it’ll let a user or designer jump straight to the section of a web page’s source, and inspect or even modify the code behind the page.
Look for the src= part, double-click on it and you’ll see the URL of the image in an editable text box, meaning you can easily copy that to the clipboard and get ready to paste it wherever you need it Using a search engine Of course, there may be easier ways to get an image – using Bing or Google search, for example. Bing is actually quite a bit better in this regard. When you click on an image in the results from Bing’s Image search, you’ll see a larger preview of the picture along with a few actions you can take – like jump to the originating page; search for other sizes of the same image; use Visual Search to run a query on just some selectable portion of the image; or simply just view it in the browser, thereby opening just that image and showing you the direct URL to it. In the case of both Google and Bing, if you click on “Share”, then you’ll get a link to the search result of that image rather than the picture itself – so if your plan is to embed the image in another web page or upload it to some other place, then you’ll be frustrated.
Simply choose Upload picture, paste in the URL of the logo you want to use and you’re off to the races. Figuratively speaking, anyway. You might have to jigger about with the proportions of the image by downloading it first and editing it elsewhere, as the image will need to be more-or-less square. Built-in icons in Teams appear to be 240×240 pixels in size so you could try to target that if you’re resizing. |
Tip o’ the Week 395 – Resizing pictures in Windows 10
|
This is especially the case if you’re sharing pictures with others – though it does rather depend on how. Email programs usually have ways to reduce the size of images, varying in method but increasingly very integrated to the sending process, and often with little real control of what’s going on. This doesn’t make the image smaller in the number of bytes it takes up, however – so you might think you’ve made your massive picture a nice thumbnail, only to find it’s still actually 7MB in size. In order to make the image data size get smaller in Outlook, select it by left-clicking, then from the Picture Tools | Format menu, you’ll find a Compress Pictures com mand that lets you make this image (or every other one in the mail), smaller.
The same thing happens in PowerPoints as well – tiny little watermarks on the background of a presentation making the file too big to ever email to anyone. A similar process can radically reduce the size of your presentations by compressing the size of images before saving. Files If you have pictures in the file system, there used to be a variety of ways for Windows to offer resize capabilities – one of which was to install the now-defunct Windows Live Photo Gallery, which had a nice wizard to resize images to standard sizes. Now, in Windows 10, there’s no easy, out-of-the-box way of doing it, as the Photos app doesn’t offer resizing and nothing shows up in the desktop / file system mode. If you have a habit of uploading photos you’ve taken to online forums and the like, some of them will deal with resizing for you (as does Facebook, Yammer etc too), but if they don’t, you may find you’ll need to radically reduce the dimensions of your pic before you can share it.
Afterwards, right-click within Windows Explorer on your chosen image – or select several and do the same – and resize the image(s) to a given set of dimensions in a trice. Then you’re ready to upload the resulting new pics to your online forum of choice.
|


