662 – How to make the perfect martini

clip_image002

Here’s a bonus Tip, akin to the Sweary Broccoli Soup one from last month. Since many of us will be taking time off in the next week, and activities may involve a modicum of adult beverages, what better time that to share some finely practiced tips in making the (IMHO) perfect martini?

The timeless cocktail which comes in many variants, is distinct from the Italian fortified wine, Martini – it’s thought that the barman who first gave the “martini” its name did so as a variant of “Martinez”. So it’s martini with a small “m”. Aficionados would probably choose a more premium vermouth as well…

This is a long post so pucker up and, of course, drink responsively. This is all a matter of opinion and exhaustive research – there are no product affiliations and recommendations are based on preference and plenty of practice.

Classic gin|voka martini | Vesper martini | Espresso martini

Get yourself tooled-up

First off, you need to select the right glassware. The classic V-shaped glass is worth investing in if you think you want to make a habit of martini drinking; if not, a champagne coupe or even a decent-sized wine glass will do.

Since the ideal martini is served very cold, you’re generally going to need something to stir or shake over ice, so a cocktail shaker would make sense. If you don’t have one, Amazon et al have plenty of starter kits that will include a long spoon and even a measuring cup (or “jigger”).

If you just can’t wait to get started, a jug full of ice and a device like an espresso cup or even an egg cup will do. Proportions are important in mixology, and if you’re not an accomplished free-pourer, you’ll need something that can be used to dole out 25ml/50ml shots or whatever size takes your fancy – 1oz in the US is just under 30ml so a little stronger than a UK single measure of 25ml.

Before you start mixing, put your glasses in the freezer and get any garnishes – like olives, or fruit peel – ready. You’ll want to do the stirring/shaking, pour straight in the glass, drop garnish in and then directly to the hands of the eagerly awaiting recipients.

The classic martini

clip_image004Gaining prominence in the 1920s, the original gin martini mixed a good quality gin with vermouth, at a ratio of 2:1, with olives or a twist of lemon peel for garnish.

Good quality” is an easy test – if you pour a little of the gin in a shot glass and take a slurp, does it make you wince and your cheeks pucker? Even though many gins are fine with a splash of tonic water, a gin martini made with 100ml Gordon’s and 50ml Cinzano Bianco isn’t going to set the place on fire. Most definitely stay away from any flavoured gins.

Start with Berry Bros No 3, Tanqueray No Ten, Warner’s London Gin or pretty much any of the millions of craft gins which pass the quality test above. If you fancy yourself as 007, substitute the gin with a quality vodka instead – same test of neat-drinkability applies – such as Grey Goose, Belvedere or anything of unflavoured quality. Smirnoff Red or supermarket own-label paint stripper? Probably not so much.

Vermouth is very much a matter of taste, but you probably don’t want anything that’s too sickly sweet and if you’ve gone to the effort of getting a nice gin, you won’t want to overpower it with cheaper fortified wine. Suggestions include Noilly Prat or Dolin Dry.

Proportions matter. Asking for a “dry” martini basically means less of the vermouth. If the 1920’s drink had 2:1 ratio of gin/vermouth, succeeding decades saw that rise to a more contemporary 3 or 4:1. Vary to your taste and endurance.

Ernest Hemmingway used to favour a 15:1 mix which he called a “Montgomery”, as it was said to be the preferred tipple of Field Marshall Montgomery before heading into battle. It’s amazing he could even see the front line.

“A perfect Martini should be made by filling a glass with gin, then waving it in the general direction of Italy” –

Noël Coward

Mr Bridger would wave his glass to the Italian Martini vermouth factory, while Churchill would supposedly take a glass of ice-cold gin and bow towards France (and Noilly Prat). President Lyndon Johnson prepared an “in & out” martini where he would pour a glass of vermouth, then throw it away and replace it with gin.

As for garnish; some would say a shave of lemon peel is the ideal accompaniment, but for many it’s the green olive that should go in a classic martini, as the saltiness of olives go well with the cold, strong booze.

Take a single or three olives – never an even number. Being served a 2-olive martini in mafiosi days was a signal from the barman that someone in the joint was going to harm you. A “dirty martini” has a sploosh of the brine that the olives come in, and it makes the drink cloudy and salty, if that’s what you like.

The technique. Fill your cocktail shaker/mixing glass/jug with ice cubes, pour the gin & vermouth over the ice and stirfor 30 secs. Pour into your frozen glasses, add the garnish of peel or a cocktail stick of olives and you’re done. A dry martini is actually quite low-calorie so don’t feel too guilty.

If you want to go no-alcohol, try Blutul alcohol-free vermouth, possibly mixed with one of the numerous zero-alcohol distilled spirits, like Tanqueray Zero. Or save a fortune and just drink elderflower cocktail in a chilled glass.

The whole Bond “shaken, not stirred” thing came from Ian Fleming’s belief that shaking vodka “bruised” it for a more intense flavour, so it was passed on to Bond. In truth, shaking over ice is only going to cloud the drink somewhat, and will cause shards of ice to be poured into the glass, melting and diluting the drink more quickly. That’s fine if you like you’re drinking Montgomeries, but not desirable for most. The best martini bars won’t even use ice – they’ll store their drinks in the freezer and pour straight from the frozen bottle.

The Vesper

A test of how good a bartender is: ask them to make a Vesper martini even if it’s not on the menu. If they don’t ask you questions about how you’d like it, prepare for disappointment. The ideal Vesper should be ice cold, very strong and is slightly sweeter than a classic martini.

The Vesper (named after the femme fatale, Vesper Lynd) was invented by Ian Fleming supposedly as he took breaks from writing, at the bar of the Dukes Hotel in London. Whether this is a misty-eyed memory or a marketing moment doesn’t matter – Dukes makes arguably the best Vesper in the world; it should be at £25 a pop, but you only need one.

“When I’m, er, concentrating… I never have more than one drink before dinner. But I do like that one to be large and very strong and very cold and very well-made”. – James Bond (Casino Royale)

In Fleming’s Casino Royale book, Bond invents the Vesper asking for 3 measures of Gordons, one of vodka and half a measure of Kina Lillet. It was revisited in the Daniel Craig film. Nowadays, you’d use a higher quality gin (see above – Dukes use Berry Bros No 3), and since Kina Lillet was an old quinine-laced form of aperitif, you’ll need to try a different mixer (Dukes makes their own blend).

Lillet is a brand of fortified Bordeaux which is available fairly widely over the counter or via mailclip_image006. Keep a bottle of Lillet Blanc in the fridge if you like your Vespers. A few drops of Angostura bitters added to Lillet Blanc apparently brings it closer to what Kina Lillet was like with a little more astringency to offset the sweetness.

Many recipes will have a twist of lemon in their Vesper, but to be a little different, Dukes favours a slice of orange for the stronger smell of the orange citrus oil.

If you’re not adept at carving hunks of skin from lemons or oranges (and potentially wasting the rest of the fruit), try taking a clementine/satsuma and slicing it thinly into circles (3-4mm thick) with a serrated bread knife (yes, a bread knife – who’d have thought it?)

Take one of the innermost circles and nick the skin in one place so you can open it out into a straight thin line and peel the flesh of the fruit away. Now take a chopstick or a drinking straw and wind the thin slice of peel into a tight corkscrew and drop it into the glass that’s currently waiting in the freezer.

The measures for a tip-top Vesper are the same as in the Bond recipe – 3 measures of gin, one of vodka (both selected as per the classic martini above), ½ a measure of Lillet Blanc and a few drops of Angostura. Stir with ice in the cocktail shaker for 30 secs, pour and enjoy.

Espresso martini

Much less boozy than the straight up drinks above, and a favourite of the cheaper cocktail bar who likes to feature syrupy sweet stuff that can be advance prepared in bulk. A proper espresso martini is a joyous and unctuous thing.

clip_image008You will need access to good coffee – ideally from an espresso machine, or Nespresso if that’s what you have. At a pinch, you could substitute strong, quality drip, cafetière or even instant coffee.

If you don’t have a kitchen worktop festooned with coffee making gear, go and buy some espresso beans for garnish and to help make your own liqueur.

The spirit of choice is vodka, and since you’ll be adding sweet and bitter additions to it in equal measure, you don’t need to worry too much about the provenance – Smirnoff et al will do nicely. You could tequila instead.

Apart from the coffee itself, the other key ingredient is a coffee liqueur – you could use something like Kahlua, though that is a little too sweet for some. Mr Black Cold Brew is a top alternative, though not inexpensive. If you have time on your side, it’s easy to make your own.

DIY Coffee liqueur

  • Put 500ml of water in a pan with 300g of regular granulated sugar, cook on medium heat while stirring until all the sugar has dissolved. Take off the heat.
  • Take 75g of espresso beans and lightly crush them in a Ziploc/freezer bag, with a rolling pin.
  • Add the crushed espresso beans to the water/sugar mix, along with 500ml of vodka (own-brand stuff is OK though mainstream label might be better), and 1tsp of vanilla essence. Set aside to cool.
  • Once cool, pour into a Kilner Jar or similar airtight container for 3 weeks (give it a swirl every few days), then strain it into a bottle though a coffee filter or kitchen paper etc. In truth, you could dip in after a week or so, but the longer you leave it, the better it gets.

For the price of a half a litre of cheap-ish vodka, some sugar and some coffee, you’ve just made 1L of good stuff that will last for ages in a dark cupboard. Depending on how frequently you partake of espresso martinis, obvs.

When you’re ready to make your pièce de résistance, put the glasses in the freezer and look out 3 coffee beans for each. To make 2 drinks, fill your cocktail shaker with ice and pour in one large measure (the size of an espresso cup, i.e. 2oz / 60ml) of vodka, and the same again of your coffee liqueur. Make espresso coffee into one or two regular sized espresso cups (again, 2oz/60ml) and pour one of them – still fresh and hot – into the shaker.

Put the lid on, give it a vigorous shake for 20-30 seconds. The mix of sweet liqueur, hot coffee and cold ice will froth the mix up and give it a velvety texture, while also creating a lovely crema to top off the pour. If you don’t have a shaker, try a plastic jug half filled with ice; something that you could give a really good strong stir and not worry about smashing the jug…

Dispense into the waiting glasses and top with the coffee beans on each. Drink the other cup of espresso as a chaser, or maybe leave it to the side in case you fancy a refill?

Have a great holiday season, everyone. See you in the New Year!

661 – Finding mail and slimming down

clip_image002

Learning how to find stuff in email is crucial, since many of us get so much that we let it accumulate until eventually it becomes a problem. Sifting through the many cc’ed work mails, or finding the order confirmation email in your personal mailbox amongst all the other stuff, we’re more reliant on search than ever.

This is a topic that has been covered numerous times in previous ToWs – 573 – Searching in Outlook and 504 – Searching Outlook for example – but is worthy of a revisit since we may have a chance to pursue the fallacy that is Inbox Zero over the next few weeks. And maybe it’s a time to find and delete the special offer emails and once-in-a-lifetime invitations that may be clogging up our personal mailboxes too.

Work mail

Dealing with desktop Outlook on the PC, there are plenty of tools available to help you find specific messages, in fact there’s a whole toolbar full of them.

clip_image004

As you look to search mail that meets your chosen criteria – it’s from someone in particular, maybe with a keyword in the subject, or that you know has an attached PowerPoint file, you’ll see that clicking the filters and options inserts the actual commands that will drive clip_image006the search, into the Search bar positioned at the window’s top.

Remembering a few of these means it’s quick and easy to search for mail from a person (you don’t need the quotes, really, and you could use just a part of their name) by typing straight into the box. ALT+Q (for query?) sends your focus straight onto the search bar, so if you’re a keyboard warrior, you could ALT+TAB to Outlook, ALT+Q and enter a search command, before your clip_image008 mouse-toting colleagues have even clicked a toolbar. While we’re at it, remember that CTRL+number jumps to the location on the (now vertical) icon bar on the left, so CTRL+1 will normally be mailbox, CTRL+2 is calendar, CTRL+3 contacts, and so on.

Commands could also be used to filter on properties of a message that are not so easily visible through the UI – eg from:ewan messagesize:>10mb or from:nico sent:”last week”. See here for more examples of the kind of thing you can type. Look under Recent Searches to re-run ones you’ve typed before.

Reducing Mail Bloat

clip_image010Is your mailbox size is starting to look under strain (look under the File menu to see how big your ‘box is and what the limit is)? With an active work mailbox in M365, it shouldn’t be much of a risk unless you genuinely never delete anything, but a quick way of identifying the big rocks and getting rid of them may be needed occasionally.

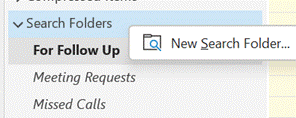
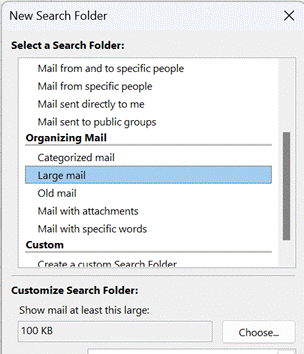
clip_image012clip_image014You could run a one-off search for all big mail as per the instructions above, or for extra control try creating a Search Folder. Expand the folder tree on Outlook’s left side, and scroll towards the bottom, to locate the Search Folders hierarchy, right-click on the top of the tree and choose New …

This will bring up a wizard which creates a query across your entire mailbox or other data file, but which looks like a folder; it’s visible only in Outlook desktop (ie not in web or on mobile) but can be a great way to locate stuff that might be filed away in the darker recesses of your mailbox.

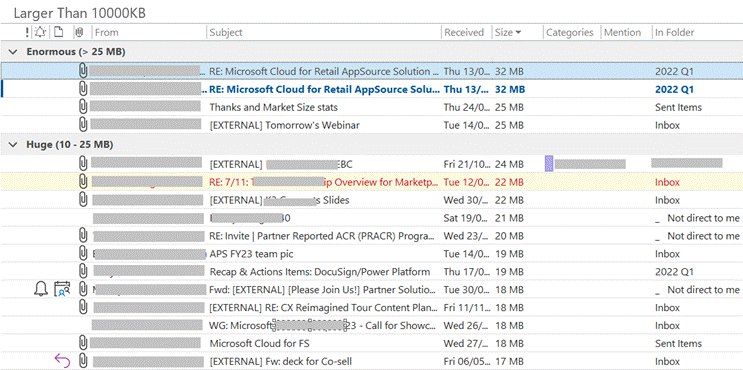
You can choose from some set templates or do your own custom thing entirely. The age of this feature is somewhat given away by the default value for “Large mail”… click the Choose button and enter something meaningful (like 10000 for ~10MB).

clip_image016

This should give you a few easily deleted big mails to at least get any short-term capacity problems dealt with.

Right-click on the Search folder and choose Customize… to give it a better name, or to tweak the criteria.

Home email

If you have a Hotmail / Outlook.com etc mailbox, there may be a more pressing size issue, as over a period of years you might have been signed up to a newsletter every time you buy something online, and without realizing it, those could account for gigabytes of data bloat on your mailbox. If every notification from Amazon or eBay is 400K, they soon mount up to a meaningful size.

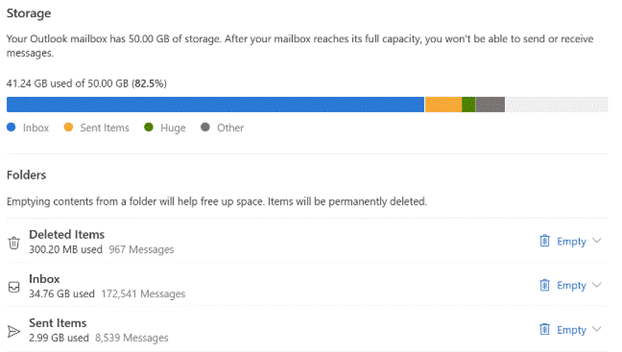
clip_image018If you have a free Outlook.com account, you should have a 15GB mailbox quota and if you have the account associated to a Microsoft 365 home or work subscription, you’ll get 50GB.

To check, go into Settings and search for Storage.

The UI for Outlook.com is simple and effective, but one thing it doesn’t do a great job of is handling message sizes.

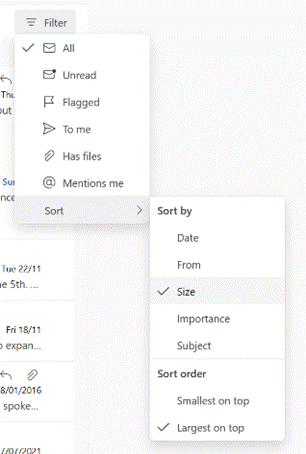
clip_image020Sort by size and you’ll see a group heading showing which emails are clip_image022the largest (displayed by default with the biggest on top), but nowhere can you find out what the actual message size is.

If you want to do a mass clean-out of your Outlook.com account, then you could try sorting by From, however the UI won’t let you click on the group heading to select all emails from that sender and make it easy to delete them.

The Windows Mail app on Win11 doesn’t offer Size either, not even to sort by.

clip_image024Sometimes, the old ways are the best – you get much more functionality if you add your Outlook.com account to full-fat desktop Outlook, allowing you to change the view, see and sort by message sizes etc. Oh, and yes, you can even set up a Search Folder too. Now, tidy away!

This is the last “regular” Tip o’ the Week until January.

If you’re still here next Friday, look out for next week’s special edition – it’ll be a belter.

660 – Contacts in D365 CRM

clip_image002Sales people tend to not like CRM systems very much. They are usually foisted on the poor folk who need to figure out how to get what they need out of them, while navigating a cumbersome and unhelpful set of behaviours and expectations. And that’s just the sales people – the CRM implementations can be poor too.

clip_image004If you have to use CRM, and you’re lucky enough to be using Dynamics 365 Sales (if not, you can get a free month’s trial), then there are some handy contact management tools worthy of a few minutes’ attention. First of all, the Outlook integration for the latest D365 CRM service means if you have an email from a customer or partner, you can track it and quickly add contacts on the email to the CRM system by invoking the Dynamics add-in.

clip_image006Click the Dynamics 365 icon in Outlook and you’ll see a sidebar show up on the right. The “Set Regarding” option lets you add the email to a customer record in CRM. Below that, if the contact doesn’t exist already, you’ll see the option to add it by clicking on the recipient’s name and hit the + button on the lower right.

Depending on the rules of your particular system, you’ll probably need to provide a job role and maybe some other fields, and you might not be able to associate that contact with an account yet – perhaps you’ll need to save it to Dynamics first, then make the association with the account to which the contact belongs.

clip_image008If the Account field is locked when you first add the contact, then once your contact has been saved in the sidebar, click the hamburger menu icon on the top left and look under Recent to open that contact again, then you should be able to choose the account name from that view, rather than fishing about in the main CRM UI for all the other added contacts.

clip_image010From within the same sidebar UI, you can fire up a more fully-featured view by opening it in a separate Dynamics window. From there you can more easily do stuff like matching the contact to one in LinkedIn, if you have Sales Navigator access; it’s a handy way of associating the two, though annoyingly it doesn’t automatically pick up the LinkedIn photo and associate it with the CRM contact.

clip_image012To set a picture for your contact, click on the circular initials at the top left of the name and that lets you choose a photo – ideally, you’ll have already saved the mugshot to your machine first, though if the image is online – a company website, for example  – you might be able to grab the direct clip_image014URL to the photo and paste it into the Upload Image dialog.

Getting images from LinkedIn can be a little more laborious especially if you’re doing this in batches. Here’s a fairly simple technique to make it easier.

  • clip_image016If you have LinkedIn Sales Navigator and it’s integrated to Dynamics 365, open the LinkedIn tab for your contact – assuming you’ve matched them already. Right-click on the profile picture and choose Save image as. Save it to your Downloads folder.
  • If you don’t have Sales Navigator, then try searching LinkedIn in another window, find your contact then open their profile. Right-click on their profile photo, choose Save image as, save to Downloads folder.
  • clip_image018Now back in D365, click on the initials back on the main contact page, to bring up the Choose Image pop-up. Click the Upload Image button, navigate to Downloads – change the view in the file picker dialog to “Extra Large Icons” to make it easier to find the right one – and select the pic you’ve just saved. Click the Change button and you’re done.

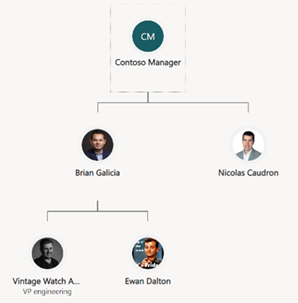
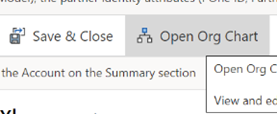
clip_image020clip_image022OK, so you have an image for each of your contacts – so what? Well, all the contacts you’ve just added should be visible in the Org Chart function which appears on the main toolbar of the Account. With a bit of dragging and dropping, you can quickly lay out the reporting structure for your known customer contacts.

clip_image024Handles will appear on contacts as you move them around, to help manage the way the chart is displayed and keep it simple. Save the chart layout when you’re happy, and you can show your boss how diligent you’re being at managing your customer relationship. Now, who wouldn’t want that?

659 – Sounding out apps

clip_image002

How you control the sonic emissions from your PC has changed repeatedly over the years; volume is often adjustable by hardware buttons or function keys but more advanced controls are usually found by double-clicking a speaker icon in the system tray. Windows 11 evolved the UI further, in the hope of making it easier to use.

Now, if you click the speaker, you don’t jump to the full blown sound control panel, but to a quick settings dialog which clip_image004controls some commonly used connectivity and display settings, customizable if you like. Desktop PCs typically don’t need Flight mode, but nocturnal users may want to add night light for quickly changing screen colour.

clip_image006Drag the slider by the volume icon and the predictable happens but click the icon to its right and you can easily choose which output device you want to use, if you have several (like headphones, speakers, monitors etc). Clicking More volume settings at the bottom takes you to a more fully-featured volume control panel.

If you have multiple monitors connected to your PC – especially if HDMI is involved – it’s clip_image008possible your machine might expect to route sound to one or more of them; unless you do actually have speakers attached to the monitor, or it’s in fact a flippin’ big television, you’d probably prefer it didn’t show up on the list of potential output devices.

clip_image010Click on the arrow to the right of the device you want to exclude – the ASUS monitor, in this case – and then hit the Don’t allow button: next time you look in the quick volume settings UI, it’s no longer there.

Some apps might have a UX for controlling audio output directly, over-riding the system default and probably sticking with whatever device you choose – Teams or Zoom, for example, may choose a USB speaker/mic or a headset if connected, rather than using the laptop speaker. If the app doesn’t know anything of sound devices, then ordinarily it will use the default (as per the options above), but there is a somewhat hidden setting that lets you tweak things further rather than having to alter the system’s chosen output just for that app or session.

If you want to fire the audio stream from a particular app at a different endpoint than the system default – let’s say you have a Bluetooth speaker connected, but you’d prefer system sounds and the likes to keep coming from your laptop speakers – you could tell Windows to send that app’s audio output to a different place, and the app will never know about it.

clip_image012In the main System > Sound control panel, scroll down to Volume Mixer and click the arrow to open it up. In that page, you’ll see a list comprising the currently-running applications which have made some kind of audio output (in other words, if you want to set an app up, make sure it’s started it and if it’s not in the list, start playing something).

clip_image014

In this case, the Dell monitor does have an amp & speakers attached to its audio line-out socket (where audio is sent to the monitor via the display cable, and it then puts it out to the speakers), so while spending a day of Teams calls and other system sounds emanating from the tinkly-bonk USB speaker, the business of smashing out some banging tunes can go to the bassier speakers.

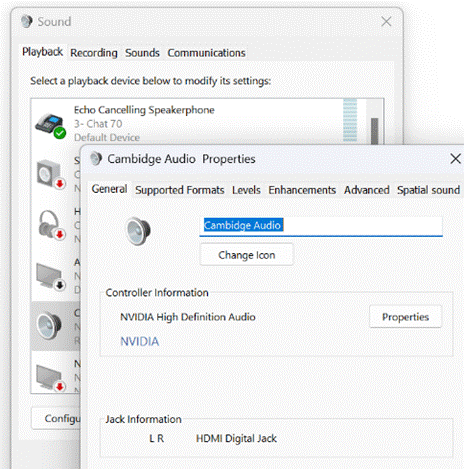
clip_image016Finally, should you wish to give your devices more meaningful names than the ones shown, look for More sound settings in that first System > Sound settings page. This brings up a Windows clip_image018XP-era dialog which allows more precise configuration of devices and levels.

The Sound dialog lets you choose the sound scheme (controlling all the bongs and bings of Windows), configure the speaker arrangement (if you have surround sound etc), or choose all kinds of enhancements and effects.

It also lets you rename the device altogether and set a different icon, so when it shows up elsewhere – including in the shiny Windows 11 Settings app – then it’ll be a bit clearer what it really is