|
 Sales people tend to not like CRM systems very much. They are usually foisted on the poor folk who need to figure out how to get what they need out of them, while navigating a cumbersome and unhelpful set of behaviours and expectations. And that’s just the sales people – the CRM implementations can be poor too. Sales people tend to not like CRM systems very much. They are usually foisted on the poor folk who need to figure out how to get what they need out of them, while navigating a cumbersome and unhelpful set of behaviours and expectations. And that’s just the sales people – the CRM implementations can be poor too.
 If you have to use CRM, and you’re lucky enough to be using Dynamics 365 Sales (if not, you can get a free month’s trial), then there are some handy contact management tools worthy of a few minutes’ attention. First of all, the Outlook integration for the latest D365 CRM service means if you have an email from a customer or partner, you can track it and quickly add contacts on the email to the CRM system by invoking the Dynamics add-in. If you have to use CRM, and you’re lucky enough to be using Dynamics 365 Sales (if not, you can get a free month’s trial), then there are some handy contact management tools worthy of a few minutes’ attention. First of all, the Outlook integration for the latest D365 CRM service means if you have an email from a customer or partner, you can track it and quickly add contacts on the email to the CRM system by invoking the Dynamics add-in.
 Click the Dynamics 365 icon in Outlook and you’ll see a sidebar show up on the right. The “Set Regarding” option lets you add the email to a customer record in CRM. Below that, if the contact doesn’t exist already, you’ll see the option to add it by clicking on the recipient’s name and hit the + button on the lower right. Click the Dynamics 365 icon in Outlook and you’ll see a sidebar show up on the right. The “Set Regarding” option lets you add the email to a customer record in CRM. Below that, if the contact doesn’t exist already, you’ll see the option to add it by clicking on the recipient’s name and hit the + button on the lower right.
Depending on the rules of your particular system, you’ll probably need to provide a job role and maybe some other fields, and you might not be able to associate that contact with an account yet – perhaps you’ll need to save it to Dynamics first, then make the association with the account to which the contact belongs.
 If the Account field is locked when you first add the contact, then once your contact has been saved in the sidebar, click the hamburger menu icon on the top left and look under Recent to open that contact again, then you should be able to choose the account name from that view, rather than fishing about in the main CRM UI for all the other added contacts. If the Account field is locked when you first add the contact, then once your contact has been saved in the sidebar, click the hamburger menu icon on the top left and look under Recent to open that contact again, then you should be able to choose the account name from that view, rather than fishing about in the main CRM UI for all the other added contacts.
 From within the same sidebar UI, you can fire up a more fully-featured view by opening it in a separate Dynamics window. From there you can more easily do stuff like matching the contact to one in LinkedIn, if you have Sales Navigator access; it’s a handy way of associating the two, though annoyingly it doesn’t automatically pick up the LinkedIn photo and associate it with the CRM contact. From within the same sidebar UI, you can fire up a more fully-featured view by opening it in a separate Dynamics window. From there you can more easily do stuff like matching the contact to one in LinkedIn, if you have Sales Navigator access; it’s a handy way of associating the two, though annoyingly it doesn’t automatically pick up the LinkedIn photo and associate it with the CRM contact.
 To set a picture for your contact, click on the circular initials at the top left of the name and that lets you choose a photo – ideally, you’ll have already saved the mugshot to your machine first, though if the image is online – a company website, for example – you might be able to grab the direct To set a picture for your contact, click on the circular initials at the top left of the name and that lets you choose a photo – ideally, you’ll have already saved the mugshot to your machine first, though if the image is online – a company website, for example – you might be able to grab the direct  URL to the photo and paste it into the Upload Image dialog. URL to the photo and paste it into the Upload Image dialog.
Getting images from LinkedIn can be a little more laborious especially if you’re doing this in batches. Here’s a fairly simple technique to make it easier.
 If you have LinkedIn Sales Navigator and it’s integrated to Dynamics 365, open the LinkedIn tab for your contact – assuming you’ve matched them already. Right-click on the profile picture and choose Save image as. Save it to your Downloads folder. If you have LinkedIn Sales Navigator and it’s integrated to Dynamics 365, open the LinkedIn tab for your contact – assuming you’ve matched them already. Right-click on the profile picture and choose Save image as. Save it to your Downloads folder.
- If you don’t have Sales Navigator, then try searching LinkedIn in another window, find your contact then open their profile. Right-click on their profile photo, choose Save image as, save to Downloads folder.
 Now back in D365, click on the initials back on the main contact page, to bring up the Choose Image pop-up. Click the Upload Image button, navigate to Downloads – change the view in the file picker dialog to “Extra Large Icons” to make it easier to find the right one – and select the pic you’ve just saved. Click the Change button and you’re done. Now back in D365, click on the initials back on the main contact page, to bring up the Choose Image pop-up. Click the Upload Image button, navigate to Downloads – change the view in the file picker dialog to “Extra Large Icons” to make it easier to find the right one – and select the pic you’ve just saved. Click the Change button and you’re done.
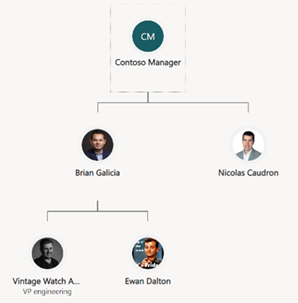
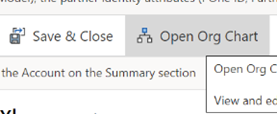
  OK, so you have an image for each of your contacts – so what? Well, all the contacts you’ve just added should be visible in the Org Chart function which appears on the main toolbar of the Account. With a bit of dragging and dropping, you can quickly lay out the reporting structure for your known customer contacts. OK, so you have an image for each of your contacts – so what? Well, all the contacts you’ve just added should be visible in the Org Chart function which appears on the main toolbar of the Account. With a bit of dragging and dropping, you can quickly lay out the reporting structure for your known customer contacts.
 Handles will appear on contacts as you move them around, to help manage the way the chart is displayed and keep it simple. Save the chart layout when you’re happy, and you can show your boss how diligent you’re being at managing your customer relationship. Now, who wouldn’t want that? Handles will appear on contacts as you move them around, to help manage the way the chart is displayed and keep it simple. Save the chart layout when you’re happy, and you can show your boss how diligent you’re being at managing your customer relationship. Now, who wouldn’t want that?
|


