Tip o’ the Week 305 – Windows 10 “Fall Update”

clip_image001The first major update to Windows 10 – known variously as the November Update, Threshold 2 (TH2) or the Fall Update – is now making its way out to users via Windows Update. The update brings new features , bug fixes and some under-the-covers management functionality to enjoy.

Any Brits who grind their teeth over the use of “fall” (now a North American term, where the rest of the English-speaking world still refers to the season as Autumn) might want to know that in the 17th century, the season was known in Britain as “fall”, but only became “autumn” through the Latin/French influences after the American colony had been established. So there.

If you’re patient, you should be offered the update via Windows Update (if a home / non-domain-joined PC), though if your Windows 10 PC is run by your company, there may be a managed deployment of the upgrade.

If you’re less patient, and you’re not using Windows 10 Enterprise, then you can force the update by re-running Windows Setup – it’s a bit of a palaver as you’re essentially running a full re-install of Windows over the top of your existing setup, although all your settings, files, applications etc will be maintained. If running from home, best allow a couple of hours.

Go to the Get Windows 10 page, click on Upgrade now and go through the wizard just as if you’re upgrading from Windows 7 or 8 to Windows 10, even if you’re already running Windows 10. This clip_image003process uses the most up to date version of Windows 10 – the November update, included – to run the setup and to upgrade whatever you’re running already.

There are lots of new features in the November Update, such as a “Find my Device” function in Settings -> Update & Security. There are other improvements to Cortana, Tablet mode, Edge, and Skype. More fodder for another tip or two.

The November update brings Windows 10 to version 1511 build 10586 (where, according to Paul Thurrott, 1511 denotes the year & month of the major release). If you’re not sure which version of Windows you’re running, clip_image005try typing ver at the Start menu, and choose the “See if you have …” option – or visit Settings | System | About to see the current version & build.

clip_image007Only after the November update will you see the “Version” & “OS Build” details appear. This should be an indicator of the pace of major updates – if “Threshold” (aka Windows 10 RTM) was effectively version 1507 build 10240, and TH2 is 1511, then who knows when RS1 (or “Redstone 1”?) will arrive?

Another quick way of getting the same kind of info is to run winver at the Start menu.

Or try msinfo32 if you want an old-school look at your PC’s software and hardware config.

Tip o’ the Week 300 – Xbox Streaming to PC

So,ToW reaches its 300th weekly missive. In the first weeks and months following the inaugural ToW, Avatar was in the cinema, the Burj Khalifa opened in Dubai, the Deepwater Horizon was busily belching oil into the Gulf and that unpronounceable volcano was disrupting air traffic all over Europe. How Time flies.

If you have an Xbox One and at least one Windows 10 PC, here’s a tip that seasoned gamers will doubtless be aware of, but many more casual users may not. Did you know you can stream whatever is happening on the Xbox, to your Windows 10 PC?

With an Xbox controller plugged in to your PC and the Xbox app open, you can play the game that’s running on the console, with only the video and audio streamed across your home network to the Windows 10 machine. If you have the Xbox in the living room but don’t use it for watching TV, this opens up the scenario that the latest Halo/CoD/Forza campaign could be running on the box and being sent to a laptop in one room, while the big screen in the lounge is tuned to brain-park guff like Eastenders/Corrie/Strictly etc.

Start the Xbox app on your Windows 10 PC and look for the Console icon (left), and you’ll be able to see consoles on your network. After you’ve registered the one you wish to control, youcan remotely switch it on in future too, assuming it’s reachable on the network and configured so.

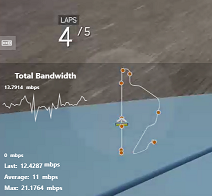
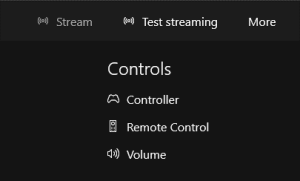
After firing the console up and/or connecting to it, you’ll be able to do a number of things, like use your PC as a media remote or mimic the Xbox controller with your mouse/touch, but given the scenario we’re interested in, let’s try testing the network for size.

If you run the Test streaming option, the bandwidth between the console and your active machine will be measured, and you’ll get a quick assessment of what quality level you can support – “Very high” is probably only suitable if you’re on a wired connection, and at one stage was only available through tweaking – though it’s now visible to all. The Very high setting sends 1080p video at a decent frame rate, so apart from the odd network judder that might crop up, it’s essentially indistinguishable from using the console directly. Just click Streamto get going.

Another use is that if you have the Xbox One Digital TV Tuner, you could stream live TV to a PC anywhere within range – so it’s possible to be watching one channel on the computer while the TV is currently in use, or you could watch TV in another room without needing the lounge screen to be on.

Once the streaming has started, if you move your mouse or finger to the top of the Xbox app window to display the in-app menu, you can change the quality of the experience, by clicking on the icon on the top right. The multi-line icon to the left of that will show you real-time streaming data in the bottom left of the screen, so you can monitor the performance of the network and make sure you’ve got the right level of quality.

If you’ve never streamed your Xbox to your PC, then give it a try this weekend and you may find a neat way of being allowed to use your console more often…

Tip o’ the Week 301 – Juggling Time Zones

clip_image002This weekend sees most of Europe moving from summer time (or Daylight Saving Time), and promises to cause confusion in some systems until everything settles down, and other parts of the world, who also use DST, have switched to winter time (in fact, most of the world doesn’t, though western Europe and most of North America does). Most of the US leaves summer time/DST on 1st November – to see more details of time zones and the dates when DST will come into effect, see here.

Most connected systems these days can figure out when the times are right to switch, but in practice, bugs can creep in and will often only get discovered when the time zone change actually takes place. One year, every Blackberry user was turning up to meetings an hour early, as the DST switch happened a week earlier than the devices expected. Since it took longer than a week to address the software issue, the problem had gone away by the time the bug was fixed.

If you’re dealing with people in other time zones, there are more tools than ever to keep you abreast of the changes – some of this has been covered before on previous ToWs (280, 244, 120, 26…) but here’s a refresher.

clip_image004Outlook – whenever an appointment is created, its date and time are recorded as an offset from UTC, and the time zone it’s due to take place in is also noted. If you’re creating meetings or appointments which are in a different time zone, like travel times, then it may be worth clip_image006telling Outlook by clicking the Time Zone icon in the ribbon, and then selecting the appropriate TZ – especially useful if you’re crossing between time zones and don’t want to run the risk of horological befuddlement.

clip_image008If you’re booking a load of appointments in another time zone – eg. you’re working in another country for a few days and creating appointments with people in that locale – then it’s even worth switching the TZ of your PC whilst you do the diary-work, to save a lot of clicking around in setting the appropriate time zone specific to each meeting.

The best way to do this would be to show your second time zone in the Outlook calendar – in the main Outlook window, go to File | Options | Calendar and select the second one to show; when you’re ready to switch between your local TZ and the remote one, just click the Swap Time Zones button to switch the PC (and Outlook) between the different zones.

Windows 10 – As featured in ToW 280 (though it was then in preview), there’s a nice new Alarms & Clock universal Windows 10 app, that shows a map of the world with your choice of locations, and the moving daylight line so you can see what’s happening around the globe. A nice alternative to that exec boardroom display nonsense, that you might expect to see gracing the wall of a Sugar (rabbit…) or a Trump (China…?).

clip_image009

Now all you need to do is deal with effects of travelling through the time zones yourself


app o’ the week

clip_image001

VLC for Windows Store – freeclip_image011

If you’re wondering how to play back DVD discs on Windows 10 (since the native playback inherent with Windows Media Center has gone the way of the dodo, much like that niche but much-loved feature), or you have some videos in unsupported formats, such as the one used by Media Center to record off the telly, then you might want to try VLC.

clip_image013

There are a few “experimental” features, meaning the app can be a touch flaky, and it much prefers playback of local media to networked stuff (depending on the format). But, it’s the most widely-used open source cross-platform playback app, it’s been refreshed with a Windows 10 UI and is free. So what’s the catch?

Tip o’ the Week #298 – Searching and finding

clip_image002Who keeps an up-to-date browser favourites list these days? Most people seem to find web sites by Binging/Googling (other search engines are available(!), though some of the pioneers are no longer around) for the site they know about, rather than in trying to keep a link that might change. This relates to the filing vs. piling analogy of document and email retention, which has been covered before (here).

[The precis is that some people find or recall things by where they are, like in a folder specific to that customer or project, whereas others might have a massive pile of unsorted stuff, but they can recover items within it by remembering key words or attributes, and searching the contents]

You’d think that by now, we’d all be experts at plugging queries into search engines, maybe even doing so before posting stupid stuff on Facebook. Hint – if anything looks dodgy or unbelievable, try searching snopes.com. Please.

Anyway, here are some tips for getting more accurate searches, in a few different places…

Outlook

Did you know you can direct specific clip_image004search criteria through Outlook’s Search pane? Click on the search box at the top of a folder and you will see the Search menu appear (or the ribbon will automatically show you the Search pane, depending on how you’ve got views set up). If you click on a criterion (like From), then Outlook will build the query for you in the search box, so you can see what it’s doing.

It’s possible to jump a little though – instead of clicking From then editing, you could just type from: Paul to search for all mail sent by anyone with Paul in their name, or try using a combo of other attributes (there are many – see more here), (eg. to: Paul sent: last week). Lots more example tips here.

Yammer

For many users, Yammer is a great conversational and collaboration tool, clip_image006but even if you don’t use it frequently to post content, it can be a brilliant way of searching for answers to frequently asked questions, that you might not get via email if you aren’t on the right DL.

Thing is, Yammer’s search tends to be a bit overly inclusive – if you enter several terms then you might have one or two more results than you’d expect.

clip_image008Adding quotes around phrases (“surface 4” “release date”) helps a bit, but it will still search for any occurrence of either phrase, but by adding a + sign to each word or phrase changes the search from clip_image010an OR to an AND (ie show results with all rather than any of the phrases).

Bing

If you’re looking to trim the results you get from a web search – either carried out from the Bing homepage, or from the address bar in your browser (assuming Bing is the default search engine) – there are a few operators that it’s worth remembering. Adding site:<url> to your query means you’ll only get stuff from there, so it may be quicker to use Bing to search a given site than to go to that site itself and search from within.

Eg. Try this querysite:engadget.com Lumia –iphone, will show results from the Engadget site regarding Lumia phones, that don’t mention iPhones: not too many results there. Try that same query as a web search rather than news (here), and you’ll notice a few pages in other languages. You could try filtering more by language (here). You can also stack site: clauses with an OR (must be capitals) operator, so you could say “Jenson Button” (site:bbc.co.uk OR site:pistonheads.com).

If you’re after particular types of content, you might want to throw the filetype: operator in, eg Azure filetype:pptx site:microsot.com. For more details on the kinds of operators Bing supports, see here.

Google users can find some search tips here, too.

Tip o’ the Week #297 – Personalisation in Windows 10

clip_image002

There are some pretty obvious updates and improvements when you move from Windows 8.x to 10 – the most celebrated being the Start menu changes, and the ability to run metro modern Store apps in a window. Running apps in overlapping windows, which can be moved, resized, minimized etc – who’d have imagined that?

Anyway, there are some neat personalisation tweaks that might not be so immediately visible, but can add a bit of a pleasing touch to your Windows experience…

clip_image004The best way to get to the Settings menu is probably to just press the Start button and choose Settings from there, though you can also get it from the clip_image006Action Center, shown by swiping from the right of the screen (in Windows 8 charms-stylee), by clicking the Action Center/Notifications icon on your task bar, or pressing WindowsKey+A.

Or you can press WindowsKey+i to open Settings directly.

clip_image008Once you’re in Settings, you’ll see a nice big Personalisation menu (well it’ll say that if you’re using English (UK) as your default language – nice bit of localisation there, Windows team …), which is typical of the additional thought & polish given to the Settings menu when compared to Windows 8.x, whose PC Settings screen often felt like a thin shim over the old Control Panel (though that is still there – just look under Themes and you’ll quickly be taken back in time to Windows XP).

clip_image010The Personalisation section includes the predictable background, lockscreen, colour etc options. As well as pretty but samey and potentially slightly boring corporate-provided background images, you could select a series of your own photo albums to show background or lock screen from your OneDrive camera roll, or other locations. Install the Bing Desktop app and you’ll be able to see the beautiful daily images from Bing as your wallpaper.

clip_image012You can get the machine to set colours based on what kind of background is being shown, which is a surprisingly neat touch.

clip_image014And under lock screen settings, you can change the apps which display content on the screen, much like the options clip_image016on Windows Phone where you can pin information from apps to the lock screen.

As above, you’ll see the Settings option on the left side of the start menu, assuming you haven’t turned it off. You can show other shortcuts in the same location by going to Settings | Start | Choose which folders… (though having File Explorer in the list gives you a sub-menu showing pinned items anyway).clip_image018

clip_image020If you want to turn back time, you could even allow the Start menu to go back to being full screen… look under Settings | Start

Tip o’ the Week #296 – Win10 Xbox App: snap snap, grin grin

There are a variety of apps out there for grabbing your PC screen in video format, using for making tutorials, saving gaming footage or other activities. There are many free screen capture apps clip_image002(like Microsoft’s Expression encoder, which is still available though no longer being developed) that seem to be either pretty complex (if feature rich), or else they add all kinds of undesirable gunk to your PC at time of installation (does anyone really want the Ask Toolbar?), they force a length limit or watermark on your resulting video, etc. There are other, commercial, products (eg Camtasia) which are really good, though again can be feature-rich and complex.

What if you want to do a simple screen recording to help make a point, and you don’t want to spend ages learning how to use a Swiss Army Knife of a tool, or installing garbage/spyware on your PC, and can’t justify spending a bunch of cash for a software package you’ll use once or twice?

Well, if you’ve got Windows 10, you may be pleased to know there’s an app that comes with the OS that can be used to do exactly this – the Xbox App. You can use it to take screen snaps (though with desktop OneNote installed, you can quickly grab an area of the screen to the clipboard by pressing SHIFT+WindowsKey +S), or you can save video footage of a target application window.

Since the functionality comes with the Xbox app, it’s safe to assume that it’s really intended to save game footage to your machine, but since it works with any windowed app too, then consider it a bonus regardless of whether you’re into gaming or not. Note that it only records one window, so if you’re looking to grab the whole desktop then you’re better off looking at the top of this tip, for Expression, Camtasia or others.


Capturing a window

clip_image004

Launch the Xbox app by clicking on the icon on your Start menu, or press Start and just type Xbox…

clip_image006Next, start the app you wish to record,   then press WindowsKey+G, which will open the Game Bar.

The Xbox app will ask to confirm that the target app you’re trying to record is a game – it doesn’t matter whether the app is or isn’t a game, so clip_image008just pretend that your target app is a game and launch the Game Bar.

clip_image010With the Game Bar open, you can either take a screenshot with the Camera icon, or begin recording video with the red circle Record icon. During recording, a small red indicator appears at the top of the currently selected window to confirm that recording is taking place, and showing the duration of the current recording. Clicking it will stop the recording, and pressing WindowsKey+G again will show the Game Bar again.

clip_image012Even easier, If you have the Xbox app running and the game bar is open, you can flick around to your target app just start recording the current application by pressing ALT+WindowsKey+R or grab a screenshot by pressing ALT+WindowsKey+PrtScrn.

Once your recording is complete, you can find it along with any screenshots with File Explorer under ThisPC\Videos\Captures. You can also find any of your recording in the Xbox app under Game DVR. That’s all there is to it.

Tip o’ the Week #294 – OneDrive sharing & syncing

clip_image001

OneDrive – the consumer-oriented file-sharing service, www.onedrive.com – has added a nice new feature which replicates functionality that used to be possible with other Microsoft file syncing technologies in days gone by, and is a key part of other services like DropBox.

It’s been possible to share folders with people for a long time on OneDrive, or even share individual documents (handy for when you want to make a presentation available to a customer or a conference organizer, for example, and don’t fancy emailing them a 30Mb file), but it’s just been stepped up a gear by allowing people with whom you share your stuff, to synchronise that content onto their own PC.

To get started, put your content into OneDrive either directly from the web UI, by using the OneDrive app or by clip_image003using the built-in OneDrive client in Windows 10 (look for the white cloud in your system tray, if you’ve set up your Microsoft Account within Windows 10).

Windows 8 can have the OneDrive client installed, and there’s one built-in to Windows 8.1, but, as yet, it appears not to support this sharing functionality – the line is, “Windows 8.1 users, upgrade for free to Windows 10…”

clip_image005You can also see what other people have shared with you by looking here, or by going to the OneDrive homepage and clicking on the Shared section on the left. You’ll see all the stuff that’s been shared with you previously, and can selectively decide not to show some folders in future – or in the case of content that you’ve been given the ability to add to or edit, you’ll be able to sync those folders to your local PC too.

If you view such a shared folder in OneDrive (via the link that’s emailed to you when your friend clip_image007sends the sharing email, for example), it will take you straight into that list of shared content, and (again, if you have Edit rights), will give you the option of adding that folder to your own OneDrive. As well as appearing in your Shared list, the folder will now show up in the regular list of folders you see when you look in OneDrive, even though it doesn’t belong to you.

If you’d like to sync that content for offline consumption on your own machine, then users of Windows 10 can right-click on the OneDrive client icon in your taskbar and choose Settings, then clip_image008Choose Folders, you’ll see the newly-shared folder appear in the list of folder available to sync, just as if it belongs to your own OneDrive storage. Check the box next to the new content to keep a synchronised copy along with your own OneDrive content. Looking at the shared, synced files in Windows Explorer, you won’t be able to see who originally posted the file into the folder, but if you view it in the browser, then it’s possible to see that info.

You might want to think about this when setting up shared folders with lots of contributors – collecting photos from a stag do or a company event, for example, it may be best to ask each contributor to create their own folder so it’s easier to see who’s responsible for the pictures, and to stop them inadvertently mucking around with each other’s

Tip o’ the Week #295 – Outlook 2016 tweaks

 Office 2016 for the PC is nearly here. Many Office users have been already running a preview version, detailed here, but according to Julia White, the rollout of the final 2016 release will begin on 22nd September.

With many new capabilities that might appeal to IT admins, and with distribution increasingly being done as part of Office365, end-users might be forgiven for missing what the differences are over 2013 or even noticing that the upgrade has taken place.

In Excel and PowerPoint, there are new charting types, additional polish to numerous capabilities in data presentation, analysis tools and the likes. OneNote goes largely unchanged, except for some high-DPI capabilities on very large or very dense screens. Outlook has some tweaks for being shown in portrait mode on tablet devices, and also gets some changes to how it goes about connecting to the Exchange/Office365 back end. Office apps also now support multi-factor authentication, so it’s possible to get users to strongly authenticate when trying to open a specific document, for example.

I’ll tell you what I want

 One nice end-user additions to most Office apps (sadly, not OneNote) is a new feature called “Tell me” – a text box that sits to the right of the menu bar, which lets you tell the software what you want it to do. Think of it like Help on Steroids, or Clippy’s Revenge.


 Click on the light-bulb on your menu, (keyboard warriors press ALT+SHIFT+Q, or just ALT then Q), and type what you want the Office app to do… and rather than just showing you help about how to do it yourself, it may jump straight to that command.

Try this – press ALT+SHIFT+Q and type forward (and as you’ll see, that is the top option anyway, after only a few letters, for… at least, it is in English…); press ENTER, then send a copy of this tip to all your friends. Simples.

You can enter help requests too, and Office will try to figure out what you’re doing, and if all else fails you can search the Help files for your phrase, or perform a “Smart Lookup” – which searches the web and displays the results in a pane to the right of the application.

Outlook has a history of incremental smart additions, like the attachment detector that first appeared a few years ago now – if it thinks you’re trying to send a message with an attachment, but you haven’t attached a file, you’ll get a pop up to check …

 Well, attaching files got a bit different in Outlook 2016, and it’s one of the  neatest new features, even if it’s not rocket engineering.

When attaching a file within Outlook 2016, you can drag & drop files as before, but if you click on the paper-clip icon on a message, you’re presented with a list of most-recently-used documents.

If the document you’re selecting lives on a SharePoint site, then (depending on how you have Office configured) the default paste behaviour may be to include a link to that doc rather than to paste the original into the email – so you can do what people have talked about for years, and that is send around pointers to the current version rather than attached copies which will go stale.

Obviously, sometimes people won’t be able to access the online variant, so it’s still possible to decide to attach a copy instead, in the traditional sense.

 Be careful when sending attachments to external users as it could be quite easy to send them a link to a shared document (which they won’t be able to access) instead of a proper attachment.

Maybe a future “attachment detector” will sense that you’re trying to email a shared document to an outside recipient, and offer to replace it with an attachment instead.

ß Who knows, maybe there’s a hidden Easter Egg already in Office 2016 already…?

There are some features in Office that might appear to be Eater Eggs but are actually designed to be useful, if hidden, functions. Try typing =rand() into a Word doc, or =lorem(100) (or number of your choice), to generate lines and lines of lorem ipsum guff.

Tip o’ the Week #293 – STOP SHOUTING ON CONF CALLS

clip_image002

Keeping track of the characters on conference calls could be a new type of buzzword bingo – from the people who stay muted the whole time (the only word they say being “bye”, at the end), to the unmuted furious typer/clicker/lunch eater/talker-to-somebody-else.

This brilliant spoof of conference calls in real life features most of them, but not the blast-radius shouter that is probably more of a nuisance to people physically sitting next to him/her than to others on the call. Sure beats real meetings, mind.

Thanks to Brett Johnson, for pointing out that there’s a feature in Windows that might help reduce the volume of the well-meaning noise pollutant, something known as Sidetone. Turns out, this has been in Windows for ages, if you have a headset that supports it.

clip_image004What Sidetone does is to play your own voice back into the audio stream you’re listening to, so if you have a headset that covers your ears entirely and blocks out background noise, you don’t completely isolate yourself and end up shouting to compensate.

To access the setting, plug in your headset then right-click on the volume icon in your system tray and select Playback devices to open the Sound settings applet, then  clip_image005double-click on your headset and look in the Levels tab.

Try it out and have a play with the levels, with a willing guinea pig: it’s a surprisingly subtle effect, but one that you won’t want to overdo.

Now, all we need to do is to build a Skype addin for meeting organisers to subvert the Sidetone on chosen attendees, to put a bit of a delay into the replay of their spoken voice, which could effectively deal with some of the other characters on the calls… and now we know how Garth from Wayne’s World achieved his effect.

Tip o’ the Week #292 – Stop the ads on Edge

clip_image001Advert blocking in Internet Explorer was covered back in ToW #247, highlighting some ways to stop annoying adverts from taking over your browser. The internet has plenty of examples of misplaced advertisement, not all of them online banner ads.

There’s a burgeoning industry in providing ad-blocker type extensions for browsers, which basically intervene and elect not to show you the ads – or the “suggested content” or other stuff that not only clutters up your favourite web pages, but also slows down their loading.

Most ad-blocking software runs inside the browser to analyse what’s going on and decide if it wants to let content through. Thing is, the Microsoft Edge browser in Windows 10 doesn’t (yet) have extensions, so there’s not much to do about adverts if you’d like to use Edge as your browser.

3rd party software

Some 3rd parties have started offering software that purports to stop ads in Edge – eg. Adguard Adblock, but whether not looking at ads is worth the $20 fee for use (beyond a trial period) is debatable. Either wait for more support from ad-blocking specialists, for updates from Microsoft which may help, or look to other solutions.

HOSTS file manipulation

Deep in the roots of the TCP/IP protocol which underpins the internet, lies an anachronism known as a HOSTS file. This was provided originally to tell your machine how to find other machines’ IP addresses given their names; they sometimes took precedence over other methods (like Domain Name System, DNS) or were a useful backstop if a name/address couldn’t be found trhough other means. Ultimately, HOSTS became unnecessary for the most part.

To see if your PC has a HOSTS file already, try running (WindowsKey+R):

notepad %systemroot%\system32\drivers\etc\hosts.

There is a neat trick to immediately block a lot of well-known advert-serving sites. Think of it that the web page you’re reading is also telling your browser to go to sitea.com, siteb.net and sitec.biz to show you lots of ads and other content from those places. If you were to put a hosts file on your PC, which specified that each of these sites refers to the mysterious concept called “localhost”, then it means your PC will quickly redirect to itself when it comes to serving up any of that content, and it will immediately fail and move on.

Several online communities maintain communal hosts files that list the URLs of a lot of common advert sources, and if you drop an appropriate file on your PC every few months (or whenever you notice there are more annoying adverts appearing), it will quietly deal with the menace, and operates at a low level so you don’t need to do anything to your browser(s).

Find a HOSTS file

There are many out there, but a good one is from MVPS.org (which lists ~15,500 known ad-serving URLs):

  • Click http://winhelp2002.mvps.org/hosts.zip to download to your PC
  • In Microsoft Edge, click the View downloads button
  • You should see the hosts.zip file at the top of your list on the right – click on it to open
  • Double-click on the mvps batch file, then select Extract all then Extract, to unzip the whole lot into a folder
  • Select with left-click, then right-click on mvps and choose Run as administrator to update your hosts file
  • You can always go back into your downloads folder and delete the folder created above – its work is done

You will likely need to tweak the registry to enable Hosts resolution:

  • Press WindowsKey+R then run regedit
  • Navigate to HKEY_LOCAL_MACHINE\SYSTEM\CurrentControlSet\Services\Dnscache\Parameters then
  • Click Edit > New > DWORD Value then type MaxCacheTtl
  • Click Edit > New > DWORD Value then type MaxNegativeCacheTtl
  • Double-click on the MaxCacheTtl key on the right pane, and enter the value 1
  • Double-click on the MaxNegativeCacheTtl key on the right pane, and enter the value 0

Another option would be to open this zip file, then double-click the file within, click Run, then Yes, Yes and OK. Assuming you trust this site, you won’t now be showing up on some list of transgressors, you’ll just have avoided the grubbiness of editing the registry as per the section above.

Now let’s compare one page:

BEFORE:

clip_image003


AFTER:

clip_image005

clip_image006Some sites will substitute blank space for the missing ads, but for content like the Other Stuff you might want to click on (such as the Taboola-type clickbait guff that’s normally at the bottom of the page), site may just quietly ditch whole sections without you ever knowing.

You may see the odd weird missing bit on some pages (eg from Ebay, see >>>), but that’s surely a fair price to pay for not cluttering up your machine with annoying adverts, having auto-playing videos blaring at you, etc. Now if they only made adverts like they used to, it wouldn’t be such a chore.

Pea & Ham, from a Chicken? Now that’s clever.