 “A computer on every desk and in every home”; sounds like a good idea, right?
It’s quite unusual to have such clarity of purpose in any corporate mission statement today, let alone in something so radical at the time it was written. 40 years ago, it must have seemed like crazy talk. Nowadays, every desk has had a computer (and use of many computers has outlived their desks), and nearly every home has one – in fact, nearly every room in some homes has at least one.
If you have a proliferation of PCs then you might have a need to make stuff that happens on one be accessible from the other(s). What if you could sit on the sofa (post turkey-fest?) and connect to the others? Use your phone or your tablet to control a corporate laptop that’s Direct Access-connected back to base, refreshing a financial report or some such?
If you’ve a Professional or Enterprise version of Windows (like a corporate Windows 10 laptop), then you’ll have the ability to connect to your machine using the built-in Remote Desktop function, a technology rooted in the Terminal Services feature that first appeared in Windows Server back in the late 1990s.
 Checking Remote Desktop is available and switched on
Firstly, have a look in the System application (press WindowsKey+X then choose System from there, or press WindowsKey+ Pause|Break if you have a full-size keyboard).  You’ll see if you’re running Pro or Enterprise version of Windows, and you’ll also have the link to Remote settings – have a look in there, and you will hopefully see the Remote Desktop section. Make sure it’s enabled and that you’ve selected the right users to be allowed to connect. Whilst you have that dialogue open, click on the Computer Name tab and make a note of what your machine is called – you’ll need that in a sec. You might even want to rename your machine to something more memorable while you’re there…
If you don’t have the Remote Desktop section available, there are other options– see later in the tip.
 Now, from another Windows machine, you should be able to connect to your PC – type Remote at the start menu to see the Remote Desktop Connection app – or just press WindowsKey+R and enter mstsc to launch the same thing (the executable is named after Microsoft Terminal Server connection, before the technology was renamed Remote Desktop Servicess).
 If you have multiple machines you might want to connect to, then mstsc /v <name> will jump straight to each one, and the Most Recently Used list for the Run command will offer you previous-used entries. This can be a handy way of remembering the names for the machines you might use regularly, so isn’t as counter-intuitive as you might think.
If you just open the mstsc app on its own and click Show Options then you’ll be able to tweak the settings such as quality of display, whether you want to run full screen or in a window, or even use multi-monitors where available. When you’re happy with the settings for each machine, you could save them out as a separate .RDP file, and you can launch the session in future by opening that file directly.
There’s a Remote Desktop Windows 10 modern app too – here – which is touch-friendly and also keeps a handy list of previously-accessed machines, though it doesn’t offer quite the same level of control of the user experience as its desktop counterpart described above. Some users of the modern app use it to run regular x86 Windows applications on their Surface RT.
Microsoft also publishes Remote Desktop client apps for Android, iOS, Mac and Windows Phone.
Firewall check
If you see Remote Desktop switched on as above, but you can’t connect to the machine from your other client, there are a number of obvious things to check (Are you connected to the same network? Have you got the name right? etc) but there are a couple of Windows  Firewall related things that might trip you up.
It’s worth checking that the PC you’re looking to connect to thinks it’s on a home network, not a public one – have a look in the Network and Sharing Center  old-fashioned Control Panel applet, and make sure your PC thinks it’s connected to a Private network. If you need to change from Public to Private, launch the HomeGroup control panel applet, and you can switch from there.
Even if you think everything should be tickety-boo but you still can’t access the remote machine, double-check  that the appropriate Firewall Rules are enabled – go into the Windows Firewall with Advanced Security control panel app, and under Inbound Rules, make sure the rules beginning Remote Desktop… are all enabled (showing a little green tick).
Remote desktop to a home PC
If your home PC isn’t running Pro or Enterprise versions of Windows then there are still options to allow you to remotely control it – a load of third party software purports to do this, though like any freeware you find on the internet, be careful… when running the setup process, make sure you’re not installing any other guff you don’t need, and maybe even think about removing the software as soon as you’ve used it, if you don’t anticipate needing it regularly.
The most recommended options include LogMeIn and TeamViewer, the latter of which is free for home use and has many client apps, including a touch-friendly modern app.
Another warning, though: the fact that TeamViewer is free means it’s also the favoured tool of the shysters calling people up and claiming to be from Microsoft, so they can access the hapless user’s computer. Make sure if you do install it, you’re getting it directly from the official source, and that you it’s as locked-down as you can make it.
 It’s been a busy time for the Skype team at Microsoft. At the Convergence EMEA conference, it was recently announced that Office365 had a new SKU: Office365 Enterprise E5.
  The E1, E3 and E5 SKUs all get a new Skype for Business capability which enables users to do online meetings with up to 10,000 participants: Skype Meeting Broadcast.


 So,ToW reaches its 300th weekly missive. In the first weeks and months following the inaugural ToW,

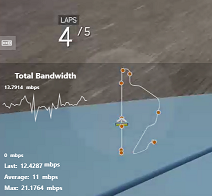
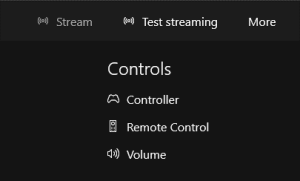 After firing the console up and/or connecting to it, you’ll be able to do a number of things, like use your PC as a media remote or mimic the Xbox controller with your mouse/touch, but given the scenario we’re interested in, let’s try testing the network for size.
 This weekend sees most of Europe moving from summer time (or
  Outlook – whenever an appointment is created, its date and time are recorded as an offset from
  telling Outlook by clicking the Time Zone icon in the ribbon, and then selecting the appropriate TZ – especially useful if you’re crossing between time zones and don’t want to run the risk of horological befuddlement.
 If you’re booking a load of appointments in another time zone – eg. you’re working in another country for a few days and creating appointments with people in that locale – then it’s even worth switching the TZ of your PC whilst you do the diary-work, to save a lot of clicking around in setting the appropriate time zone specific to each meeting.


