|
The Films & TV app got a nice refresh to coincide with the Creators Update, recently – so if you haven’t played around with it much, then it’s maybe worth another look. Films & TV can show off your local video files, or let you explore stuff to rent or buy as well as access previously bought video content. In an ideal world, it would be nice to allow apps to be able to retrieve content from any source, similar to how devices like Sonos can support multiple music sources (Spotify, Groove, Amazon etc). Sadly, for now at least, you can only see content that you bought through the Films & TV (previously Xbox Video) store.
Assuming Miracast works, that is. Russian Roulette would give you better odds than with some supposedly Miracast supporting gear, but let’s move on… The new “Explore” section in F&TV lets you see film trailers and recommended movies & TV series, as well as some highlighted 360° videos from sources like GoPro. Check out the Indy cars driving across the Golden Gate Bridge – Monaco it ain’t but it’s still quite impressive.
When playing back ordinary video, you could choose to play it back as 360° video instead – a relatively freaky experience that’s presumably included because you might happen upon 360° video encoded as regular MP4 or whatever, and want to experience that as intended. Still. |
Tag: Windows 10
Tip o’ the Week 375 – Edge improvements in CU
|
Battery improvements – as mentioned in ToW 335, Edge browser has been deliberately tuned to work better on battery-powered laptops or tablets, compared to other browsers. Well, following the Creators Update, a further test was run to stream videos until the identical laptops drained all their battery – with Edge outperforming Firefox & Chrome handsomely. YMMV but it’s worth looking at browsing with Edge if you want to get the best out of the time on your laptop. Extension support – there are more and more extensions coming out for Edge, featuring translation, password management, tracking & ad blocking and more. See them here.
Security – there’s some underlying improvement to the way that Edge protects the user from nastiness (well, some of the nastiness) on the internet – see more about it, here. There’s a summary of changes in Edge within Creators Update here. And there are more tips, here. |
Tip o’ the Week 373 – Copying Images for emails
 A picture tells a thousand words, etc etc etc. We all know the power of adding images into presentations, documents, emails and the like… even forum posts into external discussions often feature reference to pics that exist elsewhere on the internet. A picture tells a thousand words, etc etc etc. We all know the power of adding images into presentations, documents, emails and the like… even forum posts into external discussions often feature reference to pics that exist elsewhere on the internet.
If you want to use someone else’s imagery, especially if it’s something you plan to disseminate, then you really ought to ask, or else pick imagery that’s appropriate licensed. One way is to source your image content from a pre-licensed source – like public domain (fill your boots) or Creative Commons, where some rights are reserved by the creator but others are often waived, meaning you’re free to use those images within certain constraints. Bing.com has some nice image searching tools which let you find content and then filter based on the license type – just click on the filter logo on the far right, and then choose the requisite license type from the drop-down box.
Once you’ve found the image content and you’re happy that it’s OK to use it as per the license (or you don’t really care), then you can copy & paste in a number of ways.
See earlier comment. Whatever. Anyway. There are a few other ways of pasting in found content – in Facebook, for example, if you have a picture in the clipboard, you can paste it straight into a Post and it will be uploaded. The same thing is true of some online forums (watch nerds, look away now), whereas most will want you to find a URL for your photos before you can embed them in the post you’re making.
There are some different approaches to grabbing the URL of an online photo, should you need to – Google’s Chrome browser lets you right-click on an image, and you can copy it to the clipboard, copy its URL or even search Google for similar or different-sized versions of the same thing. The Edge browser usually works a little differently, though – you could share the image to another app that supports
So, if you’re a good girl or boy, you can share your own content from your PC, easily uploading to appropriate services by copying the path to any file on your machine and pasting that path into the dialog to attach, upload or insert a file. In fact, that’s probably the most useful tip in this whole mail. Done. |
Tip o’ the Week 374 – Creators Update arrives
|
this tip was originally sent in email inside Microsoft, on 7th April 2017
If you’d like to get access to the Creators Update before Tuesday next week, then you can download it in a number of ways beforehand – some home PC work for the weekend, perhaps?
As you’d expect, there are further major updates being planned – RH3 is already being rumoured, and Windows Insiders will start getting post-RH2 builds fairly soon now. If you’ve been checking out RH2 on the Insiders program, make sure you know what’s coming, and decide if you want to stay in the program. |
Tip o’ the Week 372 – Locking your PC
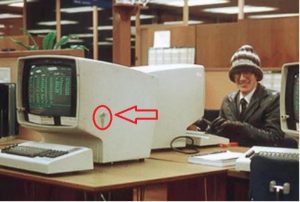
 Back in the 1980s and up to the early 1990s, IBM had many employees – this author included, though most definitely not pictured to the right – who regularly used 3270 terminals to access the Big Iron, and there was a strict policy in place that when you left your desk, you had to lock the screen. In those days, that didn’t mean hitting a keyboard shortcut, but instead, twisting & pulling a key out of the side of the terminal which put it into locked mode. Back in the 1980s and up to the early 1990s, IBM had many employees – this author included, though most definitely not pictured to the right – who regularly used 3270 terminals to access the Big Iron, and there was a strict policy in place that when you left your desk, you had to lock the screen. In those days, that didn’t mean hitting a keyboard shortcut, but instead, twisting & pulling a key out of the side of the terminal which put it into locked mode.
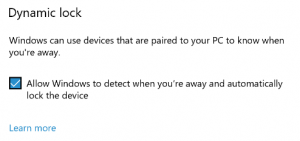
As users moved away from physical terminals to using PCs, there was a need to switch to software-locking of the “terminal” – hence the screen saver or keyboard lock, nowadays activated in many versions of Windows by various means, but mostly simply by pressing WindowsKey + L. If you get into the habit of locking your PC by firing that shortcut, you’ll find yourself instinctively doing so even when you get up from your home office to make a cup of tea. But there’s a new way, being introduced in the Creators Update of Windows 10 – due to start arriving over the next week or two. Dynamic Lock is a feature which means if you walk away from your PC while wearing or carrying a device which is paired to your PC via Bluetooth, then your machine will automatically lock.
Paul Thurrott talked about this feature in a preview build. He makes some valid criticisms, at least for now – there’s no way, for example, of choosing which device will trigger the locking motion, though there’s been a bit more further info on his site about how it works. The idea is that Dynamic Lock should be able to work with a variety of devices (like a FitBit or Band as well as a phone), but for now it appears to be phone-only.
Whatever; if you don’t have Creators Update yet, but you have a laptop with Bluetooth, try pairing your phone now and when the update arrives, you’ll be able to enable Dynamic Lock so you don’t need to lock your machine when walking away. Unless you don’t take your phone with you… Right, off for a cuppa. <WindowsKey+L> |
Tip o’ the Week 368 – Mail and Calendar apps mature
|
Ever since Windows 8 came out, the The Mail & Calendar apps are essentially joined now – though you still have “Mail”
Both mail and calendar functionality is getting advanced enough, you might choose to set up Mail and Calendar for your work/Office 365 email account, rather than bothering with installing Outlook on your home PC or companion tablet device.
Another notable new feature in Calendar is dubbed “Interesting Calendars”, optionally added alongside and sourced from a variety of publishers surfaced via Bing, and tailored for you based on locale. If you have multiple mail accounts set up, you can choose which one to add your “interesting calendars” to, by checking under the Settings > Calendar section (note – to get to the calendar specific settings, he app needs to be in the calendar view at the time, then invoke settings by clicking on the gear wheel in the icons on the bottom-left). If you add a custom calendar to your Office 365 account, the same one will be visible within Outlook too, under the “My Calendars” group.
Handy if you’re using the Mail app on a touch device (from a cheap 8” Windows tablet to a Surface being used in tablet mode).
For a history of new features in Mail and Calendar, see here (though since that page doesn’t list version numbers and also doesn’t look comprehensively up-to-date, YMMV). |
Tip o’ the Week 367 – Shortcut keys and Taskbar
|
One set of oft-overlooked shortcuts that have been around since Windows 7, deal with switching between applications. Yes, you can use the venerable ALT-TAB method (or even WindowsKey+TAB, if you want to recall the heady Flip 3D days of Vista, or make use of the multiple desktop feature in Windows 10) to flick between open applications, but if you’ve multiple applications running or have pinned apps to the Task Bar then there’s a more direct and arguably simpler way. The Taskbar goes back to Windows 95 but has grown a lot of functionality over the years If your Taskbar is in the traditional horizontal position and if you have nothing running and nothing pinned to it, you’ll see if fill from left to right as you open apps up. If n is a number from 1-9, you can use WindowsKey+n to jump to those apps which are open as if they were numbered from the left. If you are a bit more north-south in your approach and keep your taskbar tucked to the side, then it will go 1-9 from the top.
If you’re disciplined about this, you could have it that your browser of choice is always app #1, Outlook, app #2, etc. This would mean it’s easy to switch between apps, but also to start up apps which are pinned but not running. In the vertical taskbar example shown on the right, the Amazon Music app and Microsoft Word are not running (no blue line to the left of the icon) but the others are; Edge is pinned, but Outlook & Mail might just be active, but not pinned. If you use Amazon Music, the Win32 program has such poor support for common conventions of UX (despite being an otherwise decent app, especially if you’re a Prime or Music Unlimited subscriber), little things like pausing music can be a right pain – it doesn’t support the Pause key found on many keyboards, and doesn’t offer any system-wide control keys to navigate music… the app needs to be in the foreground for anything to work. A solution to hand can be to pin it to a static position on the list (let’s say #1), then press WindowsKey+1 to jump to it, and SPACE to pause or left & right arrow keys to jump back & forth in the current playlist. Similarly, if Outlook is in #4 on the Taskbar, then WindowsKey+4 followed by CTRL-SHIFT+I will always take you to Inbox, and CTRL+2 will take you to Calendar. If you want to check what’s going on in your schedule, this quick sequence (WinKey+4, CTRL+2) can be a great time-saver in jumping straight to calendar whatever else you’re doing, followed by CTRL+1 to jump back to the mail folder you might have been in previously. |
Tip o’ the Week 366 – Night, Night, screen light
|
Good advice might be to have no screen-time within 30 mins of going to bed, but good advice tells you to not eat bad food, drink bad drink or inhabit bad habits. And when do we ever follow good advice? A tactical solution might be to limit the blue light bit of our screen at night-time; it does appear to help, though avoiding electronic over-stimulation immediately before sleep is probably best, as a general rule at least. Should you need to use a PC, tablet or phone just before bed, there are a variety of tools to help. 4½ years ago, ToW #120 talked about a cool bit of software called f.lux which can tune your PC’s – or other device’s – screen, so that at certain times of the day, it reduces whites to be more pinky, by dialling back the blue light.
The Night Light options live under the Display settings; off by default, you can turn the feature on then configure it to change the hue of the screen either at a set time, or following the sun.
|
Tip o’ the Week 365 – Throttling applications’ network perf
|
If you’re using an ADSL connection, the Asymmetric nature means that preference is given to data download, with only a portion of the available bandwidth allocated to uploads, since most people are browsing, streaming and downloading files more than they are serving data or putting things into the cloud. One of the downsides to ADSL is that when you do need to upload a lot of data, it has the side effect of hammering the download speeds too. It’s even worse if something you don’t especially care about is killing your download speed through unexpected uploads, or you need to use something that requires decent upload speeds – like a Skype call or an Xbox Live session – and you get poor performance because something else is hogging your bandwidth.
Under the Network tab, you can put a value in for KB/sec (that’s Kilo-bytes per sec, rather than the Mega-bits or Kilo-bits per second of the bandwidth measurements above – remembering, of course, that 1 Byte = 8 bits, so 1KB = 8Kb), which will throttle the upload speed used by OneDrive sync. Hover over the OneDrive icon to see the The “Adjust automatically” option sounds hopeful, but still appears to favour upload speed over download requirements, though there may be more long-term monitoring going on. If you’ve identified OneDrive sync as the culprit to your poor performance, you can also pause it for a period of time – handy if you’re on conference calls with Skype and you want to give all of your bandwidth over to that.
Still, back to the experiment: after setting the limit to 25KBps as above, there’s still plenty of uploading, but not as bad an impact on the downloads…
|
Tip o’ the Week 361 – Music streaming choices
|
News just in, though, is that 2016 saw a resurgence in sales of vinyl LPs; in the UK, over 3.2m LPs were sold, up 53% from the previous year and the highest for 25 years. Why? A few major releases from the likes of Bowie & Prince, but even new music is being released on vinyl at a rate unheard of a few years back. Amazingly, a high proportion of the LPs sold never get played – they’re objects to collect and to admire, while listening to the music in digital format. Maybe even bought by people who don’t own a record player. Still, the burgeoning trade in big plastic discs is only 5% of the market and makes up the 41% of overall sales attributed to physical media including CDs. It seems streaming is the way most people consume music now, and the eventual outright demise of the digital download is being predicted in its favour. But which of the many paid-for streaming services to use? Groove
Amazon Music Unlimited
If you’ve an Echo or Echo Dot device, ask Alexa if she’ll open the pod bay doors. And many other stupid things. There’s an app for some mobile platforms (not Windows Phone, obvs) and a fairly decent Windows desktop app, too. Integration with Echo/Alexa is great, and there’s a promise of being able to use your Echo to control playback of Sonos devices, later in the year. This opens the somewhat tantalising prospect for existing Sonos users, of having a relatively cheap Echo Dot providing basic Alexa type services while controlling the music on the better-sounding Sonos. The Amazon Music desktop app plays back local music and stuff that’s streamed, even offering the ability to upload your own tracks to the cloud service so you can consume them when mobile, though you need to pay extra if it’s more than 250 tracks. Spotify
There’s little more to say about Spotify other than it’s the service synonymous for most people with the act of streaming music, just like YouTube is for video or Skype is for video chat (unless you’re an Apple user, of course)…
One potentially infuriating thing about Spotify, though, is that its desktop app won’t play back local files encoded in anything other than mp3 / mp4 / m4p – so if you have a huge library of existing media all neatly encoded and tagged in FLAC, then too bad. See comparison with the Amazon Music, here… All the others Meh. Some people like them, there are plenty of up & coming streaming services that think this is the year they’ll break through, but Tidal, Deezer, iHeartRadio, Pandora; whatever. YouTube is still the most popular music streaming service, for copyright-dodging tightwads who don’t want to pay for content and are stuck in 2002. One of the hardest things to do is to switch from one service to the other – what if you want to try out the new service but don’t want to rebuild all the playlists you may have made already? Try Soundiiz, a free web-based playlist sync & export tool, which supports a lot of the popular services including Spotify and Groove, but unfortunately not Amazon, Google or Apple’s offerings. Still worth a look, though it’s been in beta for a long time… |


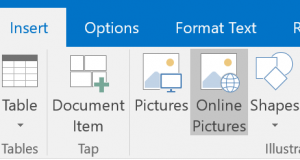
 If the destination for your image-based plagiary is some Office app, then you can usually copy & paste, or do some sort of Insert from within the app ; Outlook gives you an easy way of finding content that’s Creative Commons by default, and plenty of warnings to boot. Here’s a screen shot of the warnings and stuff, probably in flagrant breach of the actual rules…

 that ability, but with Edge (updated in a number of ways as part of the forthcoming (on April 11)
  For applications that support directly inserting an image (via pasting), then the image will be pasted instead of its URL. Try it with any image you find online – Copy in Edge, and if you paste into MSPaint, you’ll get the image itself, but if you paste into Notepad, you’ll just get the URL. Some apps – like Outlook or OneNote – will let you choose which you want; when pasting an image, you could choose to leave it as such, or pick the “text” icon on the right, to paste the URL instead.
 Asking Cortana will tell you a bit about the image, too,
  Finally, don’t forget that if you’re grubbing about in Windows Explorer (WindowsKey+E, remember), you can right-click on any local or network-located file, while also holding shift, and you’ll see a Copy as path option – which will copy the name & place where that file is (the fully qualified filename, to be precise), to your clipboard.


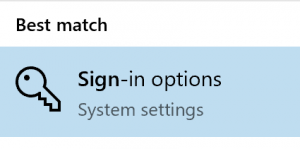
 If you’re using a preview build of Windows – or when you get the Creators Update – then try going into the Sign-in options settings, and look under Dynamic lock to enable Windows to detect paired devies moving away.
 Having no current UI to control how the feature works won’t make it unique, though – ever since Windows 10 shipped, there’s been the “


