Think of this week’s tip as not one single dish, but rather a series of related snacks; a groaning table of cold hors d’oeuvres or sizzling spicy tapas, with one common theme – they’re all about Excel. May the F4 be with you One of the neatest features in Office yet largely hidden; the F4 key repeats the last command without needing to faff about selecting the option from the menu. So what, you might say? Well, what if you’re formatting cells and want to repeat the same format over and over again – you could change one, then use the Format Painter option to apply that to select other cells, or possibly just apply the format you want, then select each additional cell in turn and press F4. One slight downside is that it only repeats the very last action, so changing a number format and then making it bold wouldn’t be easily repeatable since those are two actions. Still, there are so many uses for this “Magic Key no one knows about”. CTRL+y does the same thing in case you’ve got one of those annoying keyboards where the function keys do other things, you never know without looking if you’ll be pressing F4 or changing the system volume.
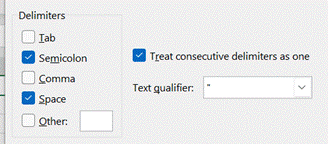
Layouts and Tabs Now, Windows has lots of tricks for arranging application windows side by side, especially if you have multiple monitors; there’s a particularly shiny new way of doing it in Windows 11 with Snap Layouts. In the context of Excel, that’s OK if you’re using two spreadsheets side by side and you might want to reference or copy data between them, but Excel has its own window-handling functions that could be more useful. The key scenario here is that you can open the same document in more than one window (by clicking New Window, on the View tab) and then show different parts of it side/side – separate tabs, perhaps, or different areas on the same sheet. The Synchronous scrolling feature means you can also keep the cursor at the same point in both sheets, making it easier to compare. If you have functions on one tab that depends on data from another, you could change the data in one window and see its impact in real time in the other. Click on the Arrange All menu option to automatically distribute the open Excel windows, optionally confining the process to just the windows from the active workbook. Transpose data with paste It’s a fairly common exercise to take a load of data that’s in one format and want to represent it differently; there is a useful Transpose feature that takes data from columns and paste it back as a row, or vice versa. One useful scenario could be when you want to take the names of everyone who got an email or meeting request and put them in a tabular format. Start by copying and pasting the names/addresses from Outlook’s To: field into a new cell: you’ll see that is’ one long string of text that needs to be broken down, but in this case, each address is delimited with a semicolon (“;”). Having selected the cell, go to the Data tab in Excel and choose Text to Columns then choose Delimited and select the semicolon. Once the wizard is complete, you’ll end up with each address in its own column. Now select the multiple cells and copy to clipboard. Next, put the cursor on a lower row or maybe a new sheet altogether; right-click on the destination cell and under Paste Options, look for the Transpose icon (with the two arrows); hovering over the different icons in this menu will preview what you’re going to do. Click on the icon to commit. Now you have a list of addresses on their own row, and without the “;”s, but they do have a leading space ahead of all but the first one. It might be quick to correct each line in turn, and there’s always the TRIM function which could be used to tidy stuff up through formulae. Alternatively, go back to the start of the process, select both Semicolon and space, and choose to combine the two, so the text in the columns is neater. When you’re happy, remove the original line that had the text in columns, leaving just the separate email addresses on their own rows. Now, snacks just make you hungry, don’t they? |
Tag: tabs
568 – The Race for Space
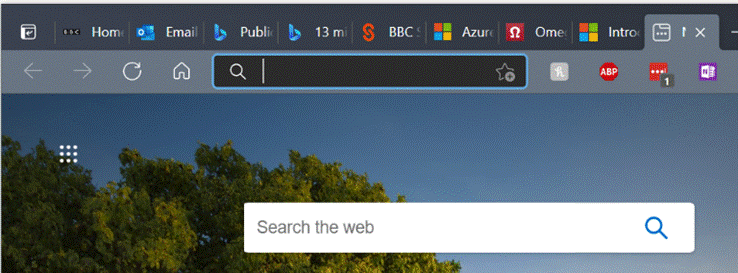
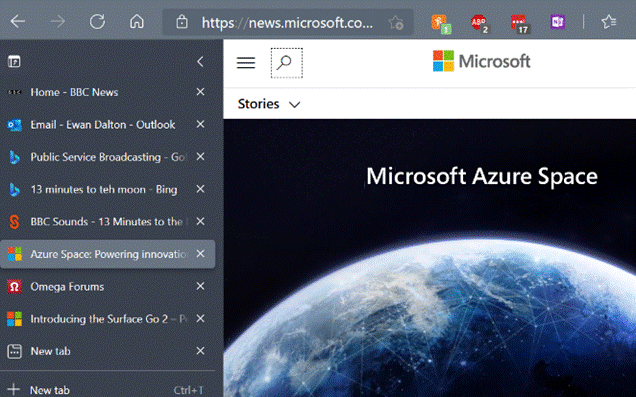
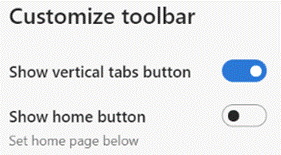
Nearly 60 years ago, JFK announced the intention to go to the moon, and the huge effort – at one point employing over 400,000 people – had to invent a load of technology to make it happen. The guidance computer on the Eagle module, for example, was the first digital portable computer, without which it would have been impossible for the landing to take place. Then there’s the old myth about how the Americans spent millions inventing a zero-gravity pen, whereas the Russians used a pencil… The “space race” continued for some years afterwards (the US had Skylab in the 1970s and built the Shuttle, while the USSR built Mir, the first proper space station), before numerous countries decided to pool resources and build the International Space Station. After unveiling Azure Space in late 2020, the 20th February 2021 – 35 years to the day after the first Mir mission – saw the launch of the ultimate in Edge devices, ensuring Azure reaches the ISS with HPE’s Spaceborne Computer-2. That will be furthest Cloud-Edge computing node until we finally become an interplanetary species, and once again leave the confines of low-Earth orbit. Edge back on Earth If you want to make the most of the space on your screen, you should try moving your Windows taskbar to the side rather than the bottom of the screen – follow the science – as it makes more efficient use of the screen real estate, especially if you have a big widescreen monitor. Open Taskbar settings here and choose Taskbar location. If you’re a vertical taskbar fan, then you’ll like a new feature in the Edge browser, also designed to maximise the use of space – vertical tabs. If you’re the kind of user who has lots of tabs open at any one time, you’ll notice that the title of each tab is quickly lost when they are arrayed horizontally. By enabling the vertical tabs feature, a single click will show them to the side of the browser window. Click the < caret to the top right of the tab list and they’ll collapse to icons only until you mouse over again, and the full width will be shown. The icon to the left of the horizontal tabs switches the display to vertical, and the icon at the top of the vertical list reverts to horizontal. If you’re using the beta or dev version of Edge, you’ll be able to show the Vertical Tabs button in the Appearance section of the settings: To enable vertical tabs on the current public release, enter edge://flags/#edge-vertical-tabs into the address bar of the browser and switch on the “experimental” feature; you’ll have to restart the browser for it to take effect, but after that point you’re free to try switching the arrangement.
|