|
We all get notified of stuff that we’re probably interested in, but
* some may take issue with “simple”. Bah. Flow promises to do all sorts of groovy things that nobody ever needs, like writing every email to a Google Sheet then sending your calendar a reminder to look at it. But there are lots of potentially interesting and useful things you can put together, either by using the many templates or by building your own custom flow based on simple logic. You could connect all kinds of disparate web-based services together and using triggers, fire off actions based on events happening – like a tweet about a particular topic, or a new event added to a calendar. Let’s take an example – say, you have an Office 365 work mail account and associated calendar. When you put something in your calendar which is both an all-day event, and is also marked “Out of the Office”, that probably means you’ll be out of the office all day, maybe away on a business trip or possibly even on holiday. Wouldn’t it be useful to be able to copy that to a calendar that your nearest and dearest can see, maybe even adding all the events from several family members into one place, shared with all the others? First off, you may want to log into www.outlook.com, go into Calendar and create a new shared calendar (if you don’t have one already) –
Now, to create the flow to copy stuff from your work to Family Calendar…
Now you should be able to see any new, all-day events that appear in your work calendar, showing up in your shared Outlook.com custom calendar. A further refinement might be to add a condition to only trigger the sync when the original meeting is set to “Out of Office” – click on Update flow to edit, then add another
It’s worth having a play around with Flow, as you can do some interesting things with it (and there are connectors for all kinds of services, including Google mail & calendar, Wunderlist tasks, even grown-up apps like Dynamics or Salesforce. There are mobile apps that can take part in flows, too); do bear in mind that it takes anything up to a few minutes to fire these kinds of events, and if there’s a problem running your logic, then you’ll be notified. It may be worth adding a debug step that can be easily removed later, by getting the flow to send you an email with the values of the fields you’re interested in…
|
Tag: office365


Tip o’ the Week 356 – How not to send mail accidentally
 An ohnosecond is the small measure of time between a luser doing something seemingly innocuous, then realising the true magnitude of what you’ve done.
Frobbing a scram switch without knowing. The dawning reality that a protest vote might actually result in that thing actually happening. Sending an email to someone you didn’t mean to, that kind of thing.
Fortunately, most of us have a limited ability to truly mess things up (leaving aside Darwin Awards candidates), but something that most of us will have done at some point, is that unintended sending of mail. The situation could come up for a number of reasons:
- Someone is copied on the mail that you’re replying to, and you either don’t realise or you intended to remove them from the list but forgot. Maybe you went on to theorise about their capability or speculate on their intent. Normally just embarrassing, could be career-limiting.
 You accidentally add someone to the TO: or CC: line of a mail, intending to remove them, but don’t. This is basic carelessness which can be avoided by not adding people to the TO: or CC: lines of your email unless you genuinely intend to send the mail to them… [coming to a Bedlam expansion pack sometime]
- You Reply-All by default to emails, maybe asking to be removed from the mailing list. Don’t do that. Seriously.
- You send an email then just after, realise that a later message has changed the conversation and that, if you’d read that first, you either wouldn’t have replied, or if you did, you’d say something different.
There are a couple of easy things anyone can do to avoid these issues, apart from thinking before sending and maybe re-reading all of what you’ve written before sending it to what you know to be a large group, or with important people on the list.

- DON’T put people on the TO: or CC: line as a way of looking them up in the address book; it’s an easy trap to fall into; maybe you just want to check how someone’s name is spelled, or find out who their boss is, etc. If you want to do that, go to the main Outlook window (ie not the email editor, if you happen to have that as a separate window), and just press CTRL+SHIFT+B to bring the address book to the fore. Or, click the Address Book button on the Home tab, or just type the name into the box above it.
- Try delaying the sending of new messages – in principle, keeping outbound mail in the special “Outbox” folder on your PC until some period of time before actually pushing the message out to the recipients.
 One option might be to delay specific messages, probably more for impact – if you want people to receive mail at a particular time (following an announcement that you know is going to happen at a set time, for example), then you can force that message to sit for a while – an extended time, maybe – before being put into the sending queue. See the Delay Delivery icon on the Options tab within the message window.
One downside to putting stuff in the Outbox is that when you’re running Outlook in the default “Cached” mode, then the Outbox is a special folder on your PC – so if something is sitting there waiting to be sent, and you put the PC to sleep or it goes offline, then the message will stay there until the next opportunity presents itself when your PC wakes up and is online.
There is a slightly more convoluted way of putting delayed mail in the Outbox on the server – see veteran ToW #30. To delay every message for just a few minutes, to give you an opportunity to yank them from the Outbox, then create a rule…
 - On the Home tab in main Outlook window, try creating a new rule by going to Manage Rules & Alerts then, and
 choosing New Rule, then under “Start from a blank rule” choose “Apply rule on messages I send”
 - On the new rule dialog, select “Next” to apply the rule to every message sent (on the “Which condition(s) do you want to check” tab), then on the “what do you want to do with this message” page, select the “Defer delivery” option and choose the number of minutes, then hit Finish / OK to apply the rule and return.


Now, when you send a message, it has the property set that delays it for however many minutes you wanted to wait – if you need to send it quickly (so you can disconnect or shut down, for example) you can go into the Outbox folder, open the message, change the “Delay Delivery” option on that individual message and press Send again.
Tip o’ the Week 349 – Office 365 UI updates
 At the Ignite conference in Atlanta at the end of September, lots of news came out about Artificial Intelligence, Windows Server, Security and Office 365 – check out the keynotes and other videos, here.
One of the new features that has appeared in some users’ Office 365 environment is a new app launcher UI – it’s the overlay which appears when you click on the 3×3 grid on the top left of Office 365 websites; if you’re an O365 subscriber then you could use portal.office.com as a Launchpad, or just go to outlook.office.com for your mail and spread out from there.
 Some Office365 features are very dependent on not only which package you’re subscribing to, but whether or not you’ve an IT department which is controlling the deployment – as well as “Standard”, there’s a “First Release” option that gets new stuff more quickly. IT departments or other groups supporting Office 365 users could use the Fast Track site to find collateral that might help them explain newer features to their end users.
To find out what level of Office 365 you’re using, click on your photo or the silhouette icon on the top right, and choose “Your Account” from the list, and then “View Subscriptions” from your My Account home page, where you can tweak all kinds of other settings, install software and the likes.
The new App Launcher has  the ability to move icons around and resize them akin to the way you can tweak the layout of your Windows Start menu (though not Live Tiles, at least not yet – there are other improvements on the way – see more on the App Launcher and upcoming changes).
 Other new features for Office 365 include Delve Analytics being rebranded “MyAnalytics” and given a freshen up; see the new MyAnalytics icon in Outlook, if you’re a subscriber (or if you have the Office 365 E5 package, in which it’s included).
Watch the demo video of this awesome technology here, check out more details on MyAnalytics here, or just visit http://office.com/myanalytics. As Paul Thurrot says, though, there may a need for “a bit of introspection some will find uncomfortable”, as the data surfaced might make you wonder just what you do all the time.
Tip o’ the Week 347 – Mentions in Outlook
 One of the nice things about subscribing to client apps as part of Office365 is the regular feature updates which flow, tying together new capabilities in the service at the back end with updates to the client. One such change which came out recently was the addition of “mentions” in Outlook – you may have seen the dialog…

Mentions is a new feature that helps to get someone’s attention, much like mentioning them on Facebook, Twitter or Yammer.
When you type an @ symbol in Outlook, you’ll see an inline pop up showing the a list of frequent and/or recent email recipients. If you start typing then that list gets narrowed and when you select the person’s name, it’s added to the message in full and they’re automatically added to the To line of the mail or meeting request too.
You can edit their name inline (so it might just say @forename) to make the mail easier to read. As a mentionee, you can  show only mails that have mentioned you as above – in the main Outlook window, look for the filter next to the search box, usually showing “All”, and it can quickly show you only mentions. In Outlook Web client, you’ll also see a little @ to the right of the messages which mention you, in the regular inbox view.
 If the people you work with are in agreement, this can be a handy way of asking colleagues to do something; if you embed mentions in a long mail, then the people you’re invoking will be able to quickly show the mails they need to respond to – a less structured and formal way than assigning a task or other means.
Tip o’ the Week 344 – Inky betterness
|
If you have a Windows 10 PC with a stylus, you may have noticed some additional functionality provided through the Ink Workspace (covered in ToW #340 no less) but it’s worth keeping an eye out on other applications for their increased usage of Ink, in a way that could make scribbling a more obvious and natural part of using your computer than you’d expected.
Recent updates to Office365’s client portfolio include a bunch of inky features – like the Maths* assistant in OneNote Mobile (the mobile/modern app, not the OneNote 2016 desktop version), which lets you not only capture written equations but can bring them to life. Or the ability to do Ink Replay (see here), which lets you show how the ink on a given page was produced – great if you like drawing a diagram that tells a story, almost like an animation. Planky made something of a name for himself in producing these kinds of videos – here he is explaining cryptography, certificates, public/private keys and digital signatures.
Ink Replay functionality is due to arrive in mainstream Office desktop apps soon, too. For more information, see the Office blog here, which also details a slew of other updates being made to Office through these regular feature enhancements.
|


Tip o’ the Week 337 – PPT premium groove things
|
On a slightly more mundane front, a demo was shown The Designer manifests itself as a selection of suggested layouts that will be displayed in the right-hand task pane of the PowerPoint app, after you’ve inserted some photos from your own collection or from the various online sources. A suitable colour scheme will also be found, depending on the predominant colours in the photo(s) you’ve pasted or inserted. It’s subtle and clever. There’s a Design Ideas icon on the Design tab, if you want to manually invoke the Designer functionality too. When you start the Designer for the first time, you need to accept that the images you use within the designer will be sent to a cloud service for analysis. See here for more. At the same time as the Designer appeared, another premium O365 service was also added, called Morph (not to be confused with Tony Hart). The Morph service makes animating slide transitions really easy, and it’s probably simpler to demonstrate than to explain. Try this:
For more details on Morph & Designer, see Kirk Koenigsbauer’s blog post from November 2015. |


![clip_image002[5]](https://msdnshared.blob.core.windows.net/media/2016/07/clip_image00251.jpg "clip_image002[5]")
Tip o’ the Week 332 – Failing to plan is, eh…
|
To get the gist of what Planner does, check out the overview video, here. For tips on getting up and running, see the Getting Started guide. There is a degree of functional overlap with other task-management systems like Wunderlist or even Outlook on its own, but Planner is designed very much to be a team-based thing and is particularly aimed at businesses or for educational use. Comparisons are inevitably made with other tools, most notably Trello, and SharePoint’s own Tasks capability has had the Sword of Damocles hanging over it, if you believe the chat, so Planner is a welcome addition. |
![clip_image002[1]](https://msdnshared.blob.core.windows.net/media/2016/06/clip_image002110.jpg "clip_image002[1]")
![clip_image003[1]](https://msdnshared.blob.core.windows.net/media/2016/06/clip_image00311.png "clip_image003[1]")
![clip_image004[1]](https://msdnshared.blob.core.windows.net/media/2016/06/clip_image00411.png "clip_image004[1]")
Tip o’ the Week #324 – Delve into something new
|
If you can get access to Delve (either on https://delve.office.com or via https://portal.office.com, depending on your account and level of access), then it’s well worth playing with it for a while, especially if you work in a large company like Microsoft, where all sorts of interesting stuff is being saved onto shared document folders. One downside of Delve might be that nervous Nellies will stop putting their documents into shared areas in the fear that other people will read them, or that the default-to-open (for their internal staff) culture that typically pervades lots of companies will flip to an access-only-on-a-need-to-know-bassist. Delve lets you see what documents are popular, what people you are connected with are doing, and lets you search by document content or by author. Want to see what FY17 holds for your org? Wondering what juicy PPTs your VP has been editing lately…?
Announced recently, the Delve Analytics function (available to O365 users based on their license type), shows you not just what other people are doing, but how you are performing too. The Delve Analytics dashboard and corresponding Outlook Addin lets you see how you’re spending your time, and who you’re spending it with, promising to help you make the most of it.
The Outlook addin surfaces Delve info within Outlook’s reading pane, so as long as you’re looking at colleagues who’re in the same Office 365 environment (which might be an issue in MSIT, where there are several tenants), you’ll see stats about how often and effectively you email with each other. Here’s one example; judge not any of the numbers…
Eek. 3h 31m average response time. Must try harder to do less email and do more work. |

 Have a Delve…

Tip o’ the Week 321 – Quick Access Toolbar customisation
 Most of us will have used the Quick Access Toolbar in Windows Office apps – even if only to click the floppy disk icon to save documents, which, like many others, makes no sense to modern life. The QAT (not to be confused with other, phonetically similar terms) lets you dock commonly-used commands to be constantly available on the top corner of your favourite Office apps. Most of us will have used the Quick Access Toolbar in Windows Office apps – even if only to click the floppy disk icon to save documents, which, like many others, makes no sense to modern life. The QAT (not to be confused with other, phonetically similar terms) lets you dock commonly-used commands to be constantly available on the top corner of your favourite Office apps.
In Outlook, try opening a message that someone else sent you (this one would be a good start); go to the QAT and click This will now add a new icon to the QAT, which will let you “design” whichever form you have open. In Outlook, a “form” is used to display In fact, adding to appointments is the best place to do it, since you can show the date and time that an appointment was created in your calendar; if you just find an appointment that you can’t remember the context of, you could quickly show the date/time you created it and that might help figure out how valid it is. If you have a meeting that someone invited you to, you’ll easily see the date/time it was sent, but if you’re the organiser, you won’t – unless you use something like Design This Form, then navigate to All Fields and choose Date/Time fields to show all the common date or time attributes of that form. For more context, this topic was covered some time ago on the Electric Wand blog and a previous tip, #102.
Whilst you’re playing with any application’s QAT, it’s worth having a look through the other commands you might want to add – like while still in OneNote, try your favourite OneTastic macros, for example.
This opens the door to being able to scan in old paper notebooks for easier reference/shelf space clearance, and ditch the dead tree notebooks for digital. If you’re like controversial car design Chris Bangle, you may beg to differ.
|


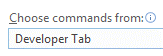 the down arrow to the far right side, choose More Commands… and then select “Developer Tab” from the Choose commands option. Now, pick the Design this Form option from the list and Add to the

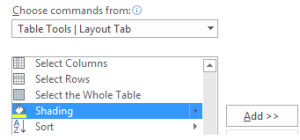 status reporting, it’s quite handy to be able to colour cells or rows in tables to show their status, but the menu option to set the colour would need you to go into the table menu. To quickly add to the QAT for future easy access, click the down arrow / More Commands… / choose the Table Tools tab and look for Shading, then Add>> and OK.
 On the topic of OneNote (and we’re still talking about the desktop one, not the Modern App version), there have been some updates shipped out to Office365 users that could be interesting – especially the ability to search handwriting, not just scribbled using a Surface stylus or similar, but grabbed from a photo by
 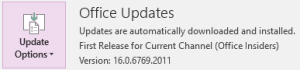 To check you’re on the latest version of OneNote via O365, go to the File menu, look under Office Account and the Office Updates section, and choose Update Now from under Update Options.
Tip o’ the Week 317 – The Wunder Years
|
Which serves nothing more than a neat segue to this week’s topic – the wonderful Wunderlist. After being acquired by Microsoft in mid-2015, the Wunderlist product is still looking refreshingly independent and has a engendered a particular love from its avid users. And it’s available on lots of platforms too. And it’s basically free.
Now, most of what you can do with Wunderlist could also be done with Outlook (either natively or through addins from other providers) but aficionados will wax on about how much slicker or easier Wunderlist is. As usual with these things, it’s all about putting the theories you already know into practice, and seeing how the tools suit your own way of working. Things Wunderlist is great at:
And now, there’s even an Outlook addin for Wunderlist, most commonly available through Office365 or Outlook.com. The addin can be used either in Outlook online in a browser, or in the desktop client, and adds a Wunderlist menu to the home tab, so you can very quickly create list items from within email. It’s really easy to set reminders too – possibly even quicker than flagging an item in Outlook and setting a time to remind you by; with the added benefit that Wunderlist reminders show up in Action Center and you’ll also get an email when the action is due, so if you’re a habitual inbox junkie who finds it hard to use a separate task list, then somewhat perversely, Wunderlist might actually help you take your eyes out of the in-tray and remember to look at other things along the way. Check out the Office Store for your Wunderlist addin or see more detail on here.
|


