 I’ve been thinking about writing this tip since the ToW started almost exactly two years ago (yay!) but for various reasons, competitive advantage amongst them, I’ve held off. I figure it’s now time to relent and share.
genesis
The tip concerns the differences in Outlook between appointments, meetings, and meetings where you are the organiser. Huh? Well, an appointment is something you put in your own calendar. A meeting is created from an appointment when you invite someone else – or are invited by the organiser – to  take part. Outlook exposes a whole load of variance in what you can do when you’re in each of these 3 scenarios, but in 2 of them – namely, appointment and being the meeting organiser, it doesn’t tell you when the appointment/meeting was created.
 When you look an invitation sent by someone else, you can see not only when you accepted it, but when it was sent. Well so what, you might ask?
What if you look in your own calendar and see something you created, but don’t recall when? It can be quite handy to remind yourself when it was added – maybe you will find some emails around the same time that might give you more information on why you put that appointment in there.
The same rules apply when you’re looking at someone else’s calendar. What if you invite someone to a meeting (and this is where the competitive advantage bit comes in, perhaps), and they decline because they have a “conflict”. was the conflict merely an appointment they created after your invite. (covering tracks, perhaps)?
In a more benign scenario, what if you’re trying to bag a meeting room, but it’s booked out. maybe for a team meeting or some such. If you could see that the meeting was created 2 years ago, then you might contact the organiser to see if it’s still happening or even realise that the organiser no longer works here, and therefore a cancellation can’t be sent out to free the room, but it’s most likely not going ahead.
method
The beginnings of this method regards customising or designing Outlook “forms”. There’s a little more info on Outlook Forms in ToW#44 if you’re interested. In a nutshell, items in Outlook (appointments, messages, contacts etc) are simply a collection of fields, and use a designated – and customisable – form to display the fields’ values. In the example of a self-created appointment or a meeting you’ve organised, the standard Outlook form doesn’t display the date of creation, but it still exists behind the scenes.
To view the date, a simple way is to start by adding a new command to the “Quick Access Toolbar” that’s shown on the top left of your Outlook form: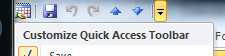
- Open the appointment or meeting you’re looking to get more information for, then click on the little down-arrow to the right of the Quick Access Toolbar. then look at the bottom of the Customize list and choose “More Commands”
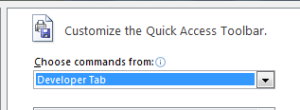 Next, change the “Choose commands from:” drop down to be “Developer Tab“, then on the left-hand side of the dialog, scroll down the commands list to find Design This Form, (NB don’t choose “Design a Form”), then Add it to the list on the right by clicking the button. Press OK to return to the item. This will now put a new icon on the Quick Access Toolbar, that looks like a pencil, ruler and set square. Very retro design tools.

This should be a one-time exercise, that will now allow you to peek inside any Outlook item once you’ve opened it up (whether it’s from your own mailbox, or someone else’s calendar).
show me
Now, when you click on the Design This Form icon in the Quick Access Toolbar on an open item, it switches the form 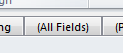 that’s being used to display that item into the “designer” mode, which shows any hidden tabs that the form might have (denoted as such by their names being in brackets). One of the hidden tabs on every form is “All Fields”, which lets you explore the values of every field that exists within the item that the form is displaying. Are you still with me?
Click on the All Fields tab and select “Date/Time fields” from the drop-down box, and hey-presto, you get to see 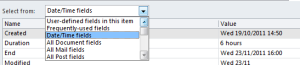 every date field – like the Created date.
If you want to explore the differences between the various item types in Outlook, try looking at “All Mail fields”, “All Contact fields”, “All Appointment fields” etc.

![clip_image002[4]](https://msdnshared.blob.core.windows.net/media/TNBlogsFS/prod.evol.blogs.technet.com/CommunityServer.Blogs.Components.WeblogFiles/00/00/00/48/08/metablogapi/4263.clip_image002[4].jpg "clip_image002[4]")
![clip_image005[4]](https://msdnshared.blob.core.windows.net/media/TNBlogsFS/prod.evol.blogs.technet.com/CommunityServer.Blogs.Components.WeblogFiles/00/00/00/48/08/metablogapi/7317.clip_image005[4].jpg "clip_image005[4]")


![clip_image001[1]](https://msdnshared.blob.core.windows.net/media/TNBlogsFS/prod.evol.blogs.technet.com/CommunityServer.Blogs.Components.WeblogFiles/00/00/00/48/08/metablogapi/7215.clip_image001[1].jpg "clip_image001[1]")
![clip_image002[4]](https://msdnshared.blob.core.windows.net/media/TNBlogsFS/prod.evol.blogs.technet.com/CommunityServer.Blogs.Components.WeblogFiles/00/00/00/48/08/metablogapi/8032.clip_image002[4].jpg "clip_image002[4]")


![clip_image002[4]](https://msdnshared.blob.core.windows.net/media/TNBlogsFS/prod.evol.blogs.technet.com/CommunityServer.Blogs.Components.WeblogFiles/00/00/00/48/08/metablogapi/6406.clip_image0024_1DFB6D98.jpg "clip_image002[4]")


![clip_image001[7]](https://msdnshared.blob.core.windows.net/media/TNBlogsFS/prod.evol.blogs.technet.com/CommunityServer.Blogs.Components.WeblogFiles/00/00/00/48/08/metablogapi/2577.clip_image0017_66F7553C.jpg "clip_image001[7]")


![clip_image001[4]](https://msdnshared.blob.core.windows.net/media/TNBlogsFS/prod.evol.blogs.technet.com/CommunityServer.Blogs.Components.WeblogFiles/00/00/00/48/08/metablogapi/1030.clip_image0014_528169E4.jpg "clip_image001[4]")


