![clip_image001[4]](https://msdnshared.blob.core.windows.net/media/TNBlogsFS/prod.evol.blogs.technet.com/CommunityServer.Blogs.Components.WeblogFiles/00/00/00/48/08/metablogapi/4213.clip_image0014_34351F56.jpg "clip_image001[4]")
Hot on the heels of ToW #138 which looked at handling PDFs in Windows 8, lots of feedback from avid ToW readers with their own tuppence to contribute.
 Mike Mundy pointed out a simple way to print from within the built-in Win8 Reader app – good ol’ fashioned CTRL-P. Actually, this combo works for any Modern UI Windows 8 App, as long as the app itself supports printing. Try it out – Internet Explorer lets you print, for example, but the News and Weather apps don’t.
One of the features of the Modern UI App is that they declare to the Operating System what they’re capable of doing – maybe they support sharing their content with other apps, or they could support interaction with different devices… like sending their content to a printer, for example. These capabilities and “contracts” are typically exposed through the Charms.
Woody also suggested that Tracker Software’s PDF-Xchange is an even better reader than FoxIt. If you haven’t tried out an alternative to the Adobe monolith, then you might want to give it a whirl.
John Owen and Jason Carter both pointed out that Office 2013 (well, Word 2013) has the capability to edit PDF files too. Well, it does rather want to save the edited version back as a Word document type, but you can always over-ride it and save as PDF.
You can also save documents as XPS format, or just print a doc out (as per the screen shot above) to the XPS Document Writer. XPS – or XML Paper Specification to give it the full moniker (or ECMA-388 for its standard name) – is a freely available spec that Microsoft developed as a way of taking stuff that’s onscreen and representing it exactly as it will appear on paper. Kind of like a PDF or PostScript file, but without requiring the license from Adobe.
XPS has never really taken off, much; even Microsoft internally makes pretty heavy use of PDFs, still, maybe for things that aren’t supposed to be edited (job offers letters, annual review docs, that sort of thing).
Or things that weren’t easy to edit before Word 2013 came along… d’oh!


![clip_image001[5]](https://msdnshared.blob.core.windows.net/media/TNBlogsFS/prod.evol.blogs.technet.com/CommunityServer.Blogs.Components.WeblogFiles/00/00/00/48/08/metablogapi/8130.clip_image0015_760A8777.jpg "clip_image001[5]")


 descriptive roots in an antiquated process. A bit like a floppy disk as the “Save” icon, or an envelope for the email/send functions, the scissors used in Cut refer back to the old method of compositing printed materials, in the days when editors would literally make up a newspaper or magazine page by chopping up other sources and sticking them onto a master copy.
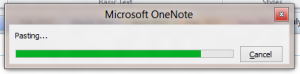 taking a while (maybe even “Contacting server for information…” too), then there is an alternative, especially if you don’t need all the formatting to come with the text.
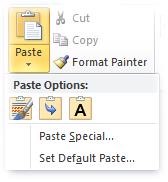 When in your favourite Office application, rather than pressing CTRL-V to paste (or just clicking the Paste icon), try clicking the down arrow under Paste in the Ribbon, and you’ll see various options – Paste Special offering the same gamut of choice as historically has been offered in previous Office versions, but the icons beneath provide a quick way to getting to the most common options.
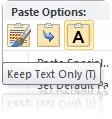 play – press K if you want to paste and keep the source formatting, M if you want to merge the two formats, or simply T to keep the text and the text alone.


 Ever since the 3rd party “Lookout” add-in was built for Outlook about 8 years ago, the pilers have inherited the earth. That’s pilers. No connection with

![clip_image001[5]](https://msdnshared.blob.core.windows.net/media/TNBlogsFS/prod.evol.blogs.technet.com/CommunityServer.Blogs.Components.WeblogFiles/00/00/00/48/08/metablogapi/6562.clip_image0015_5ADBB514.jpg "clip_image001[5]")


