Tip o’ the Week #121 – Networking with Lync

clip_image001This week, we have a semi-rehash of earlier tips (#51 and #67), based on some investigation work that’s been done inside Microsoft’s own IT group.

If you’re going to join a Lync call (especially if you’re using video or app sharing, using a Roundtable/Polycom CX5000 device etc), then best practice is to use a wired network connection. If you’ve a laptop which is on WiFi, then you need think about your connection if you want the call quality to be at its best.

Networking preference

Windows 7 and Windows 8 prefer wireless networks, on the basis that if you’re connected to a WiFi network, then there’s a reasonable chance you’re on a laptop and therefore you’re likely to move around.

Lync really wants a nice, fast, low-latency network connection. In a typical Microsoft office environment, most users have laptops and most will be connected to wireless, meaning the WiFi is going to be pretty clip_image002congested, compared to a wired network at least. And congested, slow(er) networks don’t make for great call quality (as is sometimes evidenced by the network connectivity icon).

The Lync client is network-aware, though, and will default to using the highest-performing network it can. So, if you’ve a laptop that’s on WiFi and plugged into Ethernet, then Lync will use the wired network in preference. There’s one important consideration though – Lync can’t switch an in-progress call between WiFi and wired!

So if you establish a call on Wireless, then see the dreaded red bars that tell you all is not well with your network, simply plugging in a network cable won’t do you any good. You’d have to drop the call and re-establish it to make clip_image003a difference.

To be sure which network you’re using for the call, fire up Task Manager – right-click on the Taskbar and choose Task Manager, or just press CTRL-SHIFT-ESC.

In Windows 7, select the Networking tab, and if you’re using Windows 8 Consumer Preview, look under Performance and you’ll see little graphs of how your networks are doing. This will help you see which network is being used to carry all that data.

A simple way of checking the behaviour is to use the Lync client’s test call facility and see which one spikes…

If the WiFi is taking the brunt, then make sure the wired network is connected OK, then disconnect the call and re-establish it, and you should see the wired network usage jump up.

No real need to disable WiFi, but if you have a switch on your laptop to do that, and you’re a suspicious sort (or untrusting type), then doing so may hurry the process along.

clip_image004

Tip o’ the Week #120 – The colour of time

clip_image001This week’s tip is a lovely little Windows app, recommended by Ceri Morris.

It’s a little like the sunrise alarm clocks which start your day by gently lighting the room, or the sleep alarms which gradually fade out the radio instead of a sudden silence in place of music.

This free application, called f.lux, changes the colour temperature of your Windows PC’s display,  based on what the time is. Once the sun goes down, it starts to change the bright white of your Windows backgrounds to a nice soft glow, with the intent that your eyes will adjust to the softer lighting system when you’re looking at the screen in the evening.

Ditto, early in the day, the less harsh, less bright white screen will be more soothing on the peepers first thing, and that will be altogether better. It’s possible to over-ride temporarily, if you’re doing work that is colour-sensitive (like photo editing etc), and you can preview the effect so when you install the software, you’ll be able to see what it looks like throughout the course of night and day.clip_image002

Thousands of comments on the f.lux website list people saying they’re sleeping better since their evening PC use with f.lux helps their eyes relax before settling down for the night. If work/life balance is a problem for you, then maybe you should stop using your work PC in the evening… but if you do need/want to use a computer after the sun goes down, give this tool a try and see how you get on with it.

Check out the site to install F.lux – http://stereopsis.com/flux/ – It’s really rather good.
Now, go to bed!

Tip o’ the Week #119 – Using Outlook in multiple windows

clip_image002This week’s tip comes courtesy of Jon Morris, who is agog at the way lots of people switch between their Inbox and their Calendar, in Outlook. Hands up if you routinely use the Navigation Pane on the lower left of the main window, to switch between these two most commonly used folders?

OK, put your hand down now. People will stare. As an aside, the Navigation Pane was introduced in Outlook 2003, and was codenamed the “WunderBar”. Honestly.

Long-term ToW readers may recall Tow #10 (over 2 years ago), which covered some Outlook shortcut keys – eg press CTRL-1 to switch the current window to “mail” (whichever folder of email you last had open), CTRL-2 to “Calendar”, CTRL-3 for Contacts etc. That’s one way of switching the focus around, and certainly quicker than clicking on the WunderBar.

clip_image003Anyway, back to Jon’s tip. If you right click on any folder or any of the shortcuts in the Navigation Pane, you’ll have the option of opening that folder in a new window, so you can switch between (for example) your Inbox and Calendar windows, by any of the various means you might favour (ALT-TAB, WindowsKey+number, hovering over the application on the Task bar etc). This works well if you have multiple monitors, so you could (say) have your Inbox on the main screen and the Calendar/Task list on the second one.

Now the smart bit here is that Outlook will remember what windows you had open, what folders they were looking at, and on which monitor they were displayed, if you close the application down by going to the File menu and choosing Exit. Closing the app using the Window Close “X” or by right-clicking on the application in the task bar will not remember the window positions, so if you get used to leaving the Outlook application from its own file menu, you’ll get the same window setup every time you restart.

Tip o’ the Week #113 – Add context to your Lync status

clip_image002One of the biggest cultural impacts of using Instant Messaging and UC technology in a business context is the way that people tend to check the status of someone before contacting them. It’s a relatively rare occurrence to get an internal phone call out of the blue if both parties are online: usually, it would be set up with a quick chat on IM first – then the calling party knows that the call they make isn’t going to drop to voice mail.

To quote UC aficionado Tony Cocks, “it’s all about presents”. 
Or presence, and the value that it gives to anyone trying to contact you.

If you’re set to Do Not Disturb (DND), for example, we probably all know that means trying to send an IM won’t work. Trying to call via Lync or on the internal phone number won’t get through either – setting yourself to DND sends all calls straight to voice mail (or straight to oblivion, for many people). I heard a story the other day about someone who got an unannounced incoming cellular call – the caller saying, “yeah, I saw you were on Do Not Disturb so thought I’d call your mobile…”  Like, duuuuh…

clip_image003Did you know you can allow people you trust to interrupt you when you’re on DND..? Right-click on their name in Lync, choose “Change Privacy Relationship (right at the bottom of the menu). Set them to be part of your Workgroup, and when you set yourself to DND, they’ll see you instead as being on Urgent Interruptions Only. And they can IM you.

Anyway, we can infer a lot from someone’s automatic status – if they’re Busy, then chances are their Outlook calendar has been blocked out or they may have manually set the status to show they’re busy. That doesn’t mean they’re uncontactable – only that if they don’t respond, then you shouldn’t be surprised. If they’re In a Meeting, it means not only is the Outlook calendar blocked out, but it’s being blocked by a meeting with more than one attendee. Maybe that means you could still IM the person, but they probably wouldn’t be able to take a call. If they’re on In a Call or In a Conference Call, then they’ll definitely not be able to take a call as they’re on one already…

clip_image005If they’re Away (like Richard, here), then they’ve probably either wandered off from their PC or else they’ve locked the computer (WindowsKey + L), and you may get some extra context about how long they’ve been away for. If only a few minutes, they could be sitting at their desk talking with someone (or reading a paper etc), and sending an IM might get an immediate response … but if it’s been 30 minutes, they probably are genuinely not there and you’d better look elsewhere, or send an email.

Add further contextclip_image006

As you can see from Richard’s status above, he’s also got a line below his name that says where he is – TVP. Actually, this is just set by the free-text note field at the top of the Lync main window (which asks “What’s happening today?” if you haven’t set anything else). It’s a handy way of giving a little more context if you want people to know, or just provide a pithy one-liner akin to a Facebook status.

If you want to be a little more specific you can also provide a number of custom presence states, so rather than just being Busy you could be Busy writing reports, or instead of being Available you could be Working from home. See TechNet or previous missives on this blog.

clip_image007For place specific info, you could try setting up custom locations – in short, when your PC appears on a particular network, you can give it a name and then whenever you use the PC at that location, it will show up in your own Lync client right under your name and your status. Different locations needs to be named separately (eg Home, CP, Edinburgh, TVP).

It’s not all that obvious to everyone else, however – to see someone else’s custom location, clip_image008right click on their name and View Contact Card (or just click on their name and press ALT-ENTER). If they’ve set a location up, you’ll see it – otherwise they’re either not in a place they’ve named, or you’ll just see their time zone. If you want to make it plain to everyone else where you are, then you may want to stick to custom status and/or using the Lync “What’s happening today?” text status field.

You can see set the Lync status on the above screenshot is Off work – that tells the world that even though I’m online via Lync, I’m not online to do work… and if someone was to click on my details, they could see a whole load of information about whether I’m likely to respond to their IM. If you’ve set your status to Off work and someone IMs you about work, then it’s perfectly acceptable to just ignore the message (press Esc to get rid of the popped-up window in one fell swoop). Well, depends who it is…

Tip o’ the Week #112 – Change Outlook’s startup folder

Productivity gurus wax on about how gaining and maintaining control of your never-ending to-do list starts with the way you prioritise, and how you build discipline in working through your task list rather than being distracted by less important “stuff”.

So, why is it that we stick with the default setting in Outlook, which starts up showing the Inbox folder, and with the most recent mail at the top…?
The only thing more distracting than looking at an inbox full of shiny new mail, is to have the new mail notification flash up in front of whatever else you’re doing, to tell you about it.

Check out the very first Tip o’ the Week – how to switch off the Outlook new mail notification. Try it out.
Live notification-free for at least a day; you can always switch it back on again if you need to.

If you’re on a Lync meeting and someone shares their desktop to show you a presentation (tsk, tsk), or you’re watching a presentation/demo on a big screen, feel free to berate the presenter publicly if they receive a new mail notification during the meeting.

Here’s a tip that Microsoft’s own internal IT training programme recommends: set which folder Outlook starts up in. When you launch Outlook for the first time, don’t have it go into your Inbox – what about opening your Calendar instead?

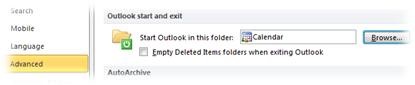
To change, go into the File menu, under Options then Advanced. Scroll down to the Outlook start and exit section, and pick your folder of choice. Simple as that – though if you routinely sleep and resume your PC, you might not be starting Outlook very often, so you may only see this occasionally. Continue reading

Tip o’ the Week #111 – Sharing PowerPoint in Lync?

clip_image001If you’re regularly part of a Lync call which involves presenting slides, here’s some best practice that everyone should know about. In a nutshell – don’t share your whole desktopto show the PowerPoint slides; don’t even share PowerPoint  as a single program (something that Lync would allow you to do), but it’s really not the best way.

Why not?In general, the user experience is better if you show slides by uploading them into the meeting/call. Showing slides by sharing the whole desktop is inefficient on the network too; if the network isn’t so great (eg when attendees are on slower lines), it can be practially unusable. Also, unless you’re really smooth in the way you operate the PC, you’re in danger of showing more than just the slides – email alerts, incoming IMs from other people popping up etc. A slicker way of sharing slides is to use Lync’s built-in functionality designed to do just that.

If you have slides sitting on your PC, the quickest way of adding them into your meeting is to click on the Share clip_image002button within the conversation window, and select PowerPoint Presentation, which will then give you the option to choose a PowerPoint file to be shown – the Lync software will then upload the PPT to the server, and convert it to an HTML format that can be shown in a browseror in the Lync client. This process of uploading & conversion can take a little while if you have a large or complex PPT, so it’s best to start uploading as early as you can.

The nice thing about using this mechanism to share slides is that they are now in the meeting, and other attendees could take over as presenter quickly – you clip_image003could even leave the meeting and let them continue.

If you store your slides on a SharePoint site, there’s a trick to quickly uploading the slides to your meeting. One way would be to navigate to the document library in the browser, and then Open with Explorer – another would be to simply open the SharePoint site in Windows Explorer, by using the UNC – eg instead of going to http://sharepointemea/sites/love-it/tipoweek, go to the start menu and simply type \\sharepointemea\sites\love-it\tipoweek.That way, you could browse to the document just as if it’s on your hard disk.

If you go back up to the point earlier in this tip, to where you’d add a slide deck from your PC – you could type the \\sharepointemea\sites\etc link into the file dialog and then select the appropriate PPT, or else you could prepare in advance by opening the library using explorer, then re-use the tip from ToW#101on how to copy the full path of a file name to the clipboard, and just paste that into the dialog when it comes time to upload the PPT.

Once you’ve converted to using this approach, you may freely mock anyone who still does it the (admittedly, easier, with one click) old fashioned way of just sharing out their whole desktop to show a single slide deck. Live the dream – upload the slides to the meeting  using Lync!

There’s a really good explanation of some of the other benefits to using the PowerPoint sharing method on this blog.

Tip o’ the Week #116 – Windows 8 – IE 10 desktop or Metro..?

clip_image001One of the potentially confusing aspects of the Windows 8 Consumer Preview is the fact that it has two web browsers built in – the Internet Explorer we know and love has been updated to IE10 on the desktop, and a new IE10 browser has been added into the Metro UI. For the most part, there’s little to tell between them (browsing a page is pretty much browsing a page, after all), though in common with all Metro applications, the new variant launches full screen and has controls in a different place to the desktop IE10. It may feel a bit snappier and is certainly easier to use when interactive via touch.

For more info on what’s new in Metro IE10 and the reasons why, check out Steven Sinofsky’s recent blog post. ZDNet’s Mary Jo Foley replayed some of what the blog says, and added a bit of commentary too.

One of the more notable differences between the two browsers (apart from the user interface) is that the Metro version does not allow any plugins – so no Java, no ActiveX, no Flash, no Silverlight. There are very good reasons for this, centred around the way the technology which underpins all Metro apps (known as WinRT) manages applications’ performance so as to prevent them stomping all over each other and the system, to stop them doing things that would adversely affect the power consumption of the machine (see more here, and here) and to generally be good, cohabiting citizens. None of that is possible whilst the browser could run arbitrary code like Flash or through pretty much any other plugin.

So what this means to the end user is, it’s possible that you’ll open up a site and it won’t operate as expected –

clip_image003

clip_image004[no more buttery biscuit base for Metro IE]

… and no amount of attempting to install the Flash/Silverlight/etc player will work.

Never fear. Avid ToW reader and serial contributor David Overton has suggested a quick solution. If you find yourself in Metro IE and unable to properly view a page, just open the Navigation bar at the bottom of the screen, click (or tap) on the spanner icon for Page Tools, then select View on the desktop to switch to the desktop version of IE, with the same URL being shown.

Now you can view your addin-happy sites using the traditional IE.

clip_image006Power users apply here

clip_image007Another tip courtesy of David concerns the bottom left of the screen. If you move your mouse directly to the lower left corner, you’d see a preview of the Start menu (clicking on or tapping on which jumps to the Start screen, a trick available from any application), but David also points out that if you right-click, you’ll see a power-user menu with shortcuts to a bunch of applications that are pretty well hidden within the new Metro UI.

An even more power-usery way of getting to the same menu would be to press WindowsKey+X at any time. You can even start a Command Prompt with Admin privileges, in fewer clicks or keystrokes than in Windows 7.

Tip o’ the Week #115 – Windows 8 keyboard tips

The next couple of posts on this blog are out of sequence, since they concern Windows 8. I’m bringing them forward by about a month… so ToWs #115 and #116 will come soon, then we’ll revert back to ToW #111 thereafter…

Windows 8 Consumer Preview has been out for a little while so it’s worth taking a look at some tips on getting the best out of the Consumer Preview.

Despite all the focus that is (rightly) being given to the touch experience of Windows 8, it’s still very important to offer a good keyboard/mouse experience too, since most existing PC users don’t (yet) have a touch screen.

When the mouse first came on the scene, some existing PC users complained that they’d never use the new UI mechanism since the keyboard was so much more efficient. The way the PC has evolved, it’s a blend of keyboard, mouse, touch, voice… some people prefer one over the others, and many of us will use a combination that’s appropriate at the time and on the device. In short: if you don’t see the point of touch initially, you’ll look back in a few years’ time and wonder what all the fuss was about.

Shut down and sleepclip_image002

One design aspect that’s had online forums grumbling about, is the way you shut down Windows 8. Some users even complained that they even had to use Google (hmmm) to find out how to sleep or shut down their new Windows 8 install.

The answer is, there are several ways. One, is to try Bing rather than Google – http://letmebingthatforyou.com/?q=how%20to%20shut%20down%20windows%208 – whilst another would be to activate the Charms (swipe from the right it you have a touch screen, or push your mouse to the bottom right then up to hover over the charms that appear), then select Settings, then Power, then Sleep / Shut down / Restart. All very well, but a few more keystrokes or mouse clicks than under Windows 7…

A quick alternative is to press CRL-ALT-DEL to display the Lock / switch user / change password etc dialog, then press ALT-S to activate the Shutdown option in corner, and then press the underline letter for Sleep, Shut down or Restart – so to sleep a PC quickly, just press CTRL-ALT-DEL, ALT –S, S.

The Windows Key revisited

There are some new shortcut keys to help navigate Windows 8 CP. Try these out… (Wnd is the WindowsKey, ie key with the old Windows logo, normally to the left of the spacebar). When you press Wnd on its own, you’ll see that it displays the new Start screen – aka the Metro UI.

Wnd+PgUp & Wnd+PgDn – moves the Metro UI from one monitor to another, if you have multiples.
Eg. If you have a laptop plugged into an external monitor or projector and set up Extended display (Wnd+P), then you can quickly make it appear on that screen. Now you can have the Start menu show up either on the screen in front of your, or (if you have one), on the touch screen of your laptop to the side.

Wnd+”.” & Wnd+SHIFT+”.” – if you have a high resolution screen, you can snap the current application or move the existing snapped application to the left or right.

Wnd+c – opens the Charms bar on the right of the screen

Wnd+I – opens the Settings page for the current app

Wnd+k – opens the “Devices” charm, used to print from a Metro app that supports it (thanks to David Overton for that one)

Wnd+q, Wnd-w, Wnd-f – goes straight to Search for Apps, Settings and Files respectively.

Tip o’ the Week #110 – Tracking Outlook responses

clip_image001Most of us regular Outlook users are well-versed in the Request/Response model of doing things other than email. Take an appointment in your own calendar: add an invited attendee or two, and you’ve created a meeting. What’s different? The meeting invitations were sent out and the list of attendees is listed and tracked.

If you’re invited to someone else’s meeting, you’ll see options on how to respond, and clip_image002 you’ll be able to look at the scheduling view to see who else is on the list, but you won’t be able to see how they’re responded to the invite (well not entirely). You may be able to see the details in the scheduling view (depending on whether the invited attendees have given you the permission to see their calendars).

clip_image003But if you organised the meeting, you’ll see further options, including the ability to check the tracking status – so you can see who has accepted, declined or just not responded to your meeting request.

If you didn’t organise the meeting, you may be able to open the calendar of the organiser and still be able to see who responded and how. Useful when you’re sitting in a meeting that someone organised, and you want to see who’s still planning to attend.

Unfortunately, when you look at the View Tracking Status tab, you’ll see the responses shown as a table, but unfortunately it’s not possible to sort or filter that list – so quickly picking out everyone who hasn’t responded from a long list of invited people isn’t so easy.

clip_image004Redmond resident Texan Steve Winfield pointed out a simple solution, however – click on Copy Status to Clipboard, and the entire list gets copied to the clipboard – fire up Excel and hit paste, and you’ll be able to quickly sort and filter so you can chase up the non-responders or the folk who declined.

When you’re checking the tracking status of a meeting request, you will go to your calendar, but it’s not the only kind of clip_image006tracking you might need to do.

If you send an email with a read or delivery receipt requested, or are looking for a voting buttons response, you’ll see your original email sitting in Sent Items but with a different icon on the clip_image008message . open the message and you’ll be able to see some tracking capabilities, which differ a little depending on whether you’re looking at delivery or read receipts, or responses to the voting request. Either way, this time, you can only see a static list, with no clipboard shortcut. If you’d like to copy the responses:

· Click on the top one, 

· Press SHIFT-END to select the whole lot

· Press CTRL-C to copy to clipboard

Now, it’s a snap to go into Excel, paste the responses and you’re free to sort & filter as before.

Tip o’ the Week #109 – SkyDrive on the move

clip_image001Everyone should know about SkyDrive – the free Microsoft service that gives users with a Live ID (including MSN, Hotmail etc) a 25Gb storage space online, accessible ostensibly from anywhere?

Well, it’s just been made more convenient to access SkyDrive files from mobile devices, thanks to SkyDrive Mobile. In the case of Windows Phone and iPhone (and iPod Touch, and iPad too), there are apps specifically built to make the interface to SkyDrive more smooth – otherwise, it’s still possible to get there via a browser from other devices, albeit maybe a little more clunky.

We’re increasingly stepping up efforts to support non-Microsoft devices in accessing our services – as well as SkyDrive and Tag, there is a growing number of Microsoft apps for iOS and Android.
An example is the newly-released MSN App for the iPad – link via iTunes here.

One of the more useful tricks with SkyDrive is to use OneNote for home-based note taking (making sure you don’t fall foul of MS security policy and use it for work related, potentially confidential stuff) – with a OneNote stored in SkyDrive, it’s accessible from your phone, from multiple clip_image002PCs using OneNote just as  normal, and from any browser you care to point in the right direction. It’s a huge boon for taking notes like holiday booking reference numbers, insurance claim notes, shopping lists etc. We’ve covered this a while before in ToW #52 here, and there’s also an article in the online help.

We’ve also looked in the past at an unsanctioned but still potentially useful 3rd party PC app called SDExplorer, which lets you access SkyDrive folders directly from within Windows Explorer, and therefore within any application. There’s a free version that’s limited in some functions, and a trialware pay-$20-for variant that’s a bit more capable. Have a look but do remember that it’s subject to break any time the SkyDrive team make major changes – the SDExplorer authors seem to have done a reasonable job keeping up, but as they say, YMMV.