
 Windows Explorer has a search function which can filter found files, based on some attribute or other – so you return files that are only of a particular type or age, or maybe of a specific size. The problem is, the understanding of what is a big file has changed over the years.
In the days of the floppy disk, any file larger than 1Mb was a bit unwieldy. When server hard disks cost £1,000 per Gb, then file servers would impose quotas of maybe a few 10s of Mbs per user.
But now, with storage so cheap (e.g. a 4Tb hard drive is a little over £100, Azure storage is a few pennies per Gb/month, and OneDrive seemingly can’t wait to give it away) it’s easy to become blasé about very large files.
One particular culprit in the generation of unnecessarily mahoosive files is PowerPoint. With the ease of inserting graphics and video, especially, it’s not hard to get files well into double figures of megabytes, which can be problematic to email and take ages to open. There are a few tips that can help you keep the size a little more trim.
 Delete stuff you don’t need
Well, duh. Obviously, deleting stuff can make a big difference to the file size: before distributing a deck, maybe dump the hidden slides and the many appendix slides unless you feel they might be a useful reference…
It’s sometimes not as easy as ditching slides you don’t need, however – the template you’re using might have a lot of imagery that’s unnecessary in it, so it may be worth cleaning up a little.
Go into the View tab, look under Slide Master and you’ll be able to see the slide templates that define the look and the layout of new slides. It’s not uncommon to find hundreds of these, though in most cases they’re not a cause for concern – unless they have lots of images embedded.
This is particularly the case when an elaborate slide deck is produced for a conference, and people start using that template as the basis for their own presentations, because it’s got a really nice background or whatever – not realizing that the template might have 10Mb of grinning stooges holding long-obsolete mobile devices and conference logos from years gone by. If you don’t use the graphics slides, feel free to delete them from the master, then Close Master View to go back the regular deck. (Might be an idea to save a copy of the deck first, just in case you muck it up…)
Look within
The PPTX file format that has been used by PowerPoint since 2007 is part of the Open XML file formats – the idea being that instead of a proprietary binary file, the artefacts and contents within the file are described using XML according to a published format, so other applications could re-use the files. In order to achieve this and not end up with huge file bloat (XML not being well known for its brevity), the whole shebang is compressed.
What you may not know is that all of the Open XML formats use the same compression as ZIP files, and if you rename the .PPTX extension to .ZIP, you’ll be able to see inside it.
 Navigate to your file location, and make sure can see the file extensions – go to the View tab in Explorer and tick the File name extensions box if you can’t see them. Make a copy of the PPTX file you want to work on, select it and right-click to Rename (or just press F2). Now overtype the .pptx bit at the end with .zip, and agree to the dire warning that the Earth might stop turning if you continue.
Now open the ZIP file up and look in a couple of places to see what is likely to be making it huge – ppt\media and ppt\embeddings are a couple of notable sources (the  former when you’ve maybe got a video or just lots of high-res pictures embedded, and the latter is a common source of embedded XLS files which might be unnecessary… ie. Maybe you could get away with a simple copy of relevant data, rather than the whole file?). Maybe the best way to slim down the file is to open the un-renamed one in PowerPoint, then navigate to the place where the huge content was and resize, compress or replace it.
Compress pictures
A very simple way of cutting the size of large files without digging around in their innards might  be just to compress pictures – you can get to that from the Format tab when you have a picture selected, and
  individually reduce the size and resolution of each image.
Alternatively, when it’s time to save your work, use Save As and under the Tools drop down in the lower right of the dialog, you can invoke the same function, but which applies  to every image in the deck.
Choose the appropriate resolution – Screen is probably a good one for PPT, though the same picture compression functionality is also available in Word and Outlook, so if you’re pasting images into an email then resizing them, it’s an idea to compress them and you can get away with an even lower resolution there.
 The release of Windows 10 has started to pick up speed as it nears its planned July 29th RTM. If your home PC isn’t running Windows 10 yet (ie. you haven’t opted in as a Windows Insider), then you can reserve your free upgrade today and you’ll get it via Windows Update when it releases in a few weeks’ time. Windows Insiders will get theirs first, and reserved upgrades will roll in waves thereafter.
 but still cool updates. One such is the new calculator app, a “modern app” which has been enhanced compared to the old-fashioned
  “
“


 The calculator doesn’t do currency conversion, but Bing.com
  does a decent job of that – just type the currency symbols or standard identifier into Bing and you’ll get an approximation. Add the quantity too if you like.
 For some time now, the
  the current time and a date picker that’s been redesigned to be
  touch-friendly. Clicking on Additional clocks also launches the new Alarms & Clocks application which integrates a couple of useful stopwatch & timer functions as well as a day/night view of the world map, and a configurable list of locations that you may want to keep an eye on, so you know the time at a glance.


 in the Lync meeting UI. In Skype for Business, during an IM chat or call, you’ll see there’s no equivalent participant button – there’
 s the usual button to show the IM window, which shows the text chat section but not the participants button.
 This has been moved to higher up in the UI – it varies depending on which kind of chat/meeting/conference you’re in. Click on the icon to the left of
  the text (hover and you’ll see the Open Participant List tooptip) and you’ll be able to view that list.

 y View shows you a horizontally-arranged list of attendees’ mugshots, which can be right-clicked to interact with them. Speaker View hides
  all of that, but still shows a picture of you next to the person who’s currently speaking, and Content View hides both in favour of the presentation content that’s being shown (the “Stage”).
 ability to have multiple desktops.
  To access, just click on the the Task View icon on your taskbar – assuming you are showing that icon (if not, right-click on the task bar and enable it). Another means to access it is to press WindowsKey+TAB (remember that
 of the virtual desktops that appear at the bottom of the task view screen – just drag & drop the windows of your running apps.
 Do you suffer from
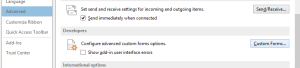 OK, now back in Outlook, go to File | Options | Advanced then scroll down to find the Developers section, and click on Custom Forms…
 Now, click on the Manage Forms button, and you’ll see a dialog to do just that… click on the button Install, then a dialog box will pop up to look for the form you want to install – paste the location to the .CFG file you Copied as Path above… You should see the Sender Address Type form appear in the list, after which you may Close | OK | OK to get back to main Outlook window.
 the dialog which pops up – this can set rules on how emails are highlighted, or not, and is what’s used by default to make unread emails bold, or urgent emails red.
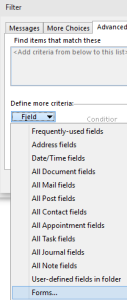 Advanced tab…
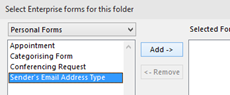 click on Add-> and then Close. This will then allow you to use that form to choose attributes for formatting. If you later chose to create Search Folders, Inbox rules or other filtering within Outlook, the same process would apply.
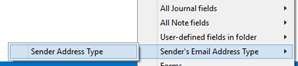 This is the one custom field that was added through the whole form shenanigans above – if the sender was internal, it’s probably either blank or EX, if external it’ll be SMTP.
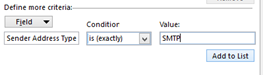 Now, set the criteria – if the Sender Address Type is SMTP, then we want to treat it differently – click Add to List then OK.


 Symbol Swipe
 Try downloading the update to turn Lync into Skype, from
 What to do? Well, if you can get to a network connection somehow (even a friend’s phone), then you should be able to locate your handset. This is a capability that’s been in Windows Phone for a while, but the web UI is being jazzed up a bit. It’s possible to:
 You do need to make sure it’s enabled to start with – best check now, as you won’t want to discover that your phone isn’t reporting its location, the one time when you need to find it. Just go to the settings and look under find my phone.
 The updated UI for the Find My Phone function only seems to appear on the latest IE/Windows 10 build, but it provides a little more info – like when your phone was confirmed to have been found/locked/wiped etc.
 If you know you’re phone’s never coming back, you can wipe it – so your data doesn’t end up in a baddie’s hands, but your phone is reset to factory defaults so will still be a functional device that could be used again.